Well, my fine, feathered, Fraterculae friends, before you skip straight away to the comments which no-one ever reads, a little disclaimer.
Despite the title, this piece is most definitely not connected to the brash, uncrowned king of practical jokers, the cheeky chappie from Hackney, in any way, shape or form.
© APB Photography™, licensed under CC BY-SA 2.0
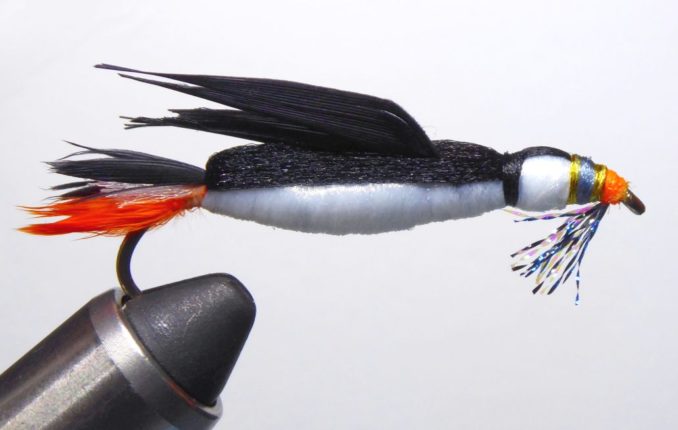
At the end of my last article (the ‘Evolution of a Puffin’) I now had a Puffin fly that I would be I’d happy to frame for my Postaller friend. I said I would get it done as soon as possible but, although I was all too aware that the framing would be a tale for another day, it took a little longer than expected.
To date, I have only tried my hand at framing a couple of small trout flies and one fairly large salmon fly. Because of these flies’ slender, streamlined shape, they didn’t pose any particular challenge. However, framing the ‘Puffin Billy’ fly, was going to be another matter entirely.
Our Billy is a stout little seabird with a distinctly plump, rounded white belly. Quite a chunky lad, so the space between the backing board and the glass of a ‘normal’ frame simply doesn’t leave a deep enough gap to securely fix him into place without squashing his tummy or his wings. I’m pretty sure Billy would object to that!
© SharpieType301 2021
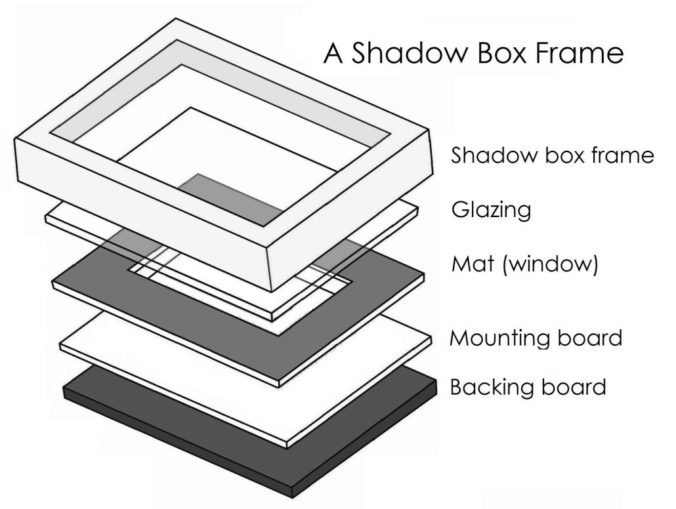
Not a huge setback. I’d simply use a deep, 3D, shadow box frame. I had actually picked one up in a charity shop for another project, just before Christmas, but the mat and mounting board was a bit of a mess. No sweat, I’d buy a new one.
Ah, but those pesky Covid demons were against me. I’d completely forgotten about the impending lockdown.
By the time I’d figured this out, a visit to the nice little shop where I’d planned to pick up a selection of box frames was strictly verboten. Not too keen to give Amazon yet more commission, Mr Sharpie was dispatched to browse the likes of Wilko and the local supermarket—the only places still open where there was still a remote possibility we’d find such a thing. Much to my amazement, he duly returned with two, one with a dark grey-blue surround, the other, off-white.
© SharpieType301 2021
The darker-framed one was perfect as the texture of the surround was reminiscent of rugged rocks and I’d already chosen a slightly roughened sea-green card as a mounting board. What I wanted next was to figure out a way to almost float ‘Puffin Billy’ in mid-air, rather than him being pressed tight against the mounting board.
Following a quick web-search, I discovered that there were quite a few methods that other people had used to mount a 3D object (such as a fishing fly).
Method one was simply plain old glue, and this suggestion was immediately discounted. I could have glued the back of the fly directly onto the mounting board, but I knew as soon as I saw it that this really wasn’t an option. Only a damn great blob of glue would raise Billy a suitable distance off the mounting board. Additionally, it’s a one-shot method. You need to be 100% certain that the fly is in precisely the position you want it to be in. I’m afraid that my conservator soul also screamed in horror at the irreversible nature of this technique. If you needed to remove it (say for example the blob of glue looked ugly—quite likely, I should think) the fly would be damaged or have bits of backing material stuck to it. No way was I going to fix poor Puffin Billy to the mounting board with a blob of epoxy resin or hot-melt glue!
Method two was quickly discarded too. This was a great idea but… It involves securing a thin Perspex dowel to the mounting board with, and I quote, ‘a suitable adhesive’. Then (or maybe beforehand, it wasn’t awfully clear) you’d drill a small hole near the tip of the dowel and push the point of the hook into it to secure the fly. A big advantage of this method is that neither the fly nor the hook is damaged, and it can be reversed, unlike any operation which applies adhesive to the actual hook.
Unfortunately, as much as I liked this idea, I could see there being a few obstacles here. Sourcing the stuff I needed (i.e. Perspex rod and a suitable glue) was one problem, especially in lockdown. The other, more serious concern was that without a lot of practice, the likelihood of it looking a lot like a dog’s dinner was pretty high.
The next idea I read about was to create a shelf, but this seemed completely impractical for Billy. To do this, I would need to attach a flat piece of wood at right-angles to the mounting board and the inner edge of the frame to form a shelf. Billy would simply then perch on this. Yeah, great… until you move the frame or, worse still, try to send it in the post. Not quite what I had in mind for a Puffin in flight!
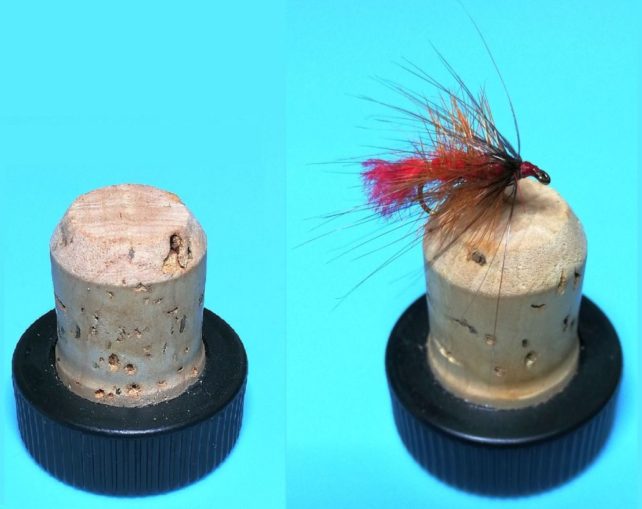
OK, onto the next method, and this one sounded considerably easier to achieve. That was to glue a small section of cork onto the mounting board and simply push the point of the hook into that to secure the fly. Again, a reversible method, so worth considering. As it happened, we’d just emptied a bottle of Auchentoshan Three Wood Single Malt, which had a nice convenient cork stopper, so I had a little play, albeit with a different fly.
© SharpieType301 2021
Happily uncomplicated, this seemed quite good as the fly looked pretty secure in its cork base. But, while it wouldn’t be hard to glue the cork into place in the frame, it really wouldn’t give the impression of a Puffin in flight, which is what I had hoped for. It was alright, but I felt the finished product would look a bit cobbled together and amateurish.
Then there was the pegboard method. A pegboard (a sturdy board with holes in it) would have the framed object anchored to it with twist ties, pulled through the holes. OK for larger objects perhaps, but completely wrong for Puffin Billy. Furthermore, where the hell was I going to get pegboard from during our enforced incarceration?
Right, on to the next idea. This sounded by far the best, or at least the most practical plan but getting it right might not be quite so straightforward. This lifts the fly away from the mounting board with a couple of clear glass or plastic beads, securing the hook with a loop of tippet (monofilament line), passed around the hook then through the beads and through holes in the mounting board.
Hmmm, this turned out to be not quite as clear-cut as I first thought. The beads I already had, and in different sizes too, but using ones of a large enough circumference to lift Puffin Billy the correct distance away from the mounting board meant that the bead was all too visible. Frankly, they looked dreadful, especially as the larger sized beads have an odd coating, which means that they pick up the colours of objects around them, as can be seen in the photo below.
© SharpieType301 2021
By now, I was becoming a little disheartened. I was on a promise to get Puffin Billy framed, packed up and winging his way to his new home, but nothing seemed to be quite right. A little disconsolate, I started digging around in the box of odd bits and bobs of craft materials that I’ve been collecting for years.
I found some stiff wire but this, being a silvery colour, didn’t look right against the colour of the hook. I unearthed a length of thin, clear silicone tubing, which I thought might do the trick if cut into short sections. Unfortunately, the silicone was relatively soft, so when I practiced using it, it buckled slightly when I drew the tippet loop tight. I was also a bit concerned that, being flexible, it wouldn’t be quite strong enough to support poor Billy securely.
Then, languishing at the bottom of my box of craft store oddments, underneath a heap of what Mr S refers to as ‘crap’ saved for ‘just in case’, I found a bag of multi-coloured ‘bugle beads’. Woohoo! Basically, these are short cut lengths of glass cane. Although all the colours of the rainbow and a few more besides, some of the bugles were clear, and there were a few which looked to be about the length I needed.
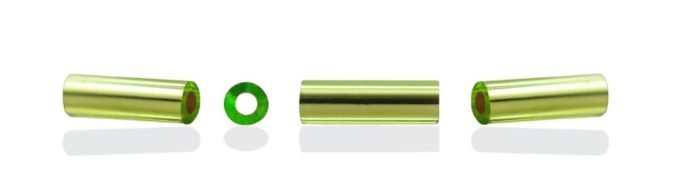
© PRECIOSA ORNELA, licensed under CC BY 2.0
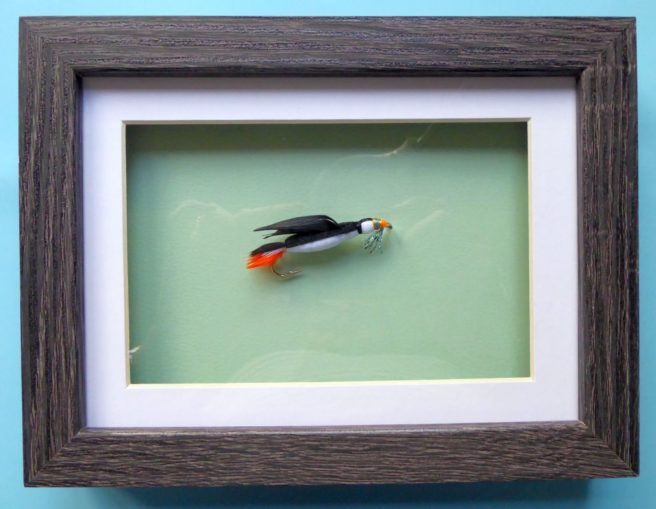
OK, now we’re in business, so let’s get at it! Puffin Billy is carefully positioned on the sea-green card mounting board exactly where I want him to be, then the location of the hook’s eye and the top of the bend (just under Billy’s bright orange feet) are marked with a tiny pencil dot. To add to the illusion of a Puffin in flight, I angled him slightly upwards, as though he was flying up from the sea after a successful fishing expedition.
Billy was then lifted away and set aside to rest after this ordeal. I used a fine awl to make a small hole through the card where each of the pencil dots were. Starting at the head, a loop of tippet is passed through the eye of the hook, then through the first bugle bead, and threaded through the hole in the mounting board. The line is pulled fairly tight through the bead, to create a post to support the fly, and is secured to the back of the mounting board temporarily with a bit of sellotape.
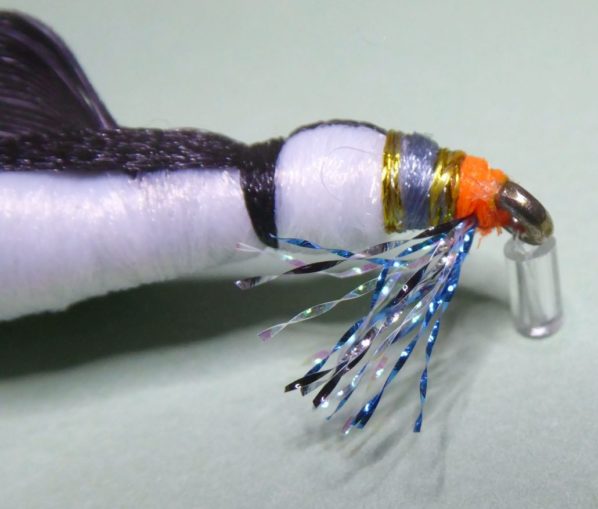
© SharpieType301 2021
Then I threaded a loop of tippet through the second bugle bead and the hole in the mounting board where Billy’s tail will sit (at the top of the bend of the hook). The loop is left quite long at this stage, so that it can be adjusted into exactly the right position under the tail before it is pulled tight. Again, it is secured to the back of the mounting board temporarily with sellotape.
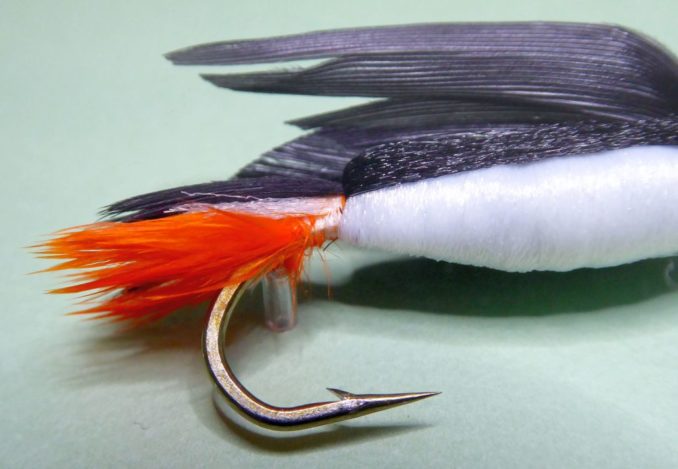
© SharpieType301 2021
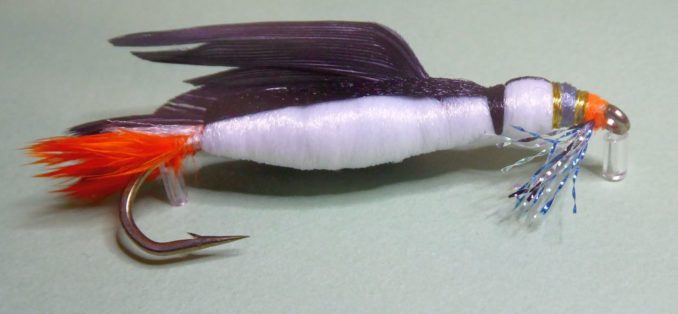
This temporary fixing gives a little leeway to make tiny adjustments to Billy’s position until he looks exactly right. Now comes the tricky bit—carefully turning everything over and tightly securing the tippet strands to the back of the board. This can be with strong tape (my choice) or with a drop of superglue. The long ends of tippet are trimmed away, and a final check made before the frame can be put together.
© SharpieType301 2021
The glass didn’t look particularly clean to me, but a good wash in hot soapy water and careful drying and polishing took care of that. The glass went into the frame first, followed by the white card window mat. Then the box frame’s spacer went in next, giving a nice gap between the front and back of the frame.
Time to pop Billy into his new abode, a last check to see that he’s still looking good and, finally, put the backing board in place. Yay! Looking good. A little label to give him some provenance, and we’re about done.
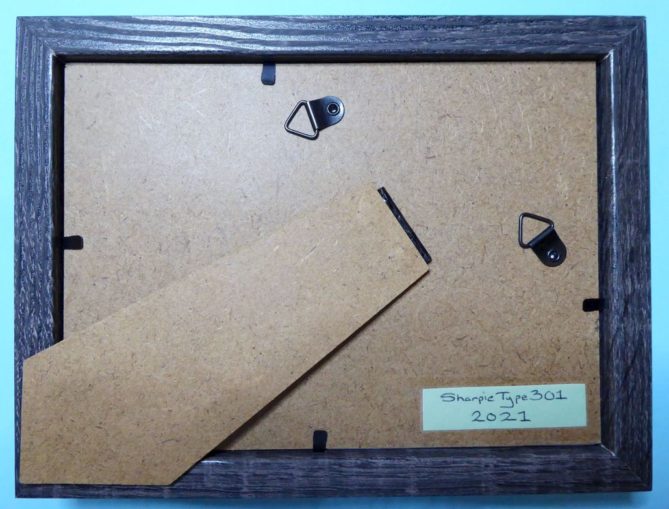
© SharpieType301 2021
As you can see from the back, this is a frame that can be wall hung, or stood on a flat surface. The backing board is easy to remove, so if Billy’s new owner ever wanted to reframe him it should be a reasonably easy task.
It isn’t perfect. If I’d been able to, I would have used a much better-quality frame. The final photograph could have been better but, try as I might, I couldn’t get rid of the reflections.
© SharpieType301 2021
However, as Otto Preminger, the great Austrian-American film director, once said: “What counts isn’t the frame, it’s what you put in it”.
© SharpieType301 2021
The Goodnight Vienna Audio file