I recently reread two of Bertram Gilfoyles articles – the first teaching us about Japanese knives and the second helping us understand how to keep them sharp. His knowledge is far deeper than mine especially as he covers some of the key differences between low maintenance blade materials, which as it happens often tend to hold a poor edge and other materials that are essentially the reverse. I found myself envious of the beautiful Damascus blades BG had in his collection which are a bit of a best-of-both-worlds in terms of materials and they always look rather gorgeous as well.
The Japanese are deservedly famous for their knife manufacturing skill.
My interest in knives had a very different starting point, when around 40 years ago I decided to do a little fell walking and scrambling in the Lake District and which I continued to do for pretty much 20 years. During that period I also had opportunities to hike in the US on a section of the Appalachian Trail in the Shenandoah national park. At that time, the question was, what to bring?
A good tool is a highly subjective phrase and largely a matter of what works and what feels comfortable. I have an old engineers hammer in my tool collection, battered, ugly, quite small and a bit rough but I wouldn’t trade it for anything new because it does the job perfectly whenever I need to accurately remove a stubborn bolt. Why fix what isn’t broken?
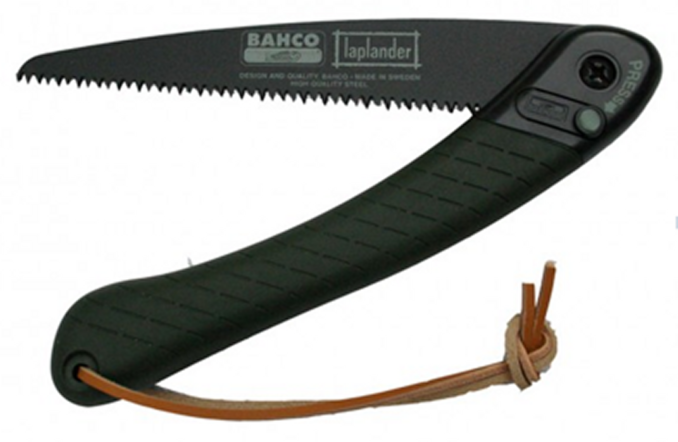
There are a small number of important tools that make life possible when working in the wilderness. Some of these suit particular locations. For example in deep bush or jungle a machete or Parang is the tool of choice, whereas a small forest axe is extremely useful in forested areas typical in the UK. I have a Hultafors Trekking axe weighing 800gms with a 17.5” helve which is ideal. Another useful and more general tool is a fold up rough blade saw given it can be used to cut green and dead wood up a couple of inches in diameter. The excellent Bahco Laplander tool with a 9” blade is perfect for this kind of tool – it may be light but it can cut through thick branches and is ideal for camp building tasks.
The most important tool to carry is a knife, which generally fills two roles – firstly wood cutting for fire, cooking & shelter and secondly food preparation (skinning, gutting, filleting & eating). A knife will often be used to carve and finely shape wood for example when creating a tripod to hang a cooking pot or when creating other tools. The choice of knife to use and how to deal with its maintenance is a little involved. We might usefully begin by pointing out why certain knives can be rather poor choices.
Like a lot of people venturing out into the wilderness for the first time the knife I choose was big.
My first wilderness knife
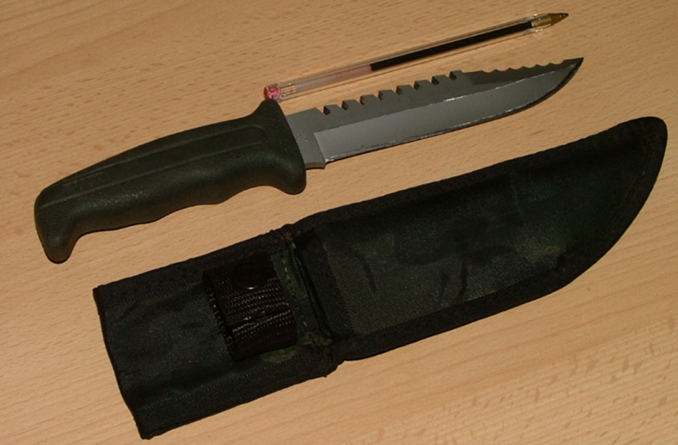
Manufactured by Buck in the USA it had a notched back, serrated upper tip, 6” blade and came highly recommended by the sports shop salesman who told me that it would be the “ideal wilderness general purpose knife” (I think I may even be quoting him verbatim). At the time I wouldn’t have known but the blade was a short concave sabre grind (double bevel) edge. In my ignorance, it did look the part and I thought it would work due to its look, feel and weight but as I found out when preparing wood for my first camp fire, it was perhaps the most useless knife I could have bought.
A heavy knife, it was too long and large with too narrow a point for fine/delicate work such as sculpting a branch to hold a rope. It was also too blunt & clumsy for feathering or whittling wood for kindling. Being blade heavy it had poor balance and possessed a curious ability to immediately lose a sharp edge assuming you could actually sharpen it at all. It had an uncomfortable handle, which you couldn’t easily rotate in the palm of your hand and which became slippery when wet. The spine couldn’t be used to strike a firestick due to the idiotic back notches (which I never once managed to find a use for). The serrations on the front upper tip were equally (and confusingly) pointless because they prevented using the blade spine as a push rest. Serrations of this type are as a rule generally pointless anyway because a well sharpened knife will have a razors edge – something serrations will never improve. Even battoning (see video below) became a headache when the serrations managed to tear the daylights out of the striker bar.
The deficiencies in this knife wern’t my only rude awakening. I also realised there were significant weaknesses in the choice of what I thought I needed to carry (as distinct from what I actually needed to carry) along with my clothing and boots.
If there is one truth I’ve grasped in life, it is that failure is a hugely underrated educational experience. I’ve always learned the most when I’ve failed the most.
After that experience finding what didn’t work I began exploring Bushcraft and it didn’t take long to encounter a very young Ray Mears – who at that time was in the process of defining what would become known as the ideal general purpose Bushcraft knife.
Characterised with an overall length of about 8 to 9 inches and a blade length of half that – this was a drop-point fixed blade knife holding a mid balance point with an arc to its spine that was gentle to the point of being almost straight. Mears felt it should be made of carbon steel with a flat back spine around 4-5mm thick from the base to the tip, providing strength whilst also permitting the spine to be used as a strike for a firestick and strong enough to cope with battoning. The edge would have a Scandi grind (explained in later notes) allowing it to maintain a good edge while being relatively easy for a knife novice to sharpening in the field with a DC4 stone. Finally the knife would have a wooden handle (personal favourites being rosewood, oak or walnut) and include a leather sheath suited to fixing on a belt (left or right handed depending on preference), round the shoulder or underarm – but all the time properly securing the knife even if the owner ended up going for an unintended swim (yep, done that).
Ray Mears in collaboration with Alan Wood was probably the first to name this style of knife as a “Woodlore knife” with an overall length of about 8 to 9 inches. It is a particularly fine choice of tool for general wilderness work and highly sought after. Mears had originally commissioned Wilkinson Sword to create a knife called the “Wilkinson Sword Survival Knife” to this general specification but it ended up being a design-by-committee product and was consequently awful. While Mears was responsible for the shape and grind of the knife, the factory took it into their heads to add top and bottom blade serrations along with the secret compartment (yes, really) in the handle and the odd shaped guard at the base of the blade – all added solely to appeal to unsavoury types who probably din’do much in the way of bushcraft.
The knife suffered a catalogue of problems and there were rumours that it cost more to make than the sale price but after the closure of the Wilkinson Sword factory the stock was purchased by Sterling Supplies and is now sold under the name Dartmoor knife (CSK185). A brand new boxed version can be yours for just £495.00. By any measure the Wilkinson Sword realisation of an ideal bushcraft knife was a huge disappointment even though I’ve seen multiple reviews that swear by it. Ah well, each to their own.
A year later Mears commissioned the artisan UK knife maker Alan Wood to hand make knives to his specification, using ferrous carbon steel instead of stainless steel. Mears always felt stainless steel was a bit soulless and his experience that carbon steel could hold an edge swayed his choice. The problem is that carbon steel rusts when damp and so needs a good deal of care to maintain. You don’t store this type of blade for any time in a sheath because it will rust. But, when using it in the field with a Scandi grind the geometry means that it will hold an edge and is dead easy for a novice to sharpen even under less than ideal conditions. Stainless is much more difficult in this regard because it is harder and if the edge happens to be double bevel it just becomes ridiculously challenging to sharpen… while sitting on a rock, in drizzle, around a camp fire, in low light – you get the idea.
When I looked way back in 2015 there was a 10 year (plus) waiting list for one of Alan’s beautiful “Woodlore” knives and they retailed for just under £500.00 – which I thought at the time might reflect their popularity but perhaps not their actual worth, irrespective of being handmade by one of the finest knife makers in the UK. I might be wrong and it’s a shame to say this, but knowing the way product popularity works, I suspect that very few of Alan’s Woodlore knives actually left the confines of their gift boxes let alone made it to the wild. I suspect he’d have disliked that. Saddly when I looked recently, his web site has disappeared. The best I could find was a second hand but mint condition Canadian sale of one of his woodlore knives for a whopping 1497.00 UKP.
Alan Wood originally posted on his web site “Ray’s concept for a Bushcraft knife has proved itself beyond question. There really isn’t anything new about the features of this simple tool but the combination is generally accepted as being unique. It won’t suit everyone as regards size and materials (I still prefer stainless steel) but you can’t go far wrong in choosing one to meet actual Bushcraft needs. If you are venturing into wilderness areas for other primary reasons such as hunting or fishing it is not a great chore to also carry more specifically designed cutting tools”.
Given the ten year waiting list back then, Mears commissioned the master English knife maker Stephen Wade Cox to hand make similar specification knives this time to be marketed as the “Bushcraft knife” and which again (yep, Mears is certainly consistent) employed O1 high carbon tool steel with a Scandi grind and an oak wood handle. Although the size of the handle was very slightly slimmer than the earlier Woodlore version of the knife, the basic design remained the same – namely a hand made fixed blade drop point knife with a blade length of 4.3”. The overall length was 8.66” and the blade was 4mm thick. Weight was 178g and the hardness of the steel was 57-58 hRc. It used to be on the Mears web site at £375 with a one month waiting list and shipped with a dark stained sheath either right or left handed based on the customer’s order but alas Stephen Wade Cox died in 2016 and so the UK lost another gifted master of knife craft (RIP). These days Mears sells knives made by Emberleaf Workshops at £475.00 and the spec is basically the same, just employing different materials for the liners and scales (ie: the handles).
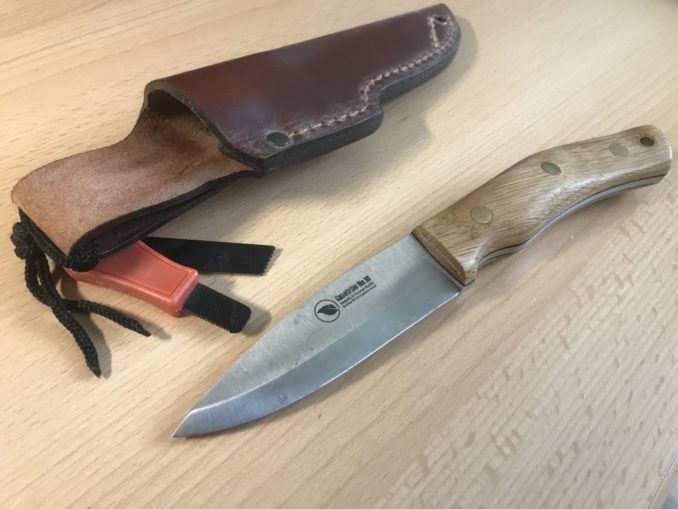
The “Woodlore” and “Bushcraft” names stuck for the basic knife design (ie: the shape, the use of carbon steel and a Scandi ground edge) and although arguably not quite as nice as their handmade counterparts, there are a number of manufacturers offering similar knives these days, which without all the notoriety cost less money and are still pretty good. The pic below shows my much loved Casstrum Number 10 Swedish Forest Knife (it has had a fairly hard life, hence the state of the blade). The steel is O2 high carbon tool steel (K720 spec) with a hardness rated at 58-60 hRc. It uses a Scandi grind, is an absolute doddle to sharpen and comes with oak scales and black liners. Interestingly the scandi angle is quite shallow on this knife so that a secondary bevel could be added, in effect converting it from Scandi to Sabre, should you desire. These knives retail for around 110 UKP (+Post). Personally, I’ve always found them a tiny little bit chunkier than I’d like, but that may be because I have girly hands (unlike my dads sausage fingers). It is nonetheless, the first knife I’d reach for to work.
There are even cheaper knives that are still exceptionally good at what they do – for example the little Mora Companion (made by Morakniv) has a carbon steel blade, cut with a scandi ground edge it is a reliable knife and feels solid in the hand but when pushed you’ll quickly grasp that the spine is relatively thin at just 2mm and so it won’t take any brute force. The handle is a cheap composite plastic – but even so it is really quite difficult to know how much better a cheap knife could get considering it retails for just 8.50 UKP. I use these little knives for gardening all the time.
Aftermarket camping knives are plentiful – but be careful when making your choice as generic Bushcraft knives, even if hand made, often use different grinds and that means that sharpening and maintenance have to be handled in different ways. ASK BEFORE YOU BUY!
Allowing for the fact that the precise angle of the edge can vary – there are more or less three types of grind (note that I’m not going to cover concave grinds but will mention them further down)
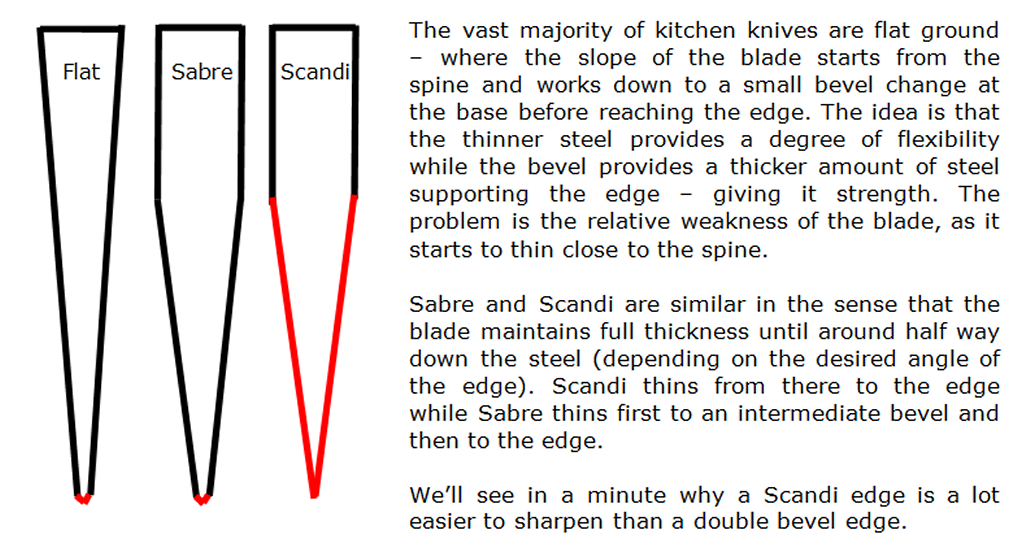
The “grind” of a knife describes how the metal of the blade is shaped to form its edge –from the back (spine) of the knife down to the fine cutting ridge of its edge. Given the almost unlimited number of different ways a blade could be shaped you’d be forgiven for thinking there might be an infinite number of different grinds – but in fact there are common elements to all grinds and when those are taken into account there are maybe eight or so basic designs.
Mears choose a scandi grind for his knife after a great deal of testing in the field with his own Bushcraft students and in particular seeing how they coped with keeping their knives sharp. The “Scandi” or Scandinavian grind is designed so that when the knife blade is looked at end-on, the taper of the metal generally starts about a half way down the blade and remains at that fixed angle until it reaches the fine cutting ridge of its edge. As we’ve seen, a Sabre grind has a secondary bevel at the bottom of the blade and so is known as a double bevel grind.
In the diagram below we take a closer look at a scandi and sabre ground knife edge.
Look at the sharp end of the edge of both knives to see how they differ.
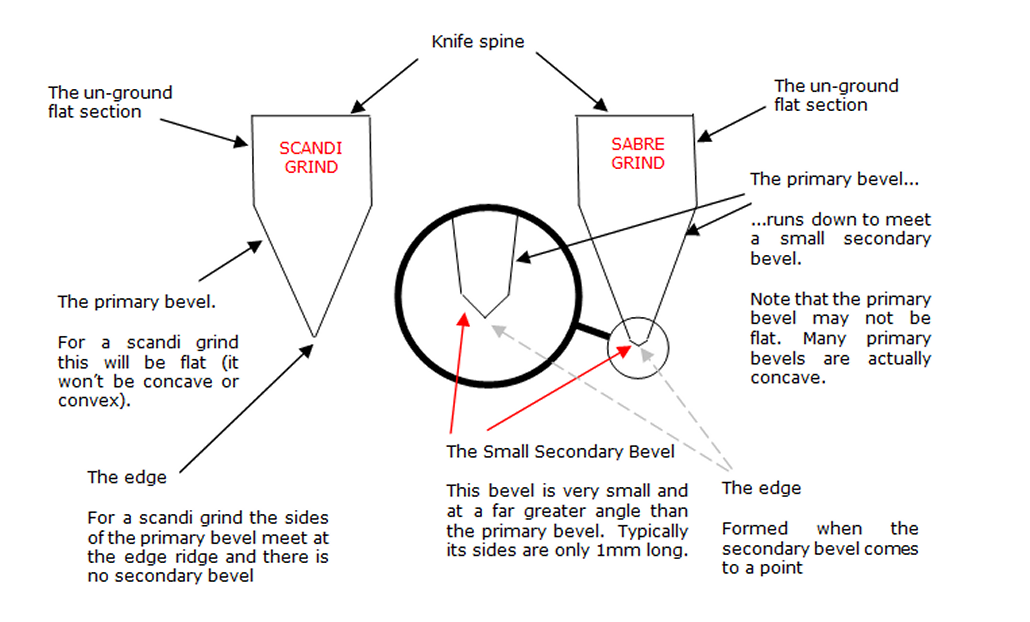
Each of these grinds has their own particular advantages and disadvantages when used.
A double bevel Sabre edge will generally be less prone to chipping and will hold its edge for longer because there is more metal immediately under the edge making it stronger. They are also generally easier to use when feathering wood or butchering meat because the angle of the secondary bevel helps prevent the blade digging deep into the material being cut. It is for that reason that the vast majority of kitchen and butchering knives employ double bevel edges.
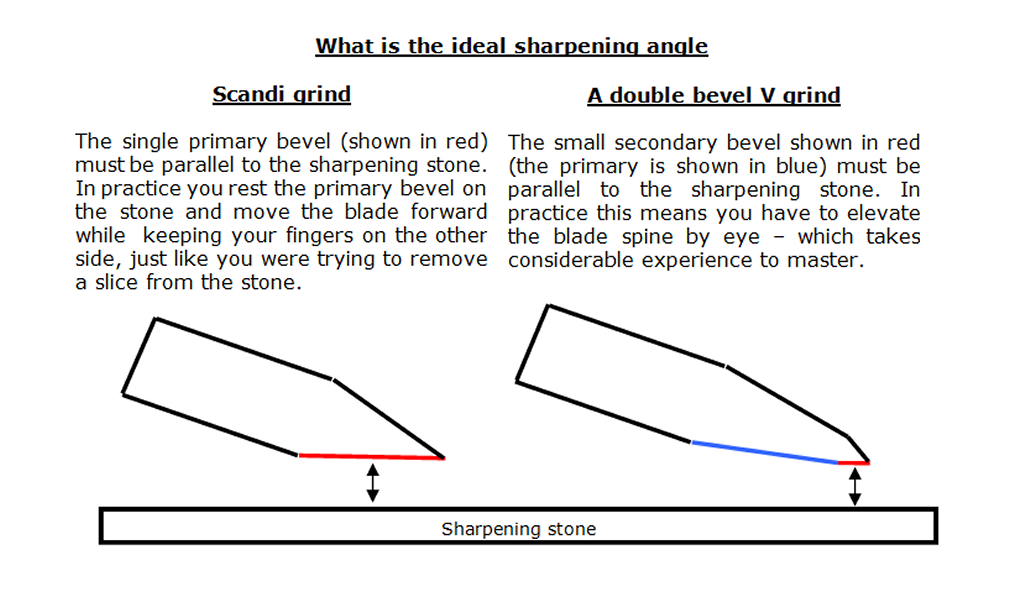
Scandi grinds, by contrast are very much easier to sharpen than a double bevel V grind especially for a novice. With a scandi grind, the knife is simply placed on the sharpening stone with its large flat primary bevel surface resting on the stone and the blade is then gently moved as through trying to take a slice off the stone. Because the primary bevel is so large (and flat) maintaining the ideal sharpening angle between the knife and the stone merely involves movement coupled with downward finger pressure on the uppermost sloped edge of the blade. This also comes with the advantage of removing any patina that may have appeared on the surface due to rust/corrosion. For those who like shiny blades it can be a significant plus point.
By contrast, the spine of a sabre or flat ground double bevel knife has to be elevated so that the very small secondary bevel and not the large primary bevel is parallel to the grinding stone before moving the blade to sharpen – and off course that takes an explanation to understand, a considerable amount of time to practice and a good deal of skill to master… so much so that most folks actually use a cradle to hold the knife to maintain just the right angle (See BG’s excellent sharpening article). While sitting on a rock, in drizzle, around a camp fire, in low light – it isn’t the easiest of tasks to do well.
Coupled with his preference for carbon steel over stainless, the added simplicity of sharpening a scandi ground knife was seen as highly advantageous by Mears in the light of working with his Bushcraft students.
Obviously personal preference and experience come into play when making your own decision. I’ve always found that the shape and size of the Mears knife is ideal but I personally prefer stainless steel and a double bevel V grind due to its strength and the more controlled feel when cutting. That said the ease of sharpening a scandi ground edge is not lost on me, especially when compared to the sheer amount of work required to get a decent edge out of a double bevel sabre grind. Both require skill – but the scandi grind requires far less skill and time. On balance I side with Mears and use a scandi ground carbon steel blade even if that does mean I am forced to pay attention to the way the knife behaves when carving or butchering, due to the lack of a secondary bevel and the need to always carry a kit to prevent the rust that will inevitably occur.
An interesting blade material is called AUS-8 which is a high Chromium Japanese stainless steel (its exact composition is 14% Chromium, 1% Silicon, 0.75% Carbon, 0.5% Manganese, 0.5% Nickel, 0.3% Molybdenum, 0.25% Vanadium, 0.04% Phosphorous, 0.03% Sulphur and the rest is steel). It is tough and withstands corrosion far better than carbon steel although as a mid range steel it still requires care (regular oiling) but is strong enough to provide good edge retention and resistance to cracking even when scandi ground (hardness is rated at 58 to 59 hRc). I’ve seen knives online made from AUS-8 – something I’m very tempted to try.
One final word concerning locking or folding knives for UK puffins.
Locking (Folding) Knives
Regardless of the legal nonsense restricting knives to law abiding citizens in the UK – it is a given that locking knives (sometimes called lock or folding knives) have no place whatsoever in Bushcraft. No matter how well a lock knife is made, the hinge of the blade will always have some degree of lateral movement when stressed and under load – a movement that will directly compromise your confidence and ability to use the tool properly. More worryingly, if the blade locking mechanism were to fail then the blade would fold back on your grip fingers, sharp end first, which could cause extremely serious injuries.
Lock knives can sometimes be useful for small tasks or where space is at a premium – but in the wilderness a fixed blade knife will always be the knife of choice.
I own a 4” German Boker lock knife using a convex V grind, quite capable of holding a good edge and where the locking mechanism was the strongest I could find at the time of purchase. The knife has never been abused but the blade definitely does flex at the hinge when pushed and so would never be used as a primary workhorse knife.
© text & images Verax Cincinnatus 2021
The Goodnight Vienna Audio file