
So.. we’ve discussed my obsession with Japanese knives (see: An introduction to Japanese knives) and there were lots of lovely comments, but one came through most – how to keep a knife sharp! This article will cover how I do this with my knives as well as the tools that are available to help you do this.
Firstly, a confession. I have bought a couple more knives.
The first purchase was a Masamoto KS 240mm gyuto. Masamoto are one of the top brands used by sushi chefs in Japan and the KS line is the one below their honyaki lines and is fully hand-made by their more experienced craftsmen. For those who don’t know what honyaki means, it means it is where it can get really, REALLY expensive.
Honyaki is a traditional method of construction where the blade is made out of a single piece of metal, unlike the sandwiched construction described previously. This method uses a clay coating when being quenched to give different parts of the blade different properties. This is, evidently, incredibly difficult to do and failure rates are very high. And produces a pattern on the blade where the harder metal fades into the slightly softer. Search for “Mt Fuji honyaki” for examples. You have to be a master blacksmith to produce these so they are expensive. You can search again for prices, but a single knife can go for £2000 because they are so difficult to manufacture.
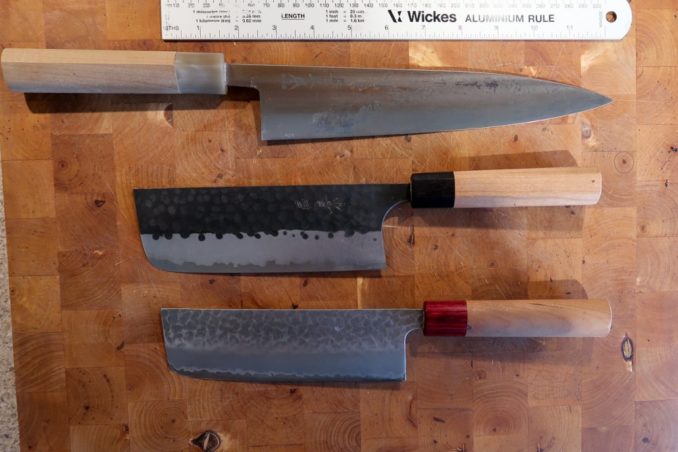
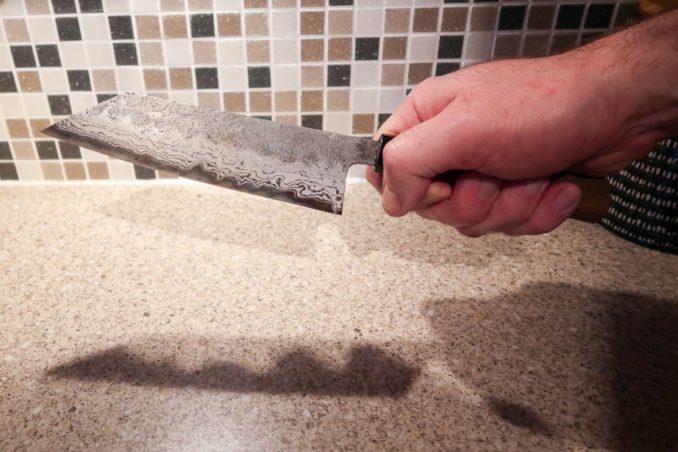
Anyway, back to my knives… The Masamoto KS did go out of production for a while but they are back and my favourite knife website had a couple in stock. Hesitated for a while and then one accidentally fell into my basket one night as I wanted to own it. It arrived, and is absolutely wonderful to use. It is a more traditional Sabatier-style blade than the traditional Japanese gyuto shape. Sabatier typically have the tip in the middle of the blade and are more symmetrical top-to-bottom, Japanese gyutos tend to have the tip slightly lower. German knives typically have a straight spine with a very curved belly to the knife. The KS is oversized for 240mm measuring more like 255mm, so I had an extra 15mm for free! It is also a fully reactive knife (no stainless there at all) so is already starting to show a patina (again see photo).
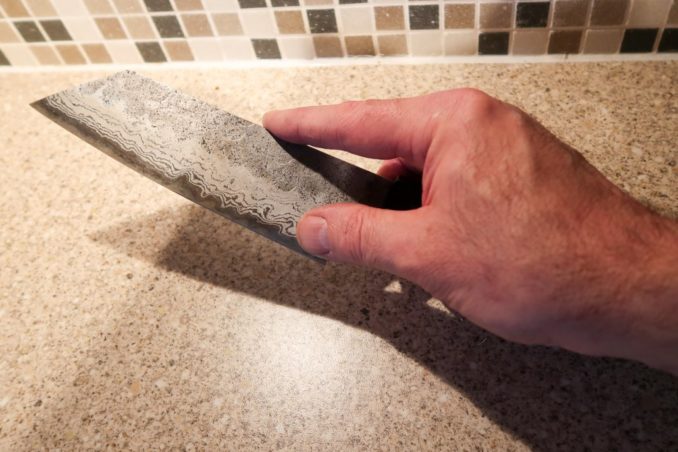
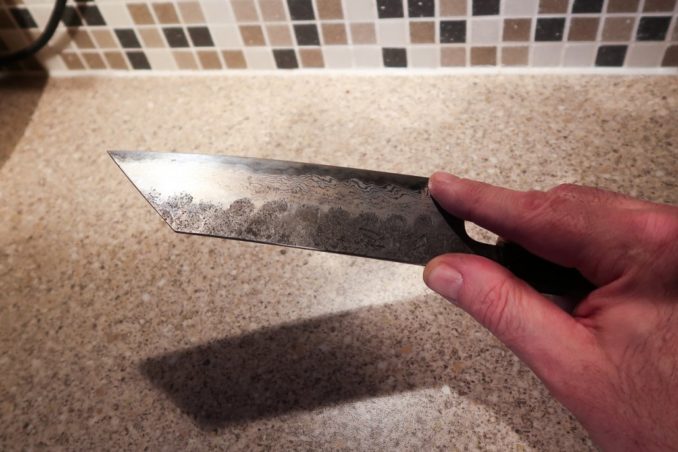
The second knife I bought was a new nakiri. Why? The one I have is perfectly good. Simply because it is a Masakage Koishi and they are incredibly difficult to get hold of – the supplier had 3 in which sold out in 10 minutes and they hadn’t been able to get any Koishi in any blade profiles for ages. Why buy it? Well, it matches the 210mm Koishi (the “pebble” knife) I already have and given difficulty of getting hold and my love for the knife I already have, I had to. They look great on the knife rack together. My eldest daughter will get my old nakiri when we finally see her! I really must stop buying stuff now…
Top in the image below is the Masimoto KS, middle is the Koishi (this thing is super sharp!) and the bottom is the nakiri my daughter will get.
Anyway, now we’re up-to-date, more on sharpening.
What matters?
Sharpening is a combination of tradeoffs to reach an optimum for any particular knife. Ideally, you want a blade with the acutest possible angle on it because it will be so sharp. But when you are cutting, you are attacking the blade edge with whatever you are cutting as well as running it along the cutting board you are using. That, together with most people’s habit of pushing food out of the way with the blade edge (or worse twisting the blade in contact with the board) and you realise you are actually attacking the edge you want to keep so have to make it robust.
The previous article discussed the metal the blade edge is made from. This, and the way it is manufactured, will dictate how it will hold up as you use the blade. Too soft and it will roll over as you use the knife. Too brittle, and you will take little nicks out of the blade edge. Bad technique (i.e. moving/twisting the blade across the board) will also start to damage the blade.
OK, so blade composition matters. What else? Consistency.
The blade needs to have a uniform edge which has a constant angle over its length to make sure that the same
cutting performance is reached. This is achieved by sharpening with a consistent angle. Also, consistency of the blade profile is important. The knife manufacturer will have taken great care to get a nice curve together with a longer or shorter “flat bit” on the blade. It is easy if you are over zealous to get a section of the blade which doesn’t ever touch the cutting board as you have taken too much metal off in a short section. Trust me, I’ve done it!
Talking of angles, angles matter. Too steep and the blade is very prone to distortion or chipping, to shallow and the knife appears blunt. Japanese knives are typically sharpened to 15 degrees whilst more western produced knives (think Sabatier, Wusthof etc..) tend to be sharpened more to 20 degrees. Once you start sharpening, you can experiment as to angle, but remember every time you do, you are removing a little bit of the cutting edge so the blade shrinks a little.
What else.. Smoothness of the edge. Imagine looking at the edge of a blade under a microscope. The very fine structure would be revealed and what you really want would be a beautifully smooth edge. But you won’t see that, you will see the edge is a series of peaks and troughs with the size of them being dependent on how the blade has been sharpened and with what equipment, how it has been treated since it has been sharpened together with the composition of the metal used. These peaks/troughs will make cutting less smooth and the knife will not “feel” right when in use.
Add to these things deformation of the blade and, well, it’s surprising these things cut anything at all.
Sharpening
So how do you do it?
Simply put, you rub the blade of the knife against something abrasive (although there are systems where you rub the abrasive against the edge of the knife, but the effect is the same).
Let’s take a bit of a detour here. Cheap and easy sharpening systems. You can buy them ranging from pull through systems to electric sharpeners. I used to have the pull through ones for my old knives. If I’m honest, I could never really tell any difference before or after. Electric sharpeners? I’ve not used one, but from what I’ve read, they appear to work but can be quite brutal on blade edges. Not putting my blades through that thank you!
So, what does that led us to? Fundamentally, you end up with whetstones (although I think an ingenious solution suggested by someone on the comment of the previous thread was wet or dry!). But which whetstones do you really need? The answer appears to be, make doesn’t really matter to get a sharp edge. You can get a sharp edge on almost any whetstone if you know how and you have the right selection of abrasiveness.
Think of it like using sandpaper on wood or paint. Shaping is done with medium to coarse, final prep is done with fine and then, if you have ever detailed a car, you will have used some very fine cutting pastes which are also abrasive. The common thing though is the abrasive particles get finer and finer as you go through the different grades, the finer the particles, the less you are taking off and the smoother the end finish is. So it is with whetstones.
Equipment
So, we’re at whetstones. There are two main ways you can use whetstones at home. Firstly, you can purchase a jig, hold the knife in the jig and run the whetstone over the knife edge. Typically, these whetstones are only relatively small. Secondly, you can purchase whetstones and manually run the knife over them. These whetstones are normally much bigger (21cm x 7.5cm being the “normal” size). A combination stone, which has two different grits one finer than the other, can be bought for less than £30. The cheaper ones tend to wear quicker, but you can get a lot done with a cheap stone set.
Also, for whetstones there are two types. There are ones that need to be soaked for 30 minutes or so before use and those termed “splash and go” where you can just wet them and use them immediately.
Personally, I have tried 2 whetstone systems. An Edge Pro Apex system and a more standard set of whetstones. I have had the Edge system for 6 years and more traditional whetstones for a couple of months (so am still learning). Which do I prefer? Personally, I love the traditional system, but that is because there is very much a sense of achievement when you get a blade back to razor sharp. I used to love the Apex because it is pretty difficult to get it wrong. It does, in my view, have some drawbacks which you need to be careful with, but I’ll discuss those later.
Here are the two systems at home:
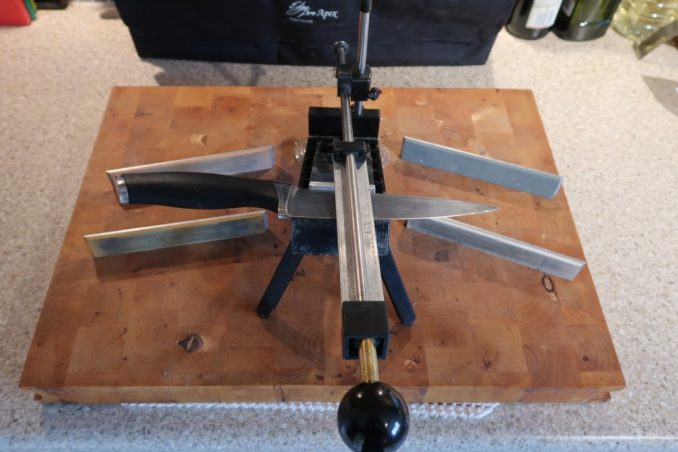
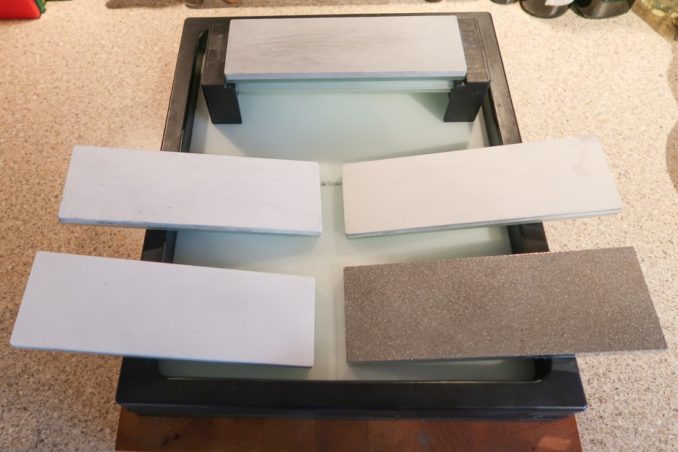
Pictured, we have the Edge Pro Apex 3 which comes with 120, 220, 400, 600, 1000 grit and Shapton glass system with bridge (raised item at back which contains the 8000 grit) and pond (the thing it is sitting in) with 320, 500, 2000 and 8000 grit together with an Atoma 140 grit diamond stone (front right). If you look at the stuff I have, it isn’t cheap, but that doesn’t mean you need them to get good results. Systems that are completely designed to work together appeal and, as Ms G will attest, I don’t do things by halves.
Some words about grit ratings. Grit rating refers to the fineness of the particles in the stone you are using. The finer the grit, the smoother the stone and the longer it takes to remove metal. Whilst most whetstones are 1:1 (i.e. 1000 grit in system A is approximately 1000 grit in system B), Edge Pro is way out of the norm. 1000 grit in Apex is (from memory) approximately 3000 grit in “standard” Japanese stones. The lower the number, the bigger the grit size, the more aggressive the stone is.
So, what do they get used for?
120 Apex/140 Atoma. When you want to change the shape of the blade significantly. I’d put a concave curve in one of my blades and the 140 Atoma managed to correct it. I’d been trying with the apex, but couldn’t get it right. The Atoma managed it. These will get the profile to the shape you want and will be used if you have significant damage. You can take significant amounts of metal away with these very easily. If you want to go from a large kitchen knife to small hand-held paring knife in a few easy strokes, these are the stones for you!
220 Apex/320 Shapton. Like a medium rough sandpaper – when you need that little bit more roughness to sharpen a blade that has really blunted. Will quickly remove rough edges, but won’t just eat through the blade like it isn’t there. Can be used to take nicks out of the blade too, but takes more time than the really rough stones.
400 Apex/500 Shapton. The workhorse of getting a blade sharp from blunt IMHO. When you’ve left the knife too long between sharpens and it needs to get the edge back on it but there is no damage on the blade.
600 Apex/2000 Shapton. We’re into touching up now or starting to fine a blade that you’ve done with the previous stones. Would use these stones with a knife that has just “gone off the boil”.
1000 Apex/8000 Shapton. Final finishing. Does hardly anything to make the edge “sharp” as it takes so little off, but does everything to make the edge consistent, removing all the micro imperfections the others leave behind. Not really useful to sharpen on their own, more for finishing.
In all honesty, you don’t need this many stones, but you’ve seen my knife collection and you don’t need as many knives as I have. A coarse, medium and fine set would see you with much nicer knives than if you have no method of sharpening at all. If I were to only have 3 stones it would probably be the Atoma, and 500 and 2000 Shaptons (from the ones I have).
Sharpening in practice
So, how do you sharpen? It’s an iterative process where you use one grade of stone to put an edge on (actually a burr) before you move to the next grade to remove the imperfections that coarser stone has put into your knife. What is a burr? Simply, it is the metal on the edge of the blade “rolling” onto the opposite side of the knife. You can feel along the edge if you pull your finger across the edge of the knife (pull, not push!!). Once you have this burr, you turn the knife over and “push” the burr to the other side and then flip whilst gradually reducing the pressure on the sharpening to remove the burr and leave the cutting edge.
How do you know you have a burr? You feel for it. Just make sure you feel pulling away from the knife edge, not towards it!
Sharpening with the Apex Pro
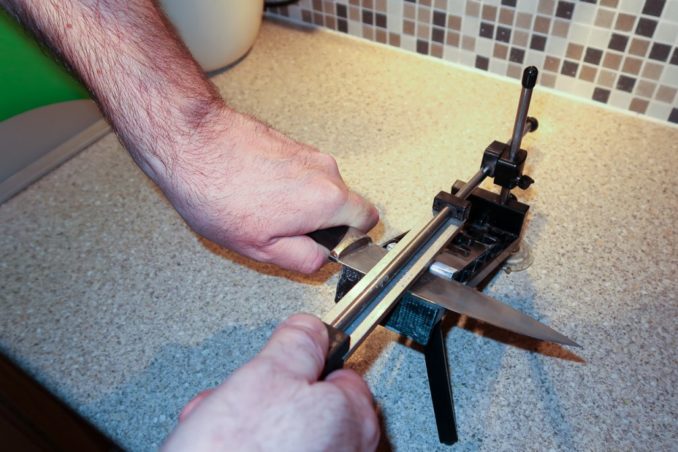
This is quite simple. Soak some stones (I used soak for 15 mins or so), then set your angle (which is easy as the rear “pillar” has marks to denote angle: red is 15 degrees, green 18 deg., yellow 21 deg. and blue 24 deg.) adjust the knife holder and then just add a stone and start. However… Knives aren’t a regular depth along the whole blade, nor are they straight. This leads to you having to balance the knife against the blade holder as you move the stone. It is quite a 2-handed thing to do, but reasonably easy to master. What is important is to keep the blade close to the edge of the Apex holder as this ensures both angle and support consistency, and to keep the stones moist to ensure the stones are lubricated enough to wear the blade rather than be cut themselves.
As the blade sharpens, you have to be a bit careful to be more aggressive on downforce on the return strokes (where you are pulling the stone towards you) but once you practice a bit, you get the hang of it nicely.
Here’s a pic of me sharpening with the Apex pro with a cheap knife.
Sharpening with this system is quite easy, as long as you are careful. The fact that you have a thin (width) stone plus nothing to guide you can leave you with concave areas of the blade. Trust me, I’ve done it where you want to “really get a sharp edge” and you spend a little too long on a certain area of the blade with a stone that takes a lot of metal off… The resultant knife is one that is not nice to use as it works for most of the edge and then you hit the section that isn’t running at the cutting board’s depth. Not nice.
Traditional sharpening stones
Everyone knows how to sharpen – use a sharpening stone. Yes, but.. Consistency. The only way you get a really good edge on a blade is to be consistent, and the Edge Pro system is consistent – if you use it well. So why even contemplate stones.
Two reasons. Firstly, because the Edge Pro system uses narrow stones, you are sharpening a small part of the blade at any point in time. This means if you aren’t sharpening consistently, you get an irregular edge. Secondly, “stones are the way to sharpen”. It takes a bit more skill to sharpen with whetstones, so there is a personal reason there – I want to learn how to do this!
Which stones? It doesn’t appear to matter. Watch a few yootoob vids and you will see that people who have good technique can get great results from stones that cost £20. They try the £200 ones and they get the same outcome. So why do I have Shaptons (the Shapton glass stones aren’t cheap)?
Two reasons. 1) I wanted something that raised the stones and captured the water. The Shapton pond/holder system appealed. 2) Because I do admire things that works together. Whilst the holder holds stones that are a standard size (the Atoma is not made by Shapton but fits perfectly into the holder), the fact that everything fits/comes together appeals. It’s kind of an Apple for sharpening stones thing (although those that know me know I’m a huge Apple avoider) without having to be captured by the manufacturer.
Right… so.. Stones. First thing to do is understand how to ensure an angle on the blade. If you just grab the handle as shown below, you’re going to have completely inconsistent results.
Why? Because your angle will really change as you move the blade along the stones. You will find that as you go back and forth, the wrist will start to twist. This is “Not Good” (said in a Samuel L Jackson as Jules in Pulp Fiction voice). The edge will become rounded and won’t have any form of consistency.
So how do you get around this. See the next pictures… The thumb on the blade and (forefinger for the reverse) hold the blade to an angle. Also notice that the forefinger (and thumb on reverse) are along the spine of the knife.
This gives a way of keeping the same pressure on the edge as you move the edge along the stone. Then apply pressure with your other hand as the blade moves over the stone. But keep the pressure over the stone, not to the side as this leads to the edge of the stone being used as a pivot point. Like this. In the first, I am pushing down as I push the blade up the stone, the second I am dragging the blade across the stone, left to right in the picture.


Two things to remember… First, constant pressure across the blade as you sharpen different bits. Second, try and apply the pressure when you are dragging the blade away from the stone. If you don’t, you can cut the knife edge into the stone which isn’t great – for the stone or the knife! How much pressure..? well the simplest way is to take a set of electronic kitchen scales and to push down on them. You want about 3lb (1.5kg) of downward pressure when you are sharpening. Then, it is a case of walking the knife back-and-fore over the stone until you get the burr on the blade. Then removing it by gently “stropping” the blade before repeating with the next finest stone.
Stropping
Stropping is the act of using less pressure on the blade to remove the burr you have created. Typically, after sharpening with a stone, I’ll gently run the blade several times either side with a lighter and lighter pressure to remove the burr before moving to the next grade of stone. This way, you remove each burr before smoothing the blade further. Think of it like lightly sanding woodwork before moving to the next grade.
Quite a few pros use leather to strop with. It is abrasive enough to remove the last vestiges of the burr, but smooth enough to leave a flat surface. Personally, I have never used this, relying always on very fine grit stones.
Outcome
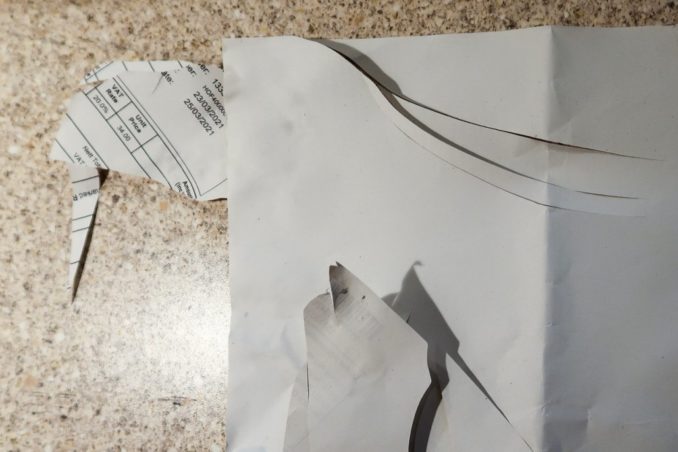
The outcome should be a very sharp blade indeed. If you can’t slice through your own fingers easily, it’s not sharp enough! Most people won’t want to try that, so the traditional way of seeing if a blade is sharp is to slice paper. A typical sharpening session should have a few of these (feel the cut from heel of blade to tip to check the blade is consistent for the whole length). It should be easy to cut a piece of paper very cleanly.
Keeping it sharp
Knives blunt for a variety of reasons. Mistreatment, using a cutting surface that is too hard, soft steel… The “better” and well treated knives will become blunt because the edge starts to roll. All knives will do this eventually and this is where you see sharpening steels coming in. I have one that gets used occasionally and it appears to just restore that last little bit of the edge when things aren’t quite as sharp as they should be. It is a very, very fine grit and doesn’t actually sharpen, more just realign the blade.
In conclusion
Keeping a knife sharp is pretty easy. It takes practice as well as a little effort, but it is worth it. Ms G now swears by sharp knives and can tell when one is “going off the boil” so will ask me to sharpen it.
What this article doesn’t show is how to sharpen in videos. I suspect you can pick up way more from videos than you can in the time it has taken you to read this! There are many great vids on yootoob which will show you, but I found that a channel called Burrfection was great at explaining how to do all this. If you investigate the channel enough, you will also see why I bought the Masimoto KS…
Anyway, this is long enough now, so until someone prompts me for another brain-dump…
© text & images Bertram Gilfoyle 2021
The Goodnight Vienna Audio file


