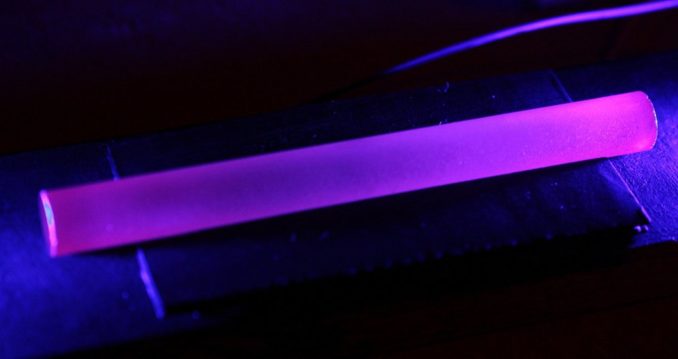
(a ruby rod lit by two bright blue LEDs. Due to the IR filter in my camera the pink colour is actually red. What you are seeing is the absorption of the blue light and the florescence of the ruby in red. The rod is 70mm in length.)
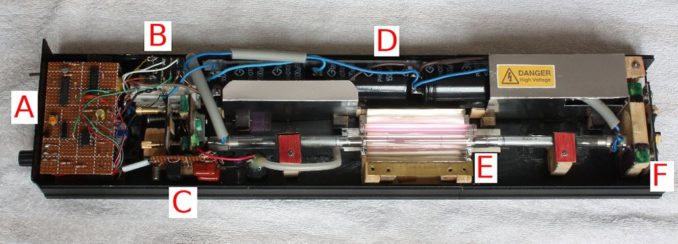
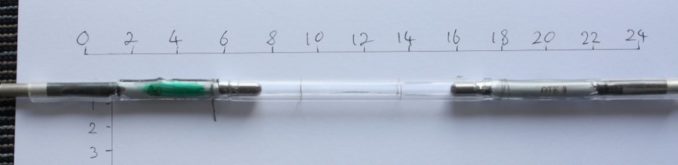
Inside The Laser Box
A hi-res version can be found here: https://imgbox.com/X0z19hQM
Components are as follows:
(A) Main control board. Initiates laser firing and monitors the charge in the capacitors. Just the Doc being fancy. You could replace this board with a switch and a voltage meter. Below this board are a modified mains transformer to generate the high voltage for the capacitors and a 12V CPU cooler fan.
(B) Interlock relay and discharge resistors. Normally closed wired. If the electricity fails the capacitors will be safely discharged.
(C) High tension control board. Provides power to the ignition transformer (right) to ionize the xenon gas in the flash tube. If you look closely (left side of the board) you can just make out a small metal ‘can’. For the geeks out there that’s a germanium transistor (Hitachi 2SB77) from a late 1960s TV set. Paying homage to the laser’s era!
(D) Four large (low ESR) capacitors. They’re rated at 360V 1500uF (measure 1600) but you can push them to 400V, although I’ve only managed to charge them to about 385. Wired in parallel-series they can deliver a peak voltage of around 740V. Deadly.
(E) Flash lamp and ruby rod in the bottom half of their reflective housing.
(F) OC (output coupler) mirror mount. If you look between B and C you can see the HR (highly reflective) mount and mirror.
The overall length of the laser is 18 inches.
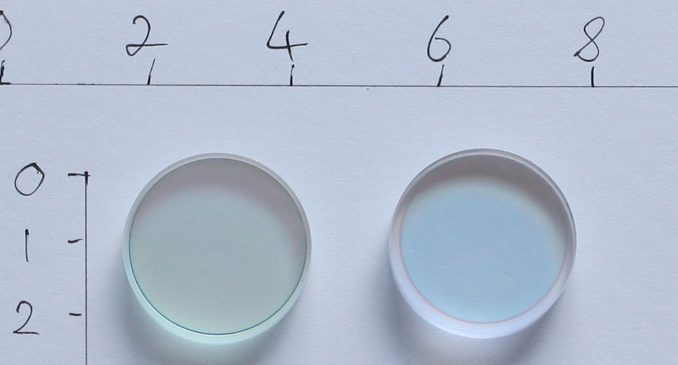
Ruby, flash-tube and mirrors
All lasers need a lasing medium or gain medium. This can be a gas, liquid or a solid. In the case of a ruby laser it’s synthetic ruby of a very high purity. Ruby is in fact sapphire with a tiny amount of chromium added that gives it its pink/red colour. Ruby laser crystals are ‘grown’ and machined into cylinders with the end faces highly polished. There are generally two varieties for laser use: 0.03% and 0.05% trivalent chromium doping, which creates a pink ruby.
Only the chromium ions lase. The aluminum and oxygen atoms of the sapphire play no part. They simply ‘support’ the chromium atoms.

In the above photo the top rod has a 0.05% doping and the bottom 0.03%. Scales are in centimeters.
Interestingly the top rod’s end faces have been damaged. A few chips and scratch marks. I obtained them from eBay but purchased the damaged one for half the price of the other rod. Both rods lase perfectly.
Also note the clear ends of the bottom rod. Showing that there are no chromium atoms – just clear sapphire.
The flash-tube took three attempts to get right. First I tried two 100 Joule camera lamps. No laser action. Then I ordered a few INP-80 Russian lamps but they seem to have an optical coating and they didn’t work.
Finally I got a hold of three INF-800 (again Russian) tubes – above photo. No visible optical coating (good) and the ruby lases beautifully with them.
The problem is the sheer size of them. Nearly a foot long and they only just about fit into the case.
If you look at the photo of the inside of the laser you can see how close the ends of the flash-tube are to the two mirror mounts. About 5mm play!
Above photo – mirrors! Yes, they really are. Dielectric mirrors tuned to specific wavelengths. Left: a broadband HR mirror. Right: a 694nm ruby laser OC mirror. 50% reflective.
A ruby laser OC is VERY HARD to obtain. (see the link at the end of the article.)
The two mirrors form an optical cavity to provide positive feedback. All oscillators need positive feedback. I suppose that a simple analogy would be gravity acting on a pendulum in a clock or the potential energy stored in the spring of a balance wheel in a watch.
Helium-Neon and Ruby Lasers In Action
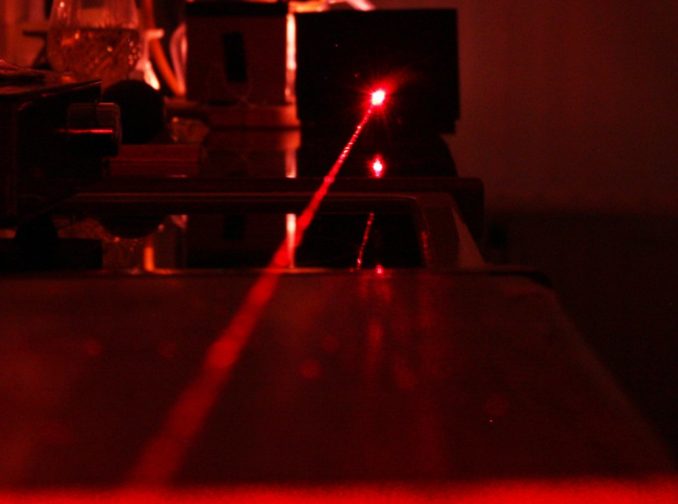
Here’s a photo of my 2mW 632.8nm (6328 Ångströms) He-Ne laser. A two second exposure at f4.5 over a distance of about six feet. It was a very humid and thundery night and so scattered the beam beautifully. The ‘speckles’ are dust particles falling through the beam. The helium glows a bright pink and it’s what is illuminating most of the room. The Doc’s brandy glass is visible at the top left! The reflected beam is from a ceramic cooker top. I’ll come back to the He-Ne laser when I write about mirror alignment.
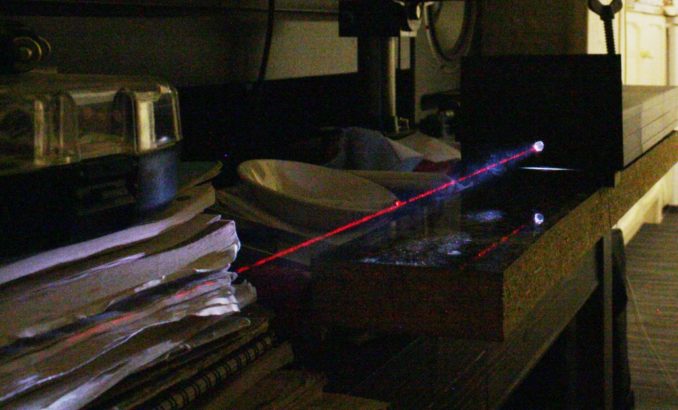
And now what you’ve been waiting patiently for – the money shot.
The ruby laser firing at about a 380 Joule flash over a distance of four feet. A two second exposure at f10 and an ISO of 400. The laser beam lasts for about one one thousandth of a second (1 millisecond). The 6943 Ångström light is a much deeper red than that of the He-Ne. In fact we are at the very long end of the visible spectrum. Once we get to 7000 Ångström we are moving into the infrared.
I’ve added some ‘participating media’ (to make the beam visible) in the form of a rolled-up paper kitchen towel and then I set fire to it! Stinks the place up but one must suffer for one’s art.
Full resolution images are available here:
If you look closely you will see blue ‘will-o’-the-wisps’ around the ruby beam. This is the light from the flash lamp being scattered by the smoke. It makes for a quite beautiful effect. There’s a black cardboard screen (obviously with a hole in it) in front of the laser to reduce flash glare and improve the contrast.
To put the energy of that beam into some sort of context we can easily assume a power of 100 milli-Joules (0.1J). That would equate to around 100 Watts (1ms time frame) making it fifty thousand (50000) times as powerful as the He-Ne beam at two milli-Watts in one second!
Information and Links
An article from Practical Science 1964. Unfortunately page 2 doesn’t work but the others are OK. Arthur Schawlow (see part 1 for who he is) wrote a great description of how the ruby laser works on page 3.
Modern Mechanix :Build your own LASER! (Nov, 1964)
Sam’s laser FAQ has got to be the first stop for any amateur laser constructor. Detailed site with lots of information. Great fun and Sam is always open to the odd email.
Diane’s site is fascinating. A very clever person.
Don’t be put off by the name of the site or the fact they’re Russian. The translation is good and the projects are genius. Even if you don’t like lasers check out his gas jet engine at the end of the page. Gotta build one!
© text & images Dr Mike Finnley 2018
Audio file