
I’ve not frequented this site as often in the past – the last year or so, though #FFriday with a beer or two is always worth a visit and the gaffer continues to get his subs.
On my rare visits, I have occasionally been asked for updates on the railway modelling pieces written a few years ago, which started back in 2018 with the shelf layout and cyclists. In 2021 Leopard blamed me for making him build a new layout (GQ surely?!), when seeing pieces on a larger challenge. Since then, life has been getting in the way of any progress – both in terms of having space to do any modelling, and the time. Volunteering at a local railway can easily take up 110% of the time you have available. I’ve stepped back from that a little as politics surfaced and removed the enjoyment. Now with the line closed until half term, that frees up time.
As for space, well with two of the kids having flown the nest, I can commandeer a bedroom – if only temporarily. I decided it was time to dust off the bigger unfinished layout and carry on its development. May as well check the shelf shunting puzzle too, to ensure all still works and the tiny cyclists are happy. A dust off tidy up and check and they are all alive and pedalling – all good.
© “Sweaty Dave” 2023
They are well travelled but never exhibited, even made it to one of the GP Bashes but never got the chance to be shown – not a great deal of options in a field full of drunks. The second layout was a much larger space hungry monster with two main lines, a coal mine with branch and transfer yard. It was made up of six sections specifically built to fit into a cupboard, away from any dangerous dusting or ‘tidying up’ by Mrs SD.
© “Sweaty Dave” 2023
To be honest the second layout needs a lot of work, it is hardly started. Yes, much of the track is laid, the pieces fit together and the basic layout and wiring are in place, but there is still so much to do. When faced with such a mountain of work, I admit to looking for reasons not to make a start. One such issue/excuse was a large wardrobe that was blocking access. I eventually cleared it out, put it on Gumtree and it sold for £60 in a day – all good, one less excuse.
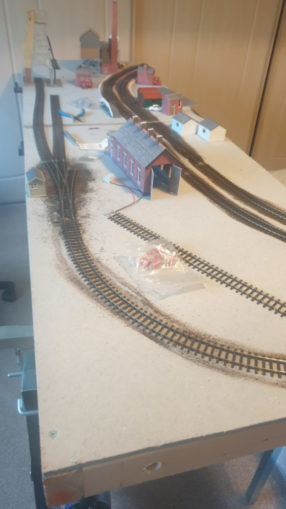
Looking at what is there, there are four large corner sections and two smaller half sized ones widening the layout. When fully made up it measures 7.5 ft by 5ish ft. The central area that can be either a town or opened up for an operator. For now, I plan to take a section or two at a time, look to fix it up before getting it all assembled and hogging a room. There are a few things that could have been done better last time..
I originally set it up with a view that to electrically connect each of the sections, I’d use familiar old fashioned 5 pin DIN plugs – the sort that you would use on your Hi-fi to connect each bit of kit – I set up enough for a couple of sections but they are very fiddly to solder up and so unlikely to be reliable, tracking down dry joints or where the solder or wires are touching the adjacent connector 1mm away is painful. With that in mind I have looked around and bought a range of alternative fixings. There are hundreds of electcial joins in the layout. Some will need to be able to connect/disconnect/reconnect as the boards are separated for storage, whereas others within a board would be a permanent fix. I have bought a couple of test packets of push fit wiring plugs – though do find they’re that small you can only put one wire in each – ok if you need to extend one wire but most connections branch out, taking power to more than one place.
The final job when it was packed away last time, was to cut the track where it crossed each boundary between sections, rather worrying to see it all spring apart. First job upon return is to join those back up. I expected to do most with regular sized fishplates, the scale sized ones being too small for this particular job (but more on this later).

© “Sweaty Dave” 2023
Back at the wiring, I cut out those 5 din sockets, replacing them with what are called ‘bullet connectors’, from the automotive industry – plug and unplug with ease and set up a wire with a simple crimp of the part. For wires within a section I’ve yet to find the ideal solution, using wiring blocks at the moment.
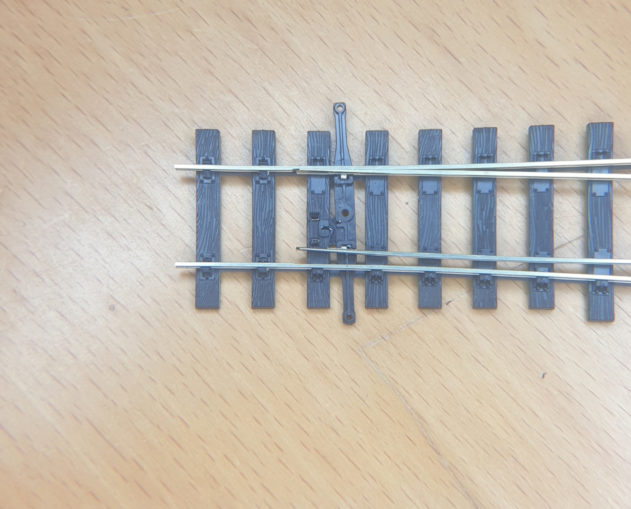
First task was to look at the three way point – it is a mess of half connected wiring. Not only are there two solenoids under there needing their power and switching, but each solenoid also has a switch on top that swaps the polarity of the power going to the relevant nose of the point in question – with three possible directions the inner rails will be either the equivalent of +ve or -ve depending upon direction. All this could mean short circuits if the line is powered further along, so these middle rails need to be isolated from further down the line and only powered through the switches. Sadly this seems to be the case for pretty much every point unless you are happy for a stretch of track to only have power when the point faces that way. DCC power has the advantage of expecting to power every inch of track all of the time for greater flexibility. Traditional power powers the track section that has one train on it. Back at the three way point, the solenoids were not perfectly aligned with the point, so would half change or just buzz. Fettling also found that one of the tiny springs controlling one of the point throws was not working, meaning it couldn’t change even manually. The point is an expensive item, at around £80, so every effort to repair it is attempted. Under the magnifying light I managed to get that spring back in place to huge relief. At time of writing the polarity switches work but the solenoids aren’t fully wired up so manually moving the point is best.
© “Sweaty Dave” 2023
Sorting out those two issues took an hour or so each – but one thing I did find was that getting those small tasks right was just as rewarding as the larger jobs, as they were something that have been waiting repair for ages and one of those nagging issues that preys on the mind. I found another point which was had a rail disconnected – the bullhead track is very fragile. Another session under the microscope and I worked out the problem and managed to get it back together.
As I said, the plan wasn’t to bring everything out at once, but concentrate on one area at a time. I set up two sections, fixed them together which gives me a bit of main line (not a lot of use and a danger the loco will plunge off the layout at each end, but wired up), and the area that will be the sidings for the coal mine. They were never fully developed in the past. The three way point at the head of the line being in place, but track after that just loosely connected and not cut to length or glued down. Now with it working, the lines can be set up. There are to be two exchange/loading tracks with a run around at the end for the colliery loco. To get sufficient length to the sidings I’ve decided to follow the main line and curve up to the edge of the section rather than just a straight run to the edge of the board, adding a bit more space. A Y point at the end and short section of track gives enough for the loco to run around the train. The third spur of the three way point goes to a coaling point and loco shed. In all cases the track is not yet in place – so next job is cutting sections to size, pinning it until happy then gluing it down, cutting at section boundaries and ballasting.
There are plenty of bigger jobs to do:
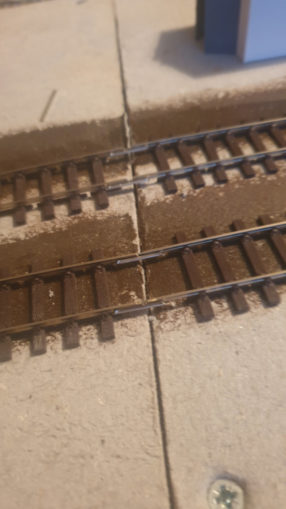
All those cut tracks need joining as sections come together. Having viewed various options on Youtube, the best seems to be to fix the track very accurately at the edge of each baseboard section rather than try to reconnect them with fishplates each time it moves.
© “Sweaty Dave” 2023
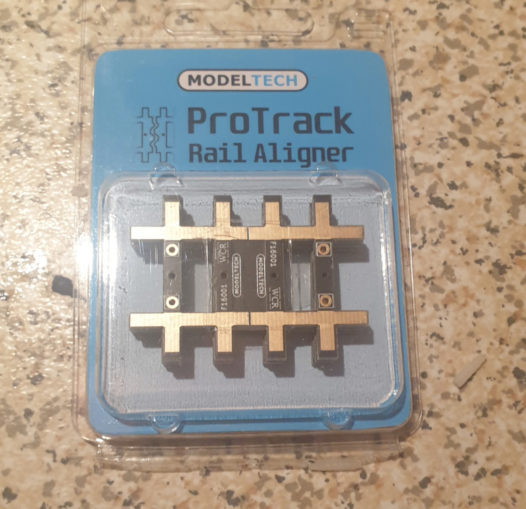
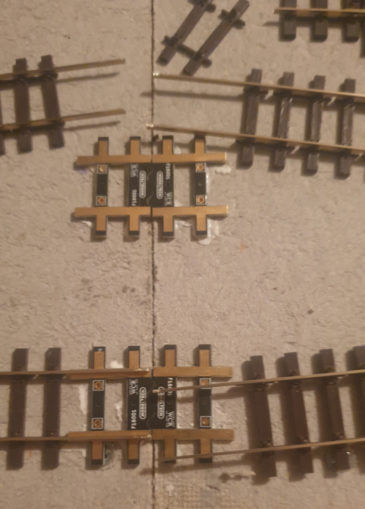
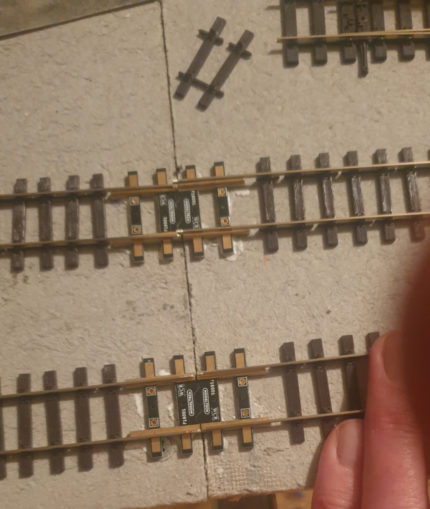
The intention is to have a gap of less than 1mm between tracks over the boundary for smooth running. Good job I set up the base sections with notches to help align them accurately(ish). You can buy items that help with the track alignment. I’ve bought one such pack – four or five pairs of joiners for £10 – with the number of joins on this layout that could easily become expensive and they only seem to work for joins that are perfectly perpendicular to the gap.
© “Sweaty Dave” 2023
The homemade one on Youtube is more flexible – cut strips of Printed Circuit board sheet to make wide sleepers that butt up to the edge of the board, glue and nail them down then solder the track to that, fixing it completely. I’ll try both options but expect the home made one will win the day.
© “Sweaty Dave” 2023
© “Sweaty Dave” 2023
I really need to buy a static grass applicator (they’re not that cheap) but the landscaping needs addressing.
The track needs ballasting properly and fixing to allow the joins to be brought together without major surgery. It also needs to be the correct profile to prevent derailment as longer wagons go over the hill.
A stream needs to be created under the bridges and lots of scenic work all over the place.
Some weathering, more rolling stock, and fix the Austerity that seems to have a broken motor.
So to recap – and for newer visitors, what is he on about?
Early on the life of GP, I ran a diary explaining the development of a small shelf model railway, built into an Ikea 120cm shelf – it is still around with moving cyclists but has come as far as it can so often just gathers dust as a complete item.
Much of the ‘enjoyment’ of modelling is in the construction rather than the operation so I then decided to move on to a greater challenge – in some ways perhaps taking too big a step up. The new layout includes finescale bullhead track (slimmer rails that are more accurate but less forgiving and prone to derailments), using Digital control and on a much larger scale – moving from 4ft x 1ft to 10×8
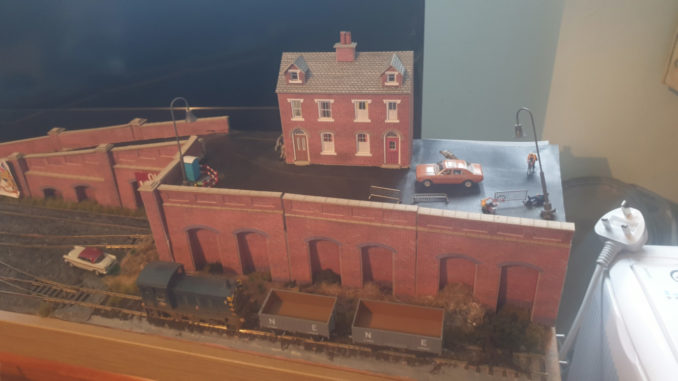
The big layout consists of a couple of round and round ovals, circling a town – this gives a better run than an end to end model as the first one was – you can set something off and concentrate on another for a while. It also has a branch line running to a marshalling yard for a coalmine. Plenty of opportunity for shunting wagons under a coal loader. There is a pit village in the middle of the layout giving a slice of life, or some time in the 1950s, with a bridge at one end, raising the track as it crosses a stream in a valley. Technically it is a digital layout rather than analogue, meaning very different controllers – rather than a simple variable resistor providing control, you use an App and mini-computers to control trains and accessories, at somewhat greater expense.
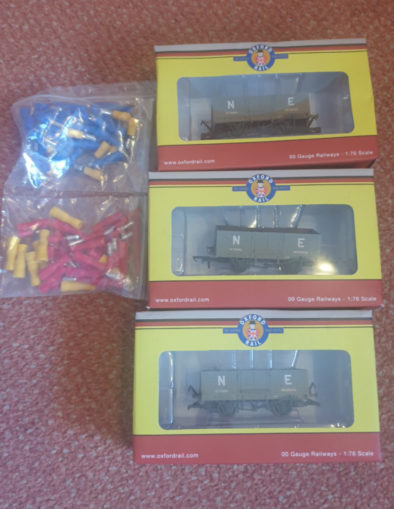
No big purchases so far this time though a trickle of parcels do arrive (fortunately when I’m working from home and Mrs SD is at work or eyes would be rolled in my direction). I did cough up just over a tenner for a Perspex box that allegedly puts the ballast down evenly – will report back when it is tested. And Hattons just nudged me that they have NE weathered coal wagons in stock, so three of those have arrived.
© “Sweaty Dave” 2023
I have a couple of buildings to construct at some point but focus remains getting the track to work.
Next time – trials and tribulations of crossing the joins.
© Sweaty Dave 2022
The Goodnight Vienna Audio file


