The first in a short series of articles, which are partly technical (going into a little bit of detail about how the family archive of photos, 8mm home movies, and audio tapes was digitised), and partly self-indulgent, as various examples from the archive are inflicted on an unsuspecting public.
These examples may, or not be of interest to others.
Now you might well ask “why go through all this stuff?” Don’t dwell in the past. Live for today, and be here now.
That’s fair enough, but I’d answer by saying that as a temporary pastime or hobby, this is as good as any, and digitising the stuff makes it extremely portable, and much easier to keep, and distribute.
And another beautiful thing about having everything digitised is that in the event of fire, you can always grab the portable hard drive on the way out, and save the old photos, movies, tape recordings and memories for family posterity – if you have the presence of mind to do so in the panic, that is.
Also, it’s much easier to hand a USB drive to the offspring, rather than a load of boxes of old photos, tapes, and movie reels etc. (Provided they’re interested, that is).
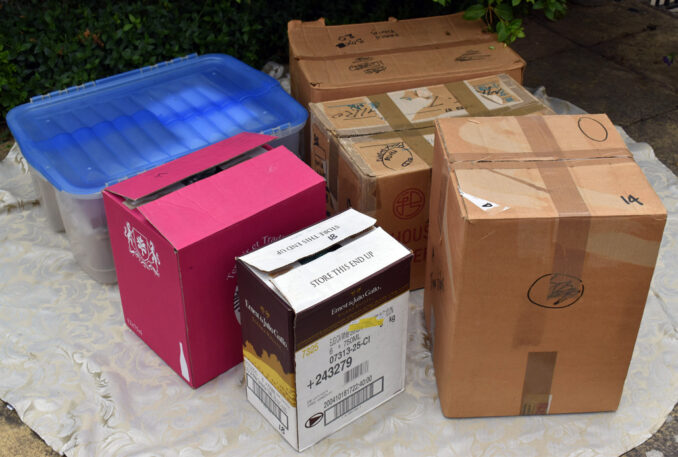
The family archive eventually found its way down to me, and it’s been sitting around in boxes for the last 20 years or so. I finally decided to do something about it a few years ago.
Sorting, organising, digitising and cataloguing all this stuff was a task I’d had in the back of my mind to do as a retirement project, and I half-heartedly started scanning the photos in 2018. Then lockdown imprisonment came along, and gave me the final push to really get moving.
And when you’ve reached the sort of age where you have more to look back on in life, than look forward to, and you’re locked down in virtual solitary confinement, what better thing to do than spend a bit of time going through the family photo and audio archive?
So rather than take the easy way out and just chuck everything away….. I decided to do something with all those boxes of stuff, and all of it has now been condensed down to a few USB drives, and a few backups.
Now I can feel comfortable about chucking away the old audio tapes, 8mm movie reels, prints, slides, negatives and old family photo albums and scrap books, but still can’t quite bring myself round to incinerating the stuff. Not just yet.
Digitise The Stuff Yourself Or Pay An Expert To Do The Job?
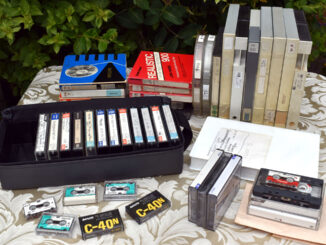
Scanning several thousand old photos is not a task to be taken lightly, nor is it a task that can be accomplished in a couple of days. There are plenty of digitisation companies around who have all the equipment necessary to scan everything for you – and that includes audio recordings in various formats, and all movie formats too.
Some of their equipment will be vintage, which enables them to scan old formats, and they generally know what they’re doing. But their work comes at a price, and the cost can soon mount up.
I decided early on that I would do the work myself, and only use the professionals for material I didn’t have the ability to scan at home.
While I was able to scan ALL the photos myself, I had to seek the help of professionals to digitise a couple of four-track audio tapes, a few mini-cassettes, and ALL the reels of 8mm movie film.
Photo-scanning Hardware
It’s perfectly possible to digitise old photos by taking pictures of them using tablets, smartphones, laptops and suchlike, but to get good results, the originals really need to be properly scanned, flat and square.
A decent quality, standard, flatbed scanner is all you need to scan photo prints, but if you want to scan film negatives and transparencies too, you’ll need to pay a bit more for a backlit scanner – in other words a scanner designed to project light through your negative or transparency, rather than onto it.
If you have a selection of different sized negatives and transparencies, you’ll have to find a scanner that will accommodate them all, to get the best results.
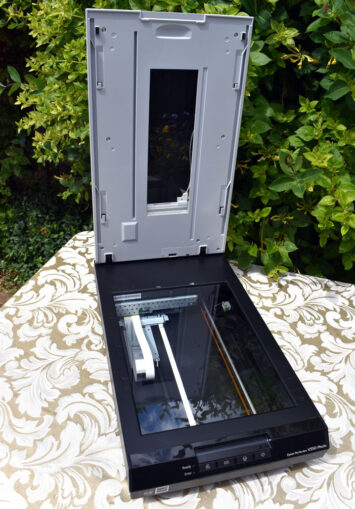
All my photos were scanned on an Epson V550 Photo Scanner. I paid £162 for it in 2016, even though I knew I wouldn’t be using it for photo scanning for a few years.
I thought it was advisable at the time to get a piece of kit ready to do the job I was planning. The V550 was discontinued some years later, and the only comparable scanner available from Epson today will set you back a cool £900+.
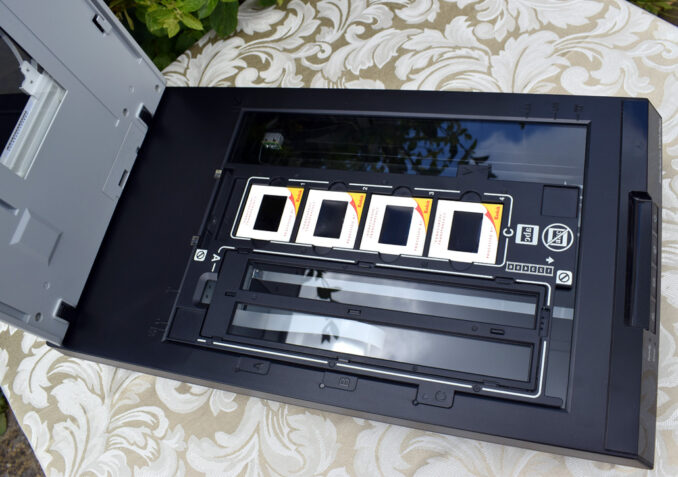
Flatbed film scanners such as the V550 have a light source in the lid, which passes over transparencies and negatives held securely in a film holding device, illuminating the film from above so the photosensitive sensors in the main body of the scanner below can convert the light into electrical signals, which are then processed to create a digital image.
A quick internet search reveals that several film scanners are available, but some only accommodate 35mm film and slides, while others are more versatile, being capable of scanning several film formats, and prints as well.
In the family photo archive there were plenty of standard 6×4 inch prints, and other colour and black and white prints of different sizes. There were also several sheets of tiny ‘contact’ prints. All such different sized prints are easily scanned on a standard flatbed scanner.
We also have 35mm slide transparencies, 35mm strips of negatives, 110, 126, 127 negatives and transparencies, plus a few very large negatives from a long time ago.
Most were suitable for scanning using the film holders that came with my scanner, but I had to knock up simple holders for the odd sized films myself.
Scanning Tips
Scanning the original negatives or positives is always better than scanning prints made from the film, because the detail in the finished scan will be a lot sharper, and there will be more of it, and the colour should be true to the original in the case of colour film.
However, it’s worth noting that if the original film has been stored carelessly, there will likely be scratches and dirt on it.
Cleaning dirt and deposits on the film with a swab very lightly moistened with distilled water is an option, certainly on the film base side, but the emulsion side is a different matter, and it’s worth investigating the various film cleaning chemicals that are available.
It can’t be stated often enough that prints and film need to be as clean as possible when scanning, and a little bit of time spent brushing or blowing dust off film and prints, and constant wiping of the scanner glass with a soft microfibre cloth will save a lot of retouching time later.
When it comes to framed pictures, it’s best to take the photos out of the frame – if you can bear the hassle.
There’s often a build up of smears and dirt on the inside, as well as the outside of the glass, which will affect the quality of the scan, so it really is worth removing the picture.
You CAN lay small framed pictures on the scanning table of a flatbed scanner and get good results, but you risk scratching the scanner glass, and getting an inferior result.
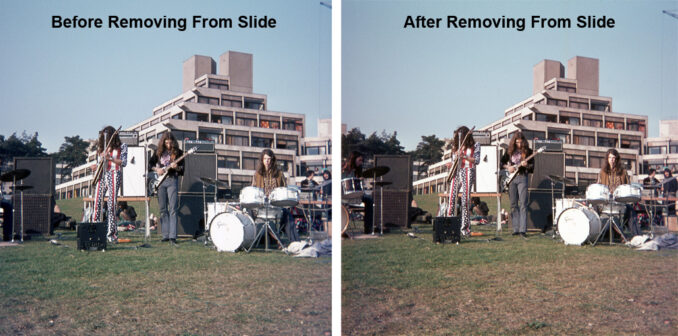
Something worth bearing in mind when scanning slides is that if you think it would have been better if the photographer had squeezed a little more into the shot, they may actually have done so. Disassemble the slide, and you’ll probably find there is some more photo hidden under the slide window edges.
(See the example below of the drummer on the left who miraculously appeared after the slide was dismantled, and the film removed, and rescanned – a process that’s a lot easier with plastic slides which snap apart, than with the cardboard mounts used by companies like Kodak).
Another benefit of removing slides from their cases, which is the same with negatives, is that you can use the numbering along the edge of the film to get images into the correct order. This can also help with allocating dates to events.
Software
The software that comes with the scanners will enable you to get good scans, and much of it is effectively ‘automatic’. You should be able to set the image source – photographic print, colour or black and white negative, positive film, etc., and the destination – such as screen or web, or printer, then click a couple of boxes for ‘adjustments’, and leave the scanner to do the rest.
I chose to tweak the settings a bit myself, and though by no means an expert, I’ve been happy with the results.
The scanning settings depend to some extent on the likely end use of your scans. For example, you’ll need higher resolution and bit-depth for images you plan to print in high quality at a reasonably large size, than for scans only destined to be viewed on a screen.
Also, the size of the image source must be taken into consideration, and generally speaking, resolution needs to be higher the smaller the dimensions of the original image.
Although I strayed somewhat from the following settings on some scans, these settings have worked for me, and there have been no obvious problems. However, they should not be taken as recommendations! It’s advisable to do your own research on matters such as resolution and bit-depth.
6×4” colour prints > 24-bit colour > 1200 resolution
35mm colour negatives > 24-bit colour > 2400 resolution
35mm colour transparencies > 24-bit colour > 2400 resolution
6×4” black and white prints > 16-bit greyscale > 600 resolution
35mm black and white negatives > 16-bit greyscale > 1200 resolution
It’s very much a ‘trial and error’ process to work out how to get the best results at the start of your scanning journey.
You may end up scanning a picture more than once before you get a satisfactory result, so don’t rush to take the source material out of the scanner ready for the next scan – wait until you’re happy with the result, then continue.
The scanning software will flip negatives from white and black, to black and white, so your black and white photos don’t look like X-rays, and look the way they should do. It will also convert those baffling colour negatives to their true colours.
There may also be a ‘colour restoration’ option, which can enormously improve the look of a photo.
Editing Your Scans
Most scanners enable you to crop pictures during the scanning process, but if you prefer to scan and leave good margins, as I do, you will need to crop the scans afterwards. This is very easy with most photo software.
I advise rotating the scan slightly, if necessary, to make sure buildings look straight, upright, and square (for example), BEFORE cropping. You may lose a little bit of the photo around the edges, but the end result should be worth a small bit of picture loss.
Having tidied the edges, and rotated the image, it’s time to consider whether a bit of ‘touching up’ is required.
In an ideal world, the original source material for each picture would be in near perfect condition, so no retouching would be necessary, although things like brightness and contrast may nevertheless benefit from a small adjustment.
This is where a good quality monitor, with accurate colour rendition comes in – plus your own judgment. Do you have a good eye for colour?
Tweaking photo colours is arguably the hardest, and most critical part of the job, and it’s really a case of trial and error, until, with experience, you get to the point where you can tell immediately which colours are too strong, which too weak, and then take the appropriate remedial action.
Not all photo software enables you to tweak individual colours. Photos in Windows, for example, does have good editing options, but you can only tweak the colour in terms of Saturation, Warmth and Tint.
There are ‘auto-enhance’ controls, but they can quite dramatically alter the look of an image, and I subscribe to the principle ‘as near to natural, and to the original, as possible’.
I’ve been fortunate to have been using Photoshop for 30 years, and as well as all the basics like crop and rotate, it has some excellent tools for tweaking colour, which I used from time to time instead of, or as well as, the colour restoration facility in the scanner software itself.
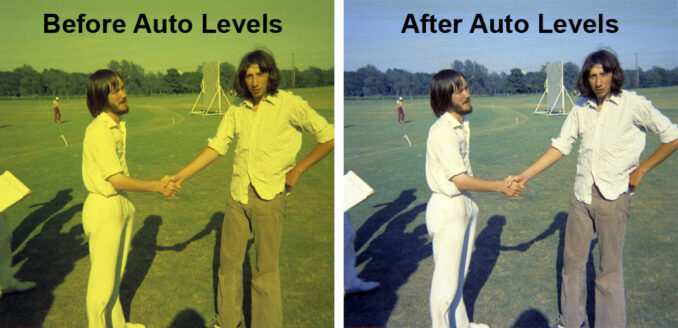
In particular, there is one Photoshop option, unassumingly named ‘Auto Levels’ (also known as ‘Auto Tone’), which is as near to photo magic as you can get, as it can restore photo colour which has deteriorated over the years into something approaching its original state.
Many of the budget price colour prints people used to get through the post in the 70s and 80s have fared badly with age– we’ve all seen prints of that era which are more red-brown than naturally coloured, while others can be very blue, or drenched with yellow.
See ‘the handshake’ photo below for an example of ‘Auto Levels’ in action.
Photoshop also has tools to enable you to remove dust, spots and imperfections – most notably the ‘Clone Stamp’ tool, which enables you to ‘paint’ over imperfections by copying and pasting suitable, good colour or texture, that is adjacent to the problem area.
Another interesting editing option, available in most photo editing software, is the Saturation/Desaturation option already mentioned. Using this tool on ‘full’ can remove all colour, and render an image to black and white – especially useful in the case of deteriorated black and white photos, where stains and stray colours may have appeared with age.
It also gives you the option to remove the colour from tinted photos, but you have to decide if it’s better to retain the charm of an old tinted photo, or ‘modernise’ the photo to black and white.
If you do remove the colour, it may be necessary to make adjustments to brightness and contrast to complete the job.
Practise makes perfect, and hopefully you end up with a good result for all your effort: a nice, tidy, well-balanced JPEG (pretty much the standard format for digital photos), and a file of several thousand pixels on the longest side. 3000-6000 pixels is the target range.
Dating, Titling, Cataloguing and Filing
Once scanned, and you’ve got a satisfactory result for each picture, the job still doesn’t end, because now all your photos are digital, it’s possible to embed all kinds of information into the files.
Titles, the date or the approximate date the photo was taken, the subject of the photo, the names of the people portrayed, and so on. This will be helpful to you in the future, and will be invaluable for those that come after.
Every one of my images is now in a folder, or sub-folder, each image has a title, and the name of every known person, and any significant objects in the photo have been embedded in tags – i.e. John Smith, Car, Guitar, etc.
I chose to include dates in the titles of my images, so, for example, in the folder ‘1970’, there’s a sub-folder titled ‘1970-12 Student Arts Cruise’, and that sub-folder contains all the photos pertaining to that subject.
Each image file in that folder is titled: ‘1970-12 Student Arts Cruise’. An identical title can easily be added to all image files in a folder using the Windows Properties box. I imagine it’s the same with other computer operating systems.
You can then tack further details about the subject matter to the title in each file individually, or in small groups, so title tags end up looking like this:
1970-12 Student Arts Cruise – Santorini – Path up to Thera
1970-12 Student Arts Cruise – Acropolis – Erechtheum Caryatid Porch
One thing I found very useful was software that enables you to change the date the ‘old photo’ was scanned, to the date, or approximate date the original photo was taken.
I used a bit of software called Exif Pilot to insert or correct the ‘date taken’ field – well worth doing for when you view your photos in software that organises photos in ‘date taken’ order.
I divided the family photos into three categories:
1. Old Photos (anything taken before I was born)
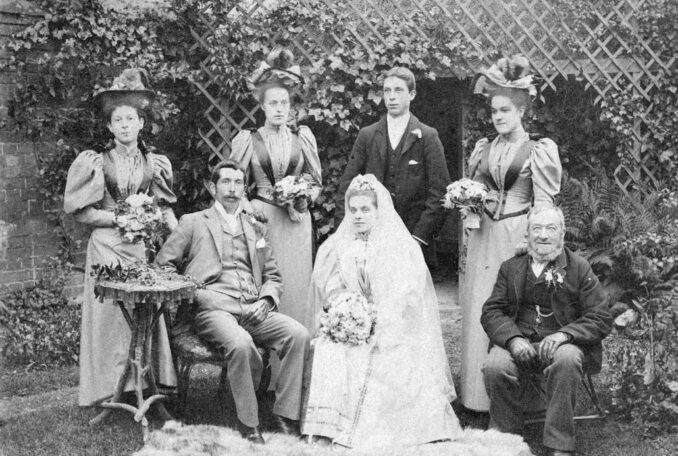
These were the hardest photos to catalogue, because there’s nobody alive today who could name the people depicted. I knew who a few of the people were, but not the vast majority. I can remember being shown some of these photos as a child, but I could only remember a handful of names.
Blessed be any ancestor who dated the photos, added people’s names, and identified the locations!
By reviewing the photos several times, and getting to know all the faces, cross-referencing them in different photos, comparing people’s younger faces to their older faces, and using vaguely remembered snippets of memory from childhood, I found it possible to identify a decent number of people.
To assist in the identification of the people in the photographs I couldn’t put a name to, I added the tags Unknown Man, Unknown Woman, Unknown Child, Unknown Baby to the image files, as necessary.
It was then possible to easily find all the photos containing unknown people, and familiarise myself with all the faces, and where I recognised the same face in several photos, I refined the Unknown tags to Unknown Man 1, Unknown Man 2, and so on, where it was possible to do so.
Also, ancestry websites can be useful, if you’ve had a go at building a family tree. I was lucky, and found a few photos of ancestors I have in common with other members who’d added photos to their trees. I got a few more names this way.
Sadly, most of the really early photos – pictures of so many people – will probably remain anonymous for eternity.
2. The Modern Era (photos taken on film after I was born)
Easy peasy. The Old Man and myself had given most photos decent, if short titles, and dates, and I knew who most people were, so this information was easily added to the new digital versions of the old photos.
3. The Digital Photos
Even easier. Digital photos are automatically dated when they are taken, and the location may even be added using GPS. It’s easy to add titles, and the names of the subjects.
The information now embedded in all your pictures will enable you to easily search your photos in the future, whether you are looking for a particular person, a favourite car, or location, for example.
A Note About AI
I’d finished my work on the old photos before AI really came to prominence. We’ve all seen how AI can create great images out of thin air, and with the capacity to do that, it can surely do a great job of retouching and redesigning old photos, especially if the original is in pretty poor condition.
A quick internet search reveals that lots of AI-powered software is now available for restoring old photos. It uses algorithms to automatically fix and enhance images, particularly those that are old, damaged, or low-quality.
These AI tools can remove scratches, dust, blur, and even colourise black and white photos. Names of popular AI options include CapCut, Nero AI Photo Restoration, Picsart, VanceAI, PhotoGlory, Topaz, and of course, good old Adobe Photoshop.
Such tools are certainly worth investigating if you’re thinking about scanning your photos, but if all the originals are in good condition, with good, true colour in the case of colour images, cropping the scan (if necessary) may be all you need to do, which means you wouldn’t get much use out of AI.
If I was starting the job again today, I wouldn’t use AI, but would stick to the hand-finished approach, using Photoshop’s pre-AI tools to retouch the images – based on a belief that the human eye is better than a computer brain.
The Era of Digital Photography
The job of scanning the old family photos largely came to an end when I came to photos taken in the year 2000. I got my first digital camera that year, although I continued using film occasionally, taking another 584 pictures on film before finally going fully digital in May 2009.
I’d been thinking about buying a digital camera for some time, but was put off by the very high prices. In the end I got a Fujifilm Finepix 1300 in 2000, and paid about £200 for it, as I recall. I took 328 personal photos with this camera, and many photos of business stock, and of my Old Man’s artworks.
Ten years later, I upgraded to a Canon Ixus 100IS, which could also shoot digital video. This was a great camera, and I took 1501 personal photos with it, many photos of stock, and plenty of videos.
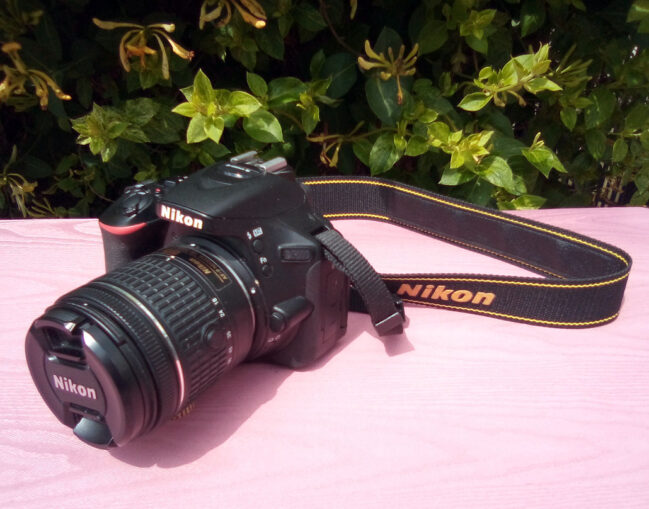
The Canon eventually developed problems (grit in the retractable pop-out lens?), so I bought my current, and third digital camera, a Nikon D5600 DSLR two and a half years ago. I’m up to 858 personal photos with this one already, and of course it, too, can shoot video.
Taking photos with digital cameras is so easy. Even with top of the range kit, you can still use point and shoot. There’s no fussing around with getting the exposure or focus right – something which was an integral part of the ritual of film photography. You can, of course, still take photos manually with the best digital cameras, if you want to.
Sometimes I’m amazed when people say they threw out all the old negatives and photos when they cleared a relative’s house. I simply couldn’t do that, and wonder how many people eventually come to regret having done so. I’ve met a few.
As for my family’s old photos, it was hard work digitising them all, but it was thoroughly enjoyable, and the results are well worth the effort.
It would have been lovely to have had lots of old negatives to scan, rather than just tatty old prints – but the negatives had all been discarded years ago, apart from a dozen or so, which dated to around the 1920s.
All the very early 19th century studio photos, taken by professionals, have lasted well, but the quality and condition of many of the home-produced ones, probably taken on an early Kodak Brownie box camera, then developed and printed by the Old Man all those years ago, have not.
And the final digitisation tally? I scanned, cropped, and retouched 8,631 images, but I won’t say how long it took.
See Also
Text & Images © 2025 NeverUpToTheJob