Introduction
Sometime in mid-2017 I casually remarked to the chap shooting at the next bench to me that I had long been fascinated by the Westley Richards ‘Monkey Tail’ transitional rifle but had never actually seen let alone handled one. ‘I’ve got two,’ he replied. ‘I’ll bring one in next week for you to have a look at.’
True to his word, the rifle was produced the following week and it was love at first sight. Fast forward a year and money having changed hands, it was mine. My problem now was how to bring it back into commission for use at the range and it is this quest that you have to thank (or curse) for providing the impetus for this whole series of articles.
The Transitional Rifle
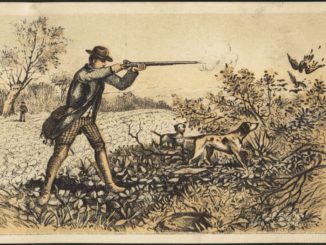
By the mid-19th century, the muzzle loading rifle, despite its shortcomings, had proven to be devastatingly effective as a battlefield weapon and, by the standards of the day, capable of incredible long distance accuracy on the target range. Throughout the 1850s, before the brass cartridge case had been perfected, gunsmiths in Europe and the USA were experimenting with breech loading rifles that used combustible paper or linen cartridges ignited by the flash from a percussion cap. These are known as ‘transitional rifles’ as they bridge the gap between muzzle loaders and true breech loaders that use self-contained or ‘fixed’ ammunition in the form of a metal casing containing powder, projectile, lubrication where necessary and means of ignition.
Breech loading was by no means a new concept in the 1850s, indeed breech loading cannon were recovered from the wreck of Henry VIII’s flagship the Mary Rose that foundered in action off Portsmouth in 1545, but they had one major problem and that was, how do you seal the joint between breech and barrel effectively when the piece is fired? At least with cannon the gun crew could stand well back at the moment of discharge but with rifles that are held close to the face for sighting purposes it was a completely different matter.
One of the most successful early breech loaders was patented by Christian Sharps in the USA in 1848. The Sharps’ rifle used a falling breech mechanism that was lowered to expose the rifle’s chamber by pressing down on the trigger guard. A paper cartridge that was slightly too long to fit in the chamber and containing a lubricated bullet and powder could then be pushed into the breech and when the trigger guard was raised it sliced off the rear of the cartridge with a guillotine-like motion to expose the powder as it sealed the breech. A cap was then placed on the nipple, the hammer cocked and the rifle could then be fired. Many of the early Sharps’ rifles were fitted with the Maynard tape priming system described in an earlier article.
The Sharps’ rifle soon earned a reputation for long-range accuracy and the 1853 model was used extensively by Union forces in the American Civil War and by ‘Berdan’s Sharpshooters’ in particular as a very effective sniping rifle.
I have fired modern reproductions of these early Sharps’ rifles and found that powder spillage from the cut cartridge together with a build-up of fouling in the breech seal can, unless the excess powder is carefully brushed away and the breech seal is kept scrupulously clean, lead to painful blow-back into the shooter’s face which inevitably induces flinching as the trigger is pulled.
Amazingly, in the late 1830s the Thuringian gunsmith Ferdinand von Dreyse had developed a bolt action rifle that fired a paper cartridge that contained its own percussion cap. When the trigger was pulled, a thin needle-like firing pin sprang forward piercing the cardboard base of the cartridge. It then passed right through the powder to strike an internal cap that ignited the powder charge. These Zündnadelgewehr or ‘Needle-guns’ were adopted by the Prussian Army in 1841 and though flawed proved far superior to the muzzle loading rifles still being used by the Austrian Army during the Austro-Prussian War of 1866. The British Government obtained a needle-gun to evaluate in 1850 and even made a few copies but, after a series of trials in which breech sealing and rapid needle erosion were criticised, the principle was rejected in favour of the Enfield Pattern 1853 rifle-musket. However, the writing was clearly on the wall; breech loading was the way forward and the days of the muzzle loader were numbered.
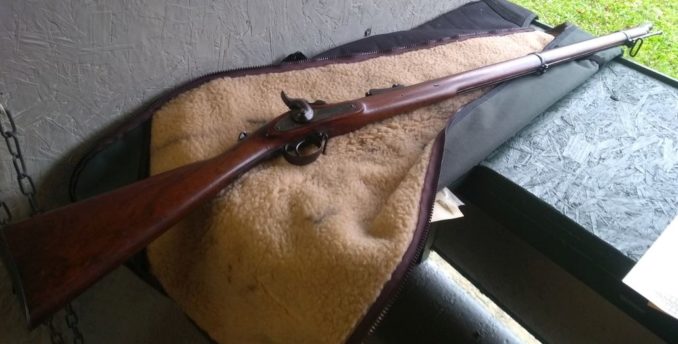
The Westley Richards .451 ‘Monkey Tail’ 1858-1881
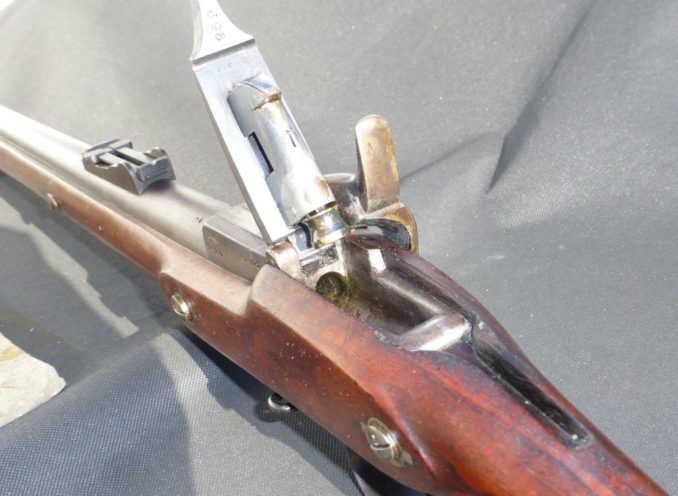
William Westley Richards founded his gun making business in Birmingham in 1812 and soon established a reputation for excellent workmanship and innovation that continues to this day. His son Westley Richards took over in 1840 and ran the business until his retirement in 1872. In 1858 after collaborating with Isambard Kingdom Brunel and Joseph Whitworth on the development of a new rifling system, Westley Richards patented what many consider to be the best capping breech loader of them all, the rifle that was to become known as the ‘Monkey Tail’ due to its open breech lever that was said to resemble a monkey’s tail.
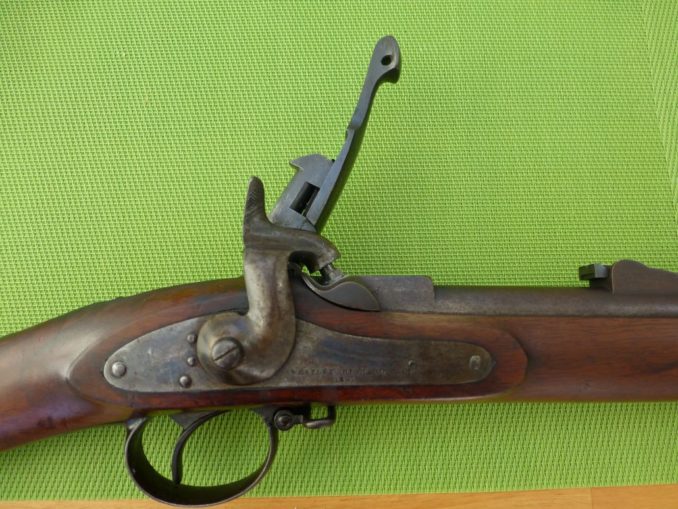
When compared with other breech mechanisms of the day, that of the Monkey Tail is simple and efficient. To load the rifle, the lever is raised to the vertical position exposing the chamber into which a paper cartridge is inserted. With the lever lowered the hammer can be drawn back and once the nipple has been capped the rifle is ready to fire. This can of course be done while lying prone behind cover.
Westley Richards’ genius lay in his use of a greased felt sealing wad that was glued onto the base of the filled cartridge. When the rifle is fired, a jet of flame from the nipple blasts through the paper cartridge and ignites the powder. This blows the wad rearwards expanding it against the gunmetal plunger in the breech mechanism thereby sealing the breech. When the next cartridge is loaded, the wad left behind from the previous cartridge is pushed ahead of the bullet into the throat of the rifling and is then fired out ahead of it. The used wad helps keep powder residues soft and cleans the bore before dropping off the bullet shortly after it exits the barrel.
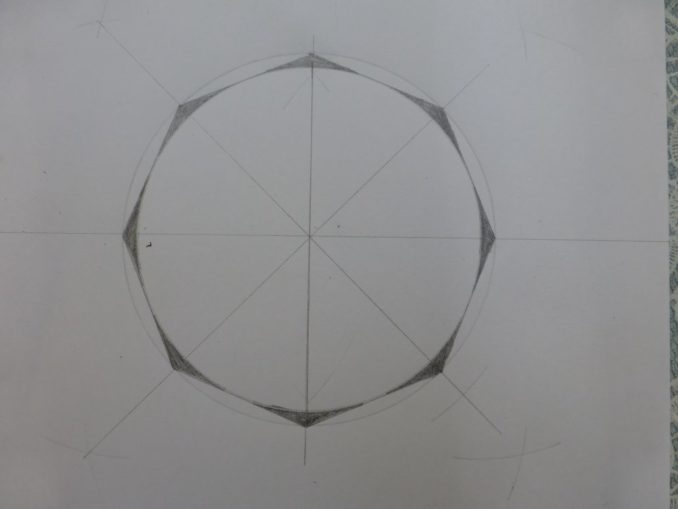
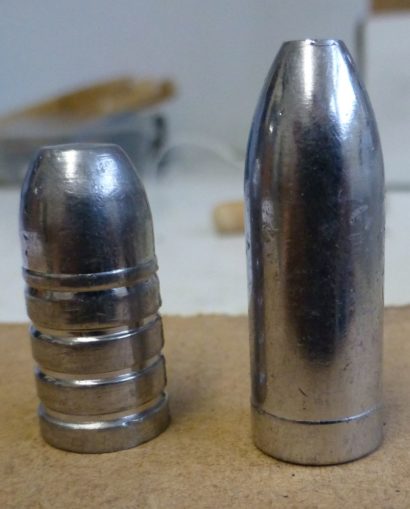
The rifling follows Whitworth’s principles but differs in being octagonal rather than hexagonal and designed to take a cylindrical as opposed to a mechanically-fitted bullet. The bullet is unusual in that it is ‘bore riding’, that is, the main cylindrical body of the bullet is designed to self-centre in the circular portion of the rifling while the slightly raised driving band at its base swages into the octagonal section causing it to grip the rifling and spin. This is a bit hard to visualise so, for my own better understanding, I drew out a cross section of the bore to illustrate it. The sharp angles in the shaded portion should really have been rounded off.
The Monkey Tail faced a lot of competition at a time when firearms design and technology were racing forward and if only Westley Richards had concentrated earlier than he did on converting his rifle into a centrefire, metallic cartridge weapon he would have been assured of great commercial success. As it was, only a few British cavalry and militia units were equipped with carbine versions while 10,000 carbines were supplied to the Portuguese government. Although records are incomplete, according to Robert Betteridge the acknowledged expert on Monkey Tails, it would appear that somewhere in the region of 64,500 rifles of various types were produced of which around 800 are known to have survived.
From its serial number, my 1861 dated, 36 inch barrelled rifle is one of a batch of 3,000 ‘military match and prize’ rifles and with only around 80 of these known to have survived it is quite rare.
The 25 inch barrelled rifles proved very popular with the Boers in South Africa who prized them for their accuracy and the fact that in the non-availability of pre-manufactured cartridges, either factory or homemade, they could be muzzle loaded. It is said that a Boer youngster was expected to be able to hit a hen’s egg on top of an anthill at 100 yards with a Monkey Tail before he was considered to be a competent shot and also that the Boers’ hit rate on a man-sized target at 800 yards with the Monkey Tail was 50 per cent.
The 36 and 39 inch barrelled rifles also did exceptionally well in competitions on the Wimbledon ranges dominating the field from 1860 until they were banned from competing in 1886 by a change of rules that only permitted the use of self-contained ammunition. Monkey Tail production continued into the 1880s by which time metallic cartridges was well established. They were declared obsolete by the British military in 1881 but continued in use into the 20th century which is an incredible achievement for a transitional rifle.
Research and paper cartridge making
One of the problems with shooting unusual old rifles is that contemporary records detailing exactly how they were used can be difficult or impossible to find and when found can prove to be contradictory. While researching Monkey Tail ammunition, I was fortunate to find a copy of the original military specification and detailed construction information for the carbine cartridge that was a very good starting point from which to begin my experiments.
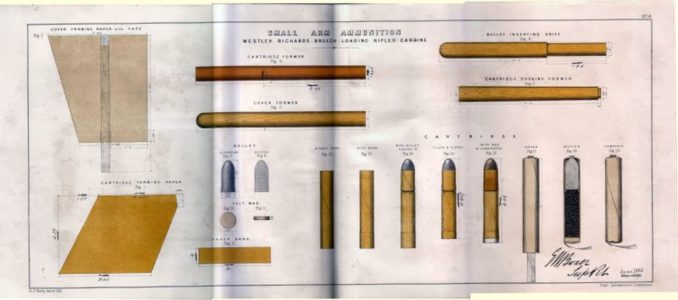
This proved to be a real godsend as although the cartridge dimensions and powder charge for my rifle are different from those shown, it nevertheless illustrates the method of construction and the special tools required which were easy to fabricate from standard half-inch dowel using nothing more sophisticated than sandpaper and a Stanley knife.
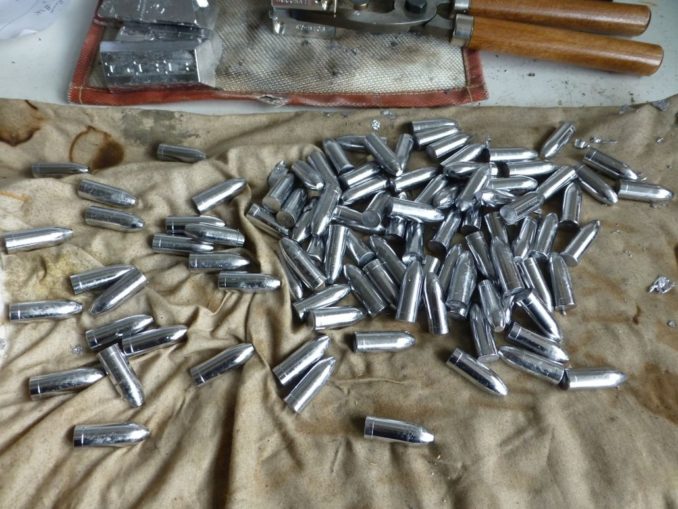
The first problem I encountered was that the carbine and the rifle used different sized and different weight bullets. Further surfing the Internet led me to a company in Salt Lake City that manufactures bullet moulds for obsolete rifles and pistols; a few weeks later and £120 out of pocket, I had my new Monkey Tail mould and was ready to start casting.
Which paper to use for the cartridges was the next consideration and here I tried a few types and thicknesses before settling on 100 per cent cotton rag ‘onionskin’ copy paper that I just happened to have lying around. I don’t have a clue how I shall be able to get further supplies when it runs out as onionskin hasn’t been made since the need to keep carbon copies of business correspondence died out some decades ago.
When I got the rifle it had not been fired for more than 20 years so, after it had been ‘put on ticket,’ I made up a dummy cartridge filled with semolina to see if a cap would pierce the paper. It’s a good job I checked as the wrong nipple, a standard Enfield type, had been installed instead of the special Westley Richards one that produces a narrower, more intense jet of flame. Fortunately Peter Dyson, a well-known figure at UK antique arms fairs, makes replicas at £15 each so that was soon rectified.
Modern writers all seem to agree that the original, factory made cartridges were formed using nitrated (combustible) paper. To make this, the paper sheets must first be well soaked in a saturated solution of potassium nitrate (saltpetre) and then left to dry overnight before cutting and assembly. I have experimented with both plain and nitrated papers and can discern no difference in performance so I doubt whether Westley Richards would have bothered with this additional step if it wasn’t strictly necessary – but I remain open to correction on this.
Making the cartridges is a bit fiddly and most Monkey Tail shooters appear either to muzzle-load them or to make up non-authentic and much simplified cartridges. I may be making a rod for my own back here but, following the principle that ‘if a job is worth doing then it’s worth doing right,’ I will follow the methods used in the 1860s as closely as possible and try to replicate the Victorian era ammunition. Here’s how I go about doing it.
1. Making the paper tubes
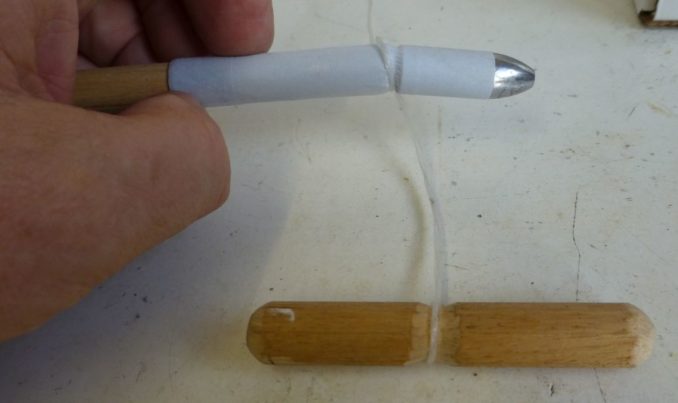
Determining the correct length for the tubes that form the cartridge cases is ongoing as while I have been able to discover the dimensions of the cartridges for the carbine and for the 25 inch barrelled rifle, nowhere can I find any information about loading the 36 and 39 inch barrelled target rifles with their longer chambers. The paper is rolled around a slightly tapered dowel and the overlapping edge is glued with sodium silicate (water glass) applied with a cotton bud. The base reinforcing band is then glued on before the completed tube is removed from the former.

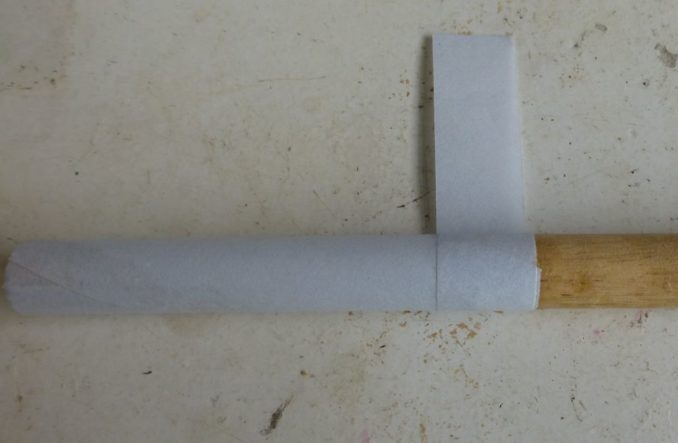
2. Inserting the bullets
As the mandrel used to form the paper tubes is very slightly tapered, the bullet is held tightly by the paper when it is pushed into the cartridge case to the correct depth using the gauge.
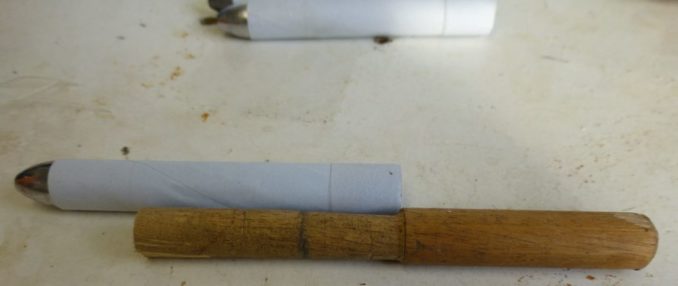
3. Choking the cartridges
With the bullet correctly seated in the paper tube, it now needs to be ‘choked’ and tied off to keep it secure and to make it flexible in order to ease loading. This is done using a dowel with a stepped end that is pushed into the tube until it touches the bullet base. A length of twine fixed to the workbench at one end is then looped around the tube just below the bullet and pulled firmly to create the groove for the linen thread. The bullet can then be tied off with a couple of turns and a reef knot which, because of the choke, lies below the surface of the cartridge.

The cartridge is now ready for filling.
4. Filling the cartridges
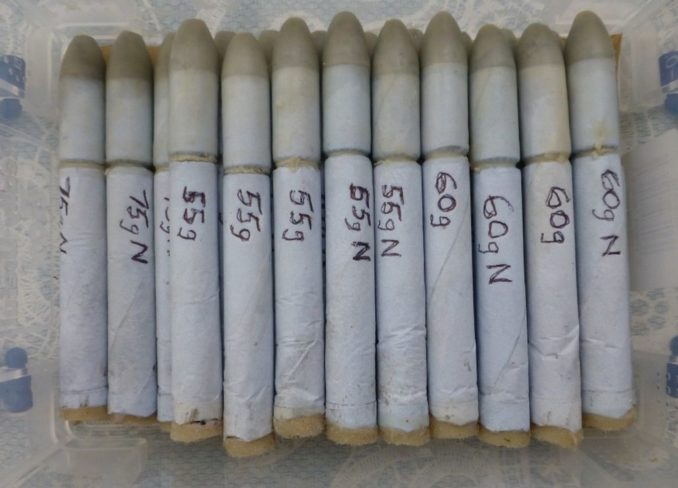
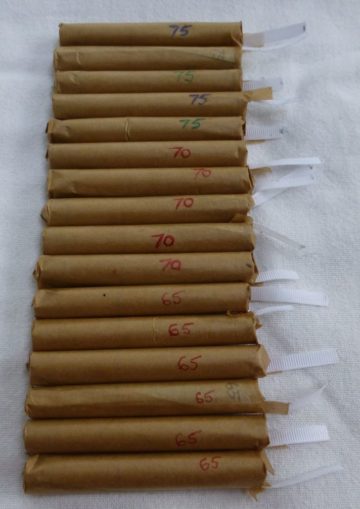
Original cartridges would now have been filled with the appropriate amount of medium grade black powder (carbine 55 grains; rifle 70 grains) but as I don’t yet know the correct amount for the long rifle, I am having to proceed by trial and error. In order to vary the amounts of powder, I use different quantities of an inert filler (semolina) to reduce the powder charge. Thin cardboard disks cut from orange juice cartons using a wad punch are ideal for this. I put one behind the bullet base, pour in the required amount of filler and separate this from the powder with another card disk. Once the cartridges have been filled, the ends are turned over and glued and a felt wad is glued onto the base. It is important to mark the cartridges with the amount of powder contained for accuracy comparison at the range.
Sealing the ends of the cartridges neatly and flat has proved to be very difficult and the only guidance I’ve been able to find was that ‘a copper knife is used for this purpose’ which is not particularly helpful. I have recently tested a small batch of cartridges with the wads glued into the ends of the tubes rather than on top of them. This has made for a much neater and stiffer cartridge that still effectively seals the breech so they are looking promising.
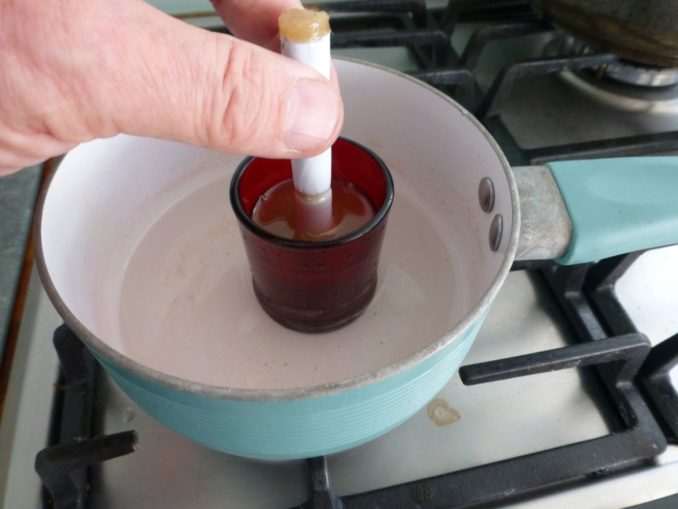
5. Lubrication
Lubrication is necessary to reduce friction between the bullet and the barrel, to help keep the powder fouling soft and to ensure that the felt wads seal the breech. Westley Richards’ own lubricant recipe gives directions for making industrial quantities and includes some ingredients that I’ve never even heard of such as ‘distilled resin’ and ‘lead soap.’ Instead I make up my own lube from beeswax, Trex and fully-synthetic engine oil which I heat up and liquefy using the ‘Bain Marie’ principle. When good and hot I dip first the wads and then the bullet ends of the cartridges down as far as the choke.
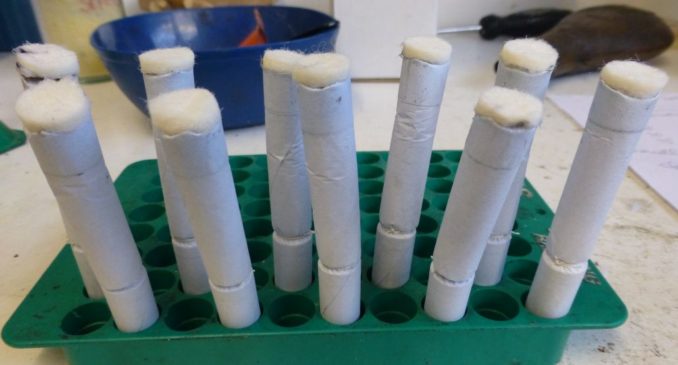
6. Making the protective wrappers (optional)
Original cartridges were supplied in individual paper wrappers to protect them in transit. To make them, another paper tube with a glued on length of linen tape is rolled around a former, one end is closed, a cartridge is inserted and the base is then turned over and glued. To use them you simply pull on the tape to strip off the wrapper which is then discarded. I don’t usually bother but I had to have a go at making them, didn’t I?
Shooting the Monkey Tail
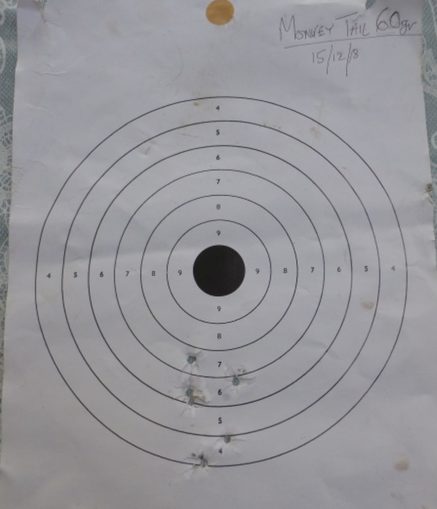
As the rifle is still relatively new to me and I have so far not met anyone with experience of shooting Monkey Tails, progress has been a bit slow and to date a tad disappointing so far as accuracy is concerned. Getting the cartridges to chamber and work correctly was the first hurdle to overcome and now, apart from the very occasional misfire, probably due to modern caps being less feisty than Victorian ones, all is performing as it should with no discernible escape of gas from the breech.
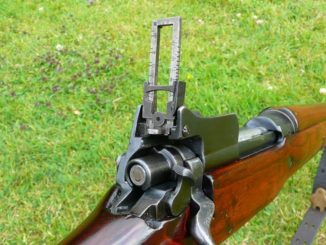
Another problem I encountered was that a non-standard rear sight element had been soldered onto the rifle’s sight ladder with a notch that was off centre. Fortunately, a good friend offered to make and fit a replacement so ‘windage’ is now correct. Further minute side-to-side adjustment is available at the foresight which is on a dovetail base that allows it to be tapped to left or right.
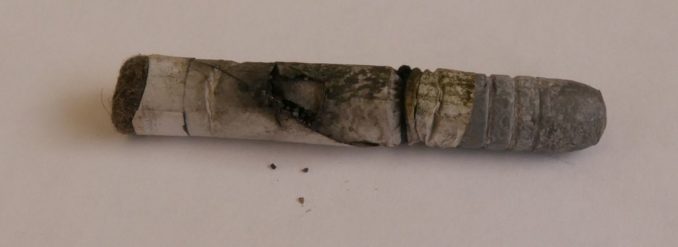
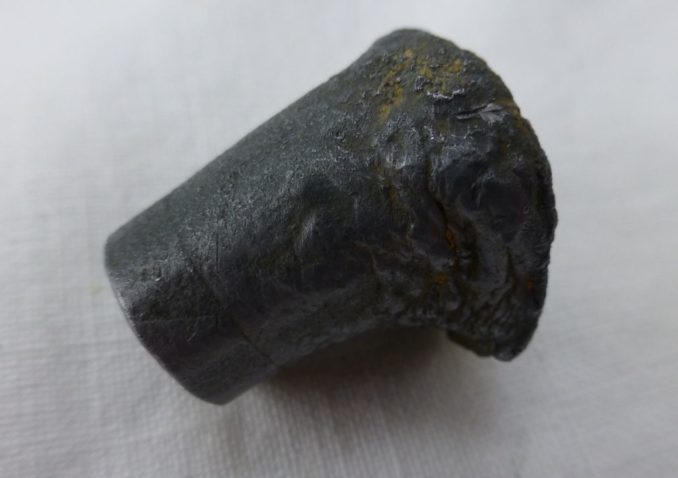
The one bullet that I have so far been able to dig from the backstop clearly shows how the driving band is distorting correctly into the rifling while the recovered scraps of paper cartridge and wads show that they too are performing as intended.

Conclusions
Bringing long-obsolete firearms back into use can be very frustrating but at the same time it is challenging, enjoyable and very educational. With the benefit of hindsight, transitional rifles were of course doomed to failure as their ammunition could only be handmade and hence was very labour intensive to produce. The cartridges were also susceptible to moisture. As a result, capping breech loaders were rapidly replaced both on the battlefield and at the target range by rifles shooting fixed ammunition once the technology to make the metal cases became readily available.
In the next article I will look at how the British military made the transition in the 1870s from the Enfield rifle-musket that had served them so well for 20 years to that iconic rifle now so symbolic of Empire, the .577/450 Martini-Henry.
© Tom Pudding 2019
Audio file