If you are in a position where you are needing a dedicated place to work from home but do not have the room inside, a shed/garden room may be a suitable alternative. Prices vary enormously based on the size and quality of the room and how you choose to convert it. Below I run through my experience of initially requiring a small home workshop and, due to Covid, end up having to convert it to a home office.
A compromise of the house I bought in 2018 was one bedroom less than ideal (a previous owner, at some point, had moved the bathroom upstairs). The area was desirable though and it ticked almost every other box. I knew there were at least a few other interested parties so I went in at the asking price. By the end of the week myself and three other parties had been asked to submit best and final. Seven weeks later I picked up the keys.
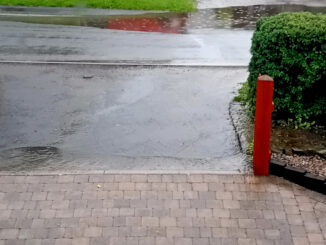
The house did not need anything dramatic doing to it beyond neglected upkeep. For example, the conservatory leaked quite a lot; the kitchen was tired and with a bit of re-jigging could be much nicer; the bathroom needed a bit of attention including changing the taps and installing a shower screen. Whilst these were not by any means large jobs, being strapped for cash (or, too tight with a belligerent belief that I can do anything sufficiently well) I set to thinking I would give it all a go.
I’d rarely if ever picked up a tool; my brother was blessed with the practical genes but he was busy with a young family and travelling for work. Rather than go full-hog on the house straight away it occurred to me that if I were to replace the existing shed with a new one and make it into a workshop this would provide valuable tool-time before unleashing myself on the house and also provide a good working area outside of the house.

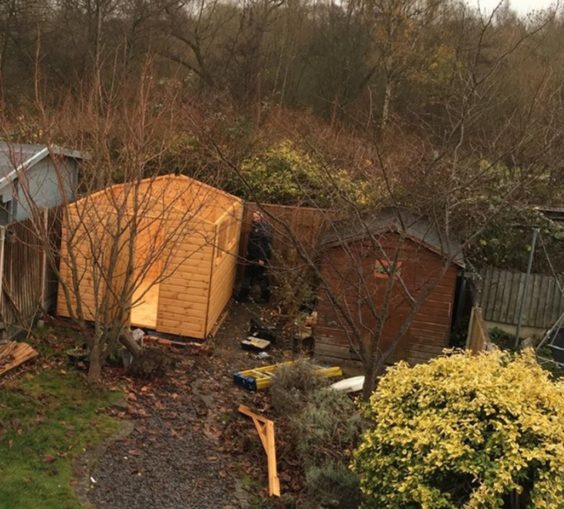
There was an existing shed in the garden already. This was a tongue and groove 8x6ft with a 2ft storage area at the rear. It would have been quite expensive originally. The garden backs on to a railway which subsequently separates the house from a nature reserve. The vegetation grown from the railway embankment hadn’t been kept on top off and had grown through the coal store and into the main compartment. Fortunately there was no Japanese Knotweed or Giant Hogweed. Additionally, there was a rats’ nest (they ate my supply of ready-to-eat rations reserved for wild camp hikes). It was not, then, fit-for-purpose. A friend suggested listing it on Gumtree which resulted in two chaps dismantling and collecting it and paying £40 the privilege. Win win for all, I think.
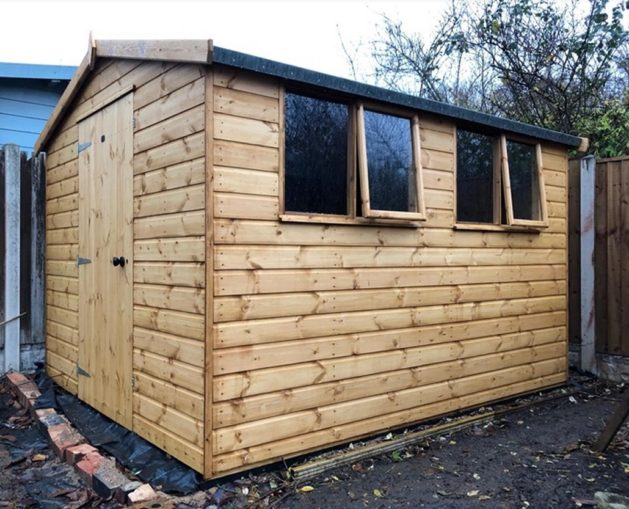
The new shed was to go in the opposite corner to the old one. This was mainly to help shelter the windows from prying neighbours more than anything else but would also catch more sun as it would be south facing. I decided to go as big as I thought the garden could comfortably accommodate and so settled on a 10x8ft. Of the three shed cladding types (featherboard; shiplap; tongue and groove) shiplap afforded the best quality-price—size comparison. I ordered in November from a local manufacturer and used the less-than-busy-time-for-shed-buying to negotiate on the price and have thrown in upgraded windows (single paned glass instead of plastic) and a wider door (useful for the equipment I had planned for the workshop). The original list price was £1,250; I paid £950 delivered and assembled. For comparison a featherboard would have been around £650; tongue and groove £1,500. (Keycraft, Hucknall, Nottingham).
I did not want to reuse the old shed’s base (old patio slabs; upon removal I discovered these were lying atop an old poorly-backfilled pond; they were listed on Gumtree and sold for £1/slab). There are many ways of making a suitable base. As I had planned on having reasonably heavy equipment in the shed (remember at this point it was to be a workshop-type area) I needed something sturdy.
Options include just resting the shed’s bearers on the bare ground / grass (poor choice as it will sink in places); laying some patio slabs (reasonable amount of work, fiddly and the rain will pool); or even undertaking a concrete pour (OTT). I decided to use gravel boards. You may have seen these at festivals, country homes, or anywhere that requires a high-strength temporary road.

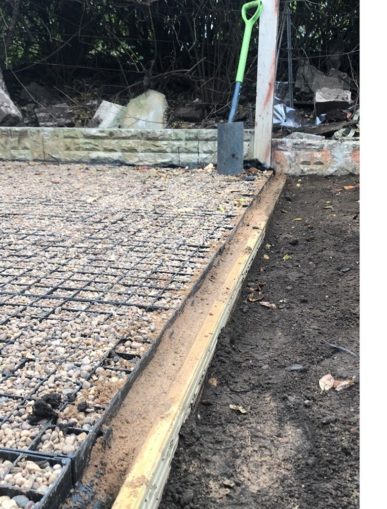
I removed the turf, hand-tamped the required area, lay a vegetation-blocking membrane (£20) followed by an inch of standard builders’ sand, another vegetation-blocking membrane and then, for the bearers to rest on, 500x500mm gravel boards (£60). The boards interlock together to increase rigidity and assist in load transfer. To increase rigidity further whilst retaining drainage ability one can fill the boards with ~10mm gravel. As I could procure this very cheaply from work it was a no-brainer. All it took was hand-balling perhaps 25 x 25kg bags from the driveway.
During installation I temporarily edged with red bricks that were in the old shed’s storage area (sold for £20 upon completion to a man in a London taxi who was building an extension and the Council had stipulated he must use recycled bricks) however later edged it with decking boards somebody local was selling for £5 (I later turned the unused decking boards into window boxes).
For the price vs performance I don’t think there is a better solution for the base. The shed has not sunk in any corner and the gravel provides excellent drainage which ensures the bearers are never sat in water which will increase their life.
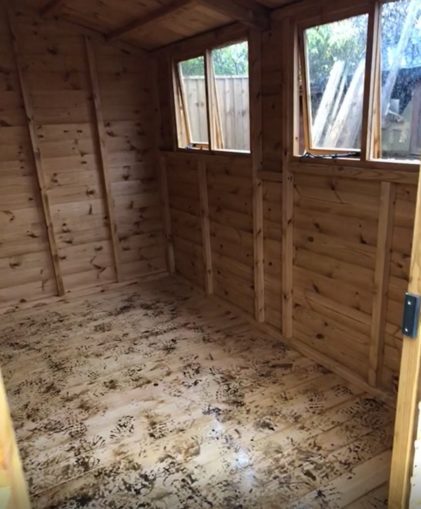
With the base laid, the shed was delivered flat-pack style on the back of a drop-side Transit from the local manufacturer. Two chaps assembled it and screwed it together in less than twenty minutes. As it was raining during assembly, the first thing I did was run an extension cord from the house to the shed, leave a window slightly ajar and pop an oil filled radiator in overnight.
By this point I had started to acquire a few tools so went round and doubled-up on where the shed was screwed together. I also went round and wherever wood met wood I used a clear standard sealant to fill the joints (this had the downside of making it almost air-tight so at a later date cut an air vent).

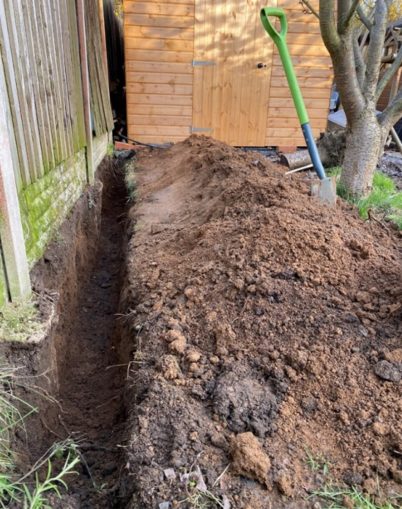
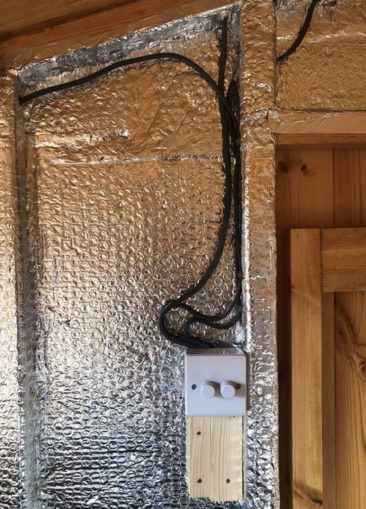
Fortunately, my brother is an electrician. I had spoken to him of the plans to make a workshop and as a Christmas present I had booked him for a day to sort the electrics. This required running a one-inch armoured cable from the house’s consumer unit to the shed’s specific consumer-unit (marketed as being good for a garage, British General 5-Module 3-Way, £28.50); running the cables for and wiring in the lights (I had settled on four dimmable, moveable spot-lights; two on each side); mount the batons between the shed frame’s uprights to provide a backing board for mounting sockets; and finally mount these (I had settled for 3 two-gang sockets internally and 1 two-gang external socket). This all went swimmingly. It took a full day, perhaps 7 hours of both of us working but by the end of the day all the cables were in.
(The armoured cable was surface-lain until the summer when I hand-dug an 800mm trench to sink the cable in to; regs state a minimum of 600mm).
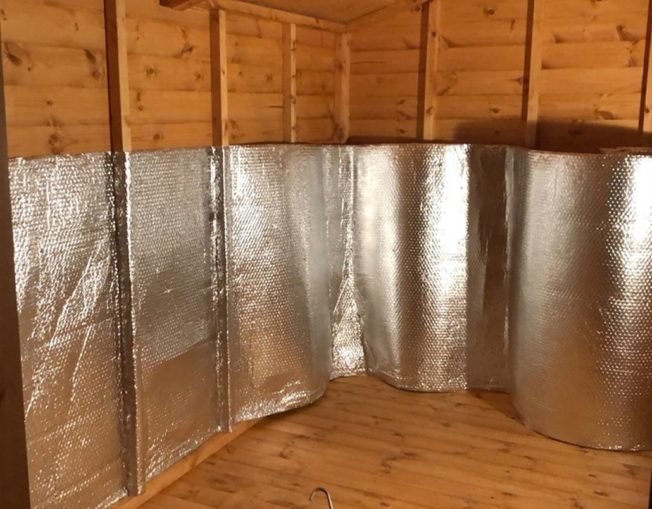
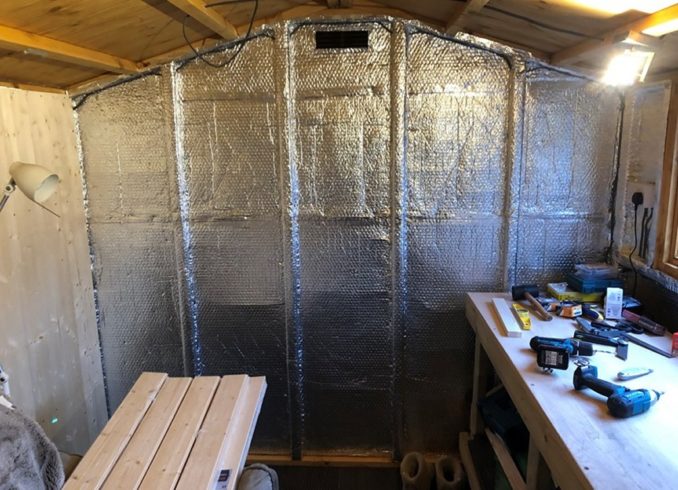
Before wiring, however, I had had to insulate the shed. The options here were almost endless and ranged from Kingspan-style insulating fit for new homes (too expensive and thick); fibre-glass loft-style insulation roll (too bulky); to aluminium-style bubble-wrap. I opted for the last one for the walls, sold by the R value of 1.455m2K/W versus price and ease of install (it took one 25m x 1.2m roll of YBS double reflective foil insulation) and cheap one-inch polystyrene for the roof (proved to be surprisingly effective, perhaps £20 for the entire roof).
The aluminium bubble wrap made it look like a spaceship but it seemed to be working. By this stage I had began putting the additional horizontal batons between the shed’s uprights for the cladding to be secured to. I opted for simple 2×1 inch planed square pine which a local merchant had on offer at the time; perhaps £15 for enough with left overs.
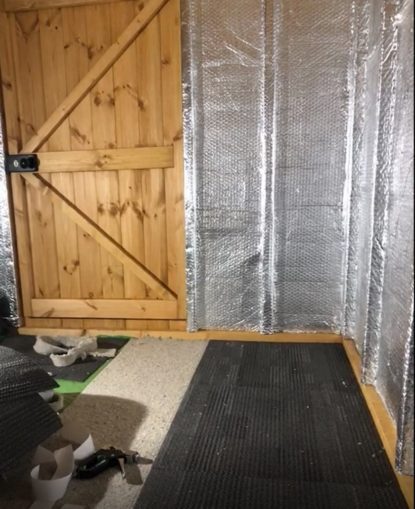
Turning attention to the floor I had decided on a three-layered approach. A simple plastic damp-proof membrane was placed directly atop the shed’s base (unsure on price, perhaps £10). Over this was lain an approximately 20mm underlay made of recycled old carpet (approximately £30 for sufficient).
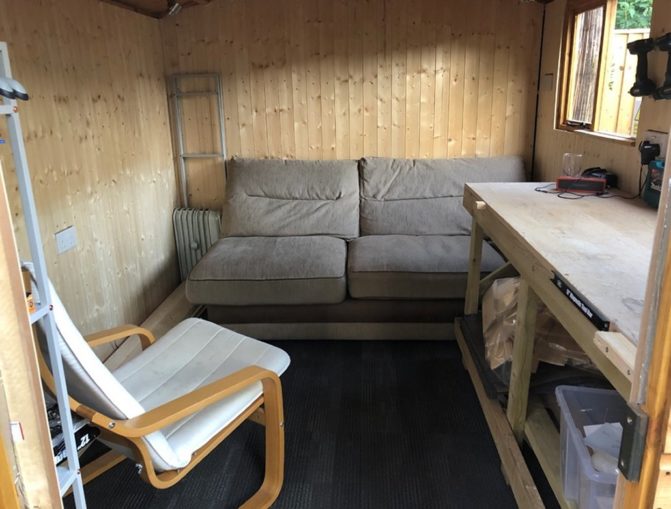
A big decision was what carpet to go for. As this was all being done in order to make a workshop I had looked at plastic-composite mats; laminate; and even rubber matting designed for garage workshops. They were all too expensive. In the end I bought a box of second-hand 500 x 500mm carpet tiles from an office refit off eBay for £25. This has proven to be a bit of bargain-of-the-century as they were dirt-cheap, hard-wearing, designed for high-traffic areas and received enough left over to be able to swap them if they become too dirty / worn through (I have yet to have to do this). I used simple double-sided carpet adhesive tape to stick to the underlay.
By this point all the functional elements had been installed so I could turn attention to the cladding. The shed/workshop had proved itself useful already with friends and family staying in it, including over Christmas. It was described as very snug.
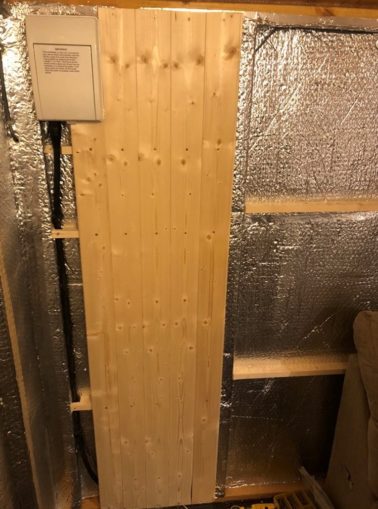
The cladding was something that needed committing to in order to ensure consistency on all four walls and ceiling. I shopped around a lot and priced up every conceivable option. My general understanding was the thicker the cladding the more sturdy and solid-feeling and thus better quality. In the end I opted for Wickes’ 7.5 – 8.0mm internal pine cladding (between £1.48 and £2.46 depending on length).
I developed a love-hate relationship with the cladding. I loved it because it was a great visual progress and increased the warmth and cosiness of the space with each length installed. I hated it because out of a couple packs of 5 you could almost guarantee a few of the boards were too warped or knotty to be useful and it was a bit too thin to feel quality. Still, it was not expensive for what it was and costs could be saved by purchasing the longer lengths and cutting them to the required length.
The installation was something I found tricky. I do not think I installed it correctly and ultimately created a lot of work for myself further down the line. I opted to pre-drill holes in each board in order to screw each board on to the batons attached to the shed’s upright. When it came to painting though, this required ensuring all screws were sunk deeper than the surface of the wood, filled with wood-filler and then sanded smooth (it also laterally curves the length of wood sometimes). Gluing the boards would be a far neater option however I liked the idea of being able to remove the boards if need be (as if this would ever happen, but it seemed important at the time). There are ways of using headless nails to fix the boards in place too however this was beyond my skill set so screws and a drill it was.
Once complete, the cladding changed the feel completely and turned it in to a room more than a shed. It was completed in stages over perhaps a year (sufficient time had passed for it the cladding to be very different colours between the new and old). It was during this time it had started to be used as a workshop cum garden-room cum wendy house for the little one. A bit of an everything-room, really. The corner piece of a sofa that did not fit in the lounge became a permanent fixture and made a very comfy seat and bed if need be. I had a few man-cave pub-nights in here but it just felt a bit contrived, so we just ended up going to the actual pub instead.
By now we are probably up to spring 2020 and commencement of lockdown one. Forced to work from home I found my back playing up sitting on the sofa for too long and getting too easily distracted being in the lounge. The workshop-shed was looking like the place to work in but had a few issues to fix first.
The WiFi wasn’t powerful enough to provide a sufficient signal so I ran an ethernet cable to be able to plug the laptop in instead. I purchased one designed to withstand the elements for a couple extra quid which seemed worth it (£20 for 30m) and a simple device which the cable plugged in to and provided 4 ethernet sockets (£6). Further, the bare cladding was now looking scruffy and I hadn’t got round to doing the finishing touches (trims, scotia, etc).
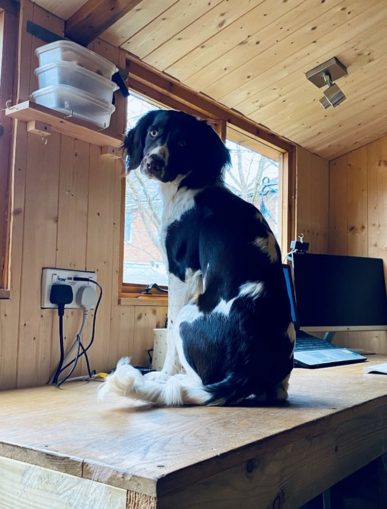
The workbench I had bought was proving a solid piece of kit so I did not want to get rid of it. Being taller than a normal desk an office chair didn’t raise sufficiently to enable it but a draughtman’s chair solved this problem (raises to 800mm).
When it came to painting this was more arduous than I envisaged. The cladding required being primed before being painted; before being primed the fixing screws had to be advanced sufficiently shy of the surface to facilitate being filled. Then it was all sanded, primed, sanded again, primed again until finally it was ready for painting.
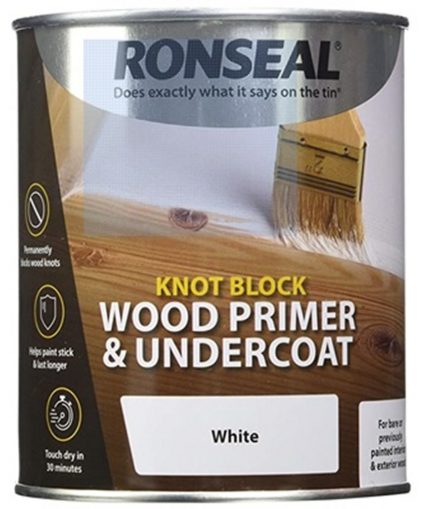
In addition to priming, the cladding also required a knot-blocker being applied. Ronseal do an all-in-one knot-blocker and primer which, touch wood, seems to have done the job very well. Only time will tell if it sufficiently stops the sap seeping through and discolouring the paint. I took time sanding between and after primes to ensure a smooth finish which would enhance the quality feel. I used 180 grit which perhaps was not quite coarse enough. 140 or even 120 would have been more suitable. Where I was lazy and didn’t sand the wood filler sufficiently irritates me now as, after painting, it is a blemish on an otherwise very lovely finish.
For paint, a sensible person would have gone for a high-sheen gloss paint to better cope with the moisture and temperature differences. However, I have always loved the chalky matt effect and magical pigmentation of Farrow and Ball’s Estate Emulsions. From a dispute we had with them I had a complimentary 5ltr tin of De Nimes that was half full. I decided on this for the back wall. For the three remaining walls and ceiling a colour called James White fitted the bill perfectly, providing a mainly white colour with a touch of green.
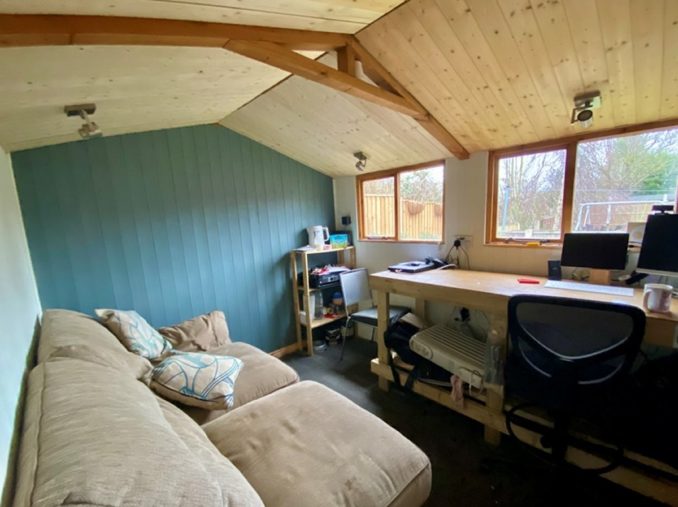
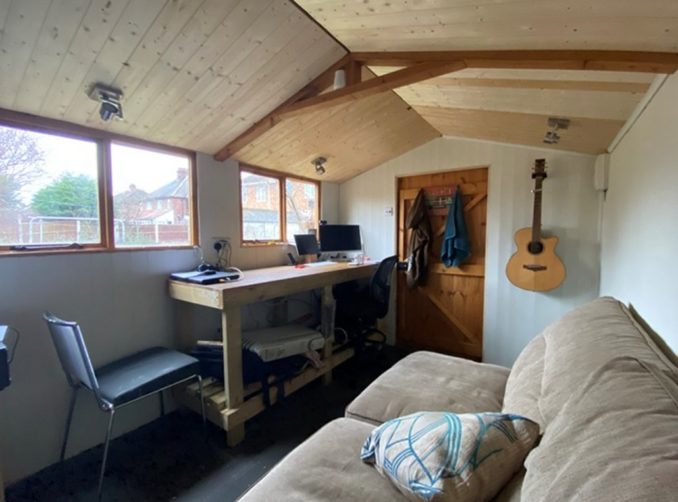
Once it was painted the shed/workshop finally became a room and, dare I say it at last, a home office. It is a very comfy room to work in and is away from the main house. Hard-wiring the internet provides a strong and stable connection which the WiIFi wouldn’t be able to provide. With a kettle, additional screen and a few things on the wall it’s really become a fantastic place to work and far from what I had originally envisaged or set out to make.
There are a few jobs which remain. The scotia I had put up in places to see how it looked tidies it up well so this will be installed in all edges. I have a kitchen work surface trim to hide the join in the apex of the roof. I am unsure whether to paint this. Likely I will, but in time.
In summary then, what was done well?
- Shed base. For £60 the boards perform brilliantly and are quick and easy to install.
- Size & shed cladding (shiplap). Any smaller would’ve been impractical and not flexible enough; larger would be too big for the garden. Featherboard would not have been sufficiently durable or last long enough; tongue and groove was price prohibitive.
- Ceiling insulation (one inch polystyrene).
- 2 rows or 2 angled dimmable spotlights provides really flexible lighting and, dare I say it, mood lighting
- I allowed for 6 sockets internal and 2 external. The external were a great idea for when lawn mowing/using pressure washer or even having garden lights.
- Carpet / carpet tiles. These were a real bargain, £20 and fit the bill. They are not the most attractive but neither are they particularly hideous. Hardwearing and easy to clean.
- The quality paint choices aided creating a quality finish and a welcoming space. After all, I now spend more time in this room than any other in the house.
And not so well…
- Sealing everywhere wood met wood. It can be a real sweat box at times. Fortunately, the glass windows help with condensation and can be opened a little to ease the mugginess if it gets too much. The air vent I added is insufficient and is actually covered by the cladding so likely ineffective.
- Floor insulation. I had overlooked how essential this was. In winter the floor can get very cold as there is probably a 3-inch gap between the shed base and the gravel boards. I have considered buying an electric underfloor heating matt which aren’t too expensive, but maybe this is one for next year.
- I went for the cheapest. It bends, it warps, it leaks sap and it’s very thin. But, it was cheap and the next thickest was a lot more expensive. It does the job.
- I am in two minds about the YBS foil insulation. It works, without doubt, and is easy to install. Its performance doesn’t seem as stated; however, it is not installed for optimal performance so perhaps I should take this one on the chin.
- Positions of the sockets. These were solely positioned to be accessible when using the workbench, which was a foolish assumption. They just appear peculiar now and look untidy.
- Other than the above it is mainly my inexperience with tools (e.g.: being too lazy on sanding; wonky edges on cutting of the boards; relying too much on scotia and trim to hide poor work).
© Cromwell’s Codpiece 2021
The Goodnight Vienna Audio file