In recent times, SwissBob (PBUH) has prevailed on me to do some of the laying up of articles from you fine puffins. Yea verily his guidance is gospel and must be followed.
No doubt I have frustrated him endlessly by not following his advice or not having the info in the first place. So here is your cut out and keep Process and Style Guide for the laying up of articles, and also some tips for content creators to make the editor puffin’s lives easier.
Firstly you will need a WordPress (WP) account – not a disqus account. SB can sort you out with an account, be aware that if your username is longer than 8 characters and you try to reset your password, the reset password link will be truncated so you will need to edit it to be correct.
Within WordPress there are two roles that SwissBob can assign you, Author and Contributor. These determine what you can and can’t do for editing, so what you see on your screen (buttons and checkboxes etc)will be different depending on your role. The biggest difference is that Contributors cannot upload media such as pictures, videos and sounds. The most dangerous difference is that Authors can also schedule and publish articles. Don’t schedule or publish unless asked or it’ll mess up SB’s media matrix.
Authoring
SB will usually send you a document with the text and some images, or a request to find supporting images. Or you may write the article yourself.
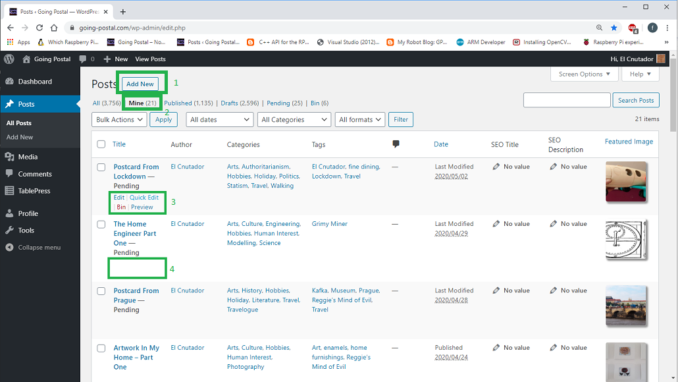
Log on to your WP account and you will see something along these lines:
© El Cnutador, Going Postal 2020
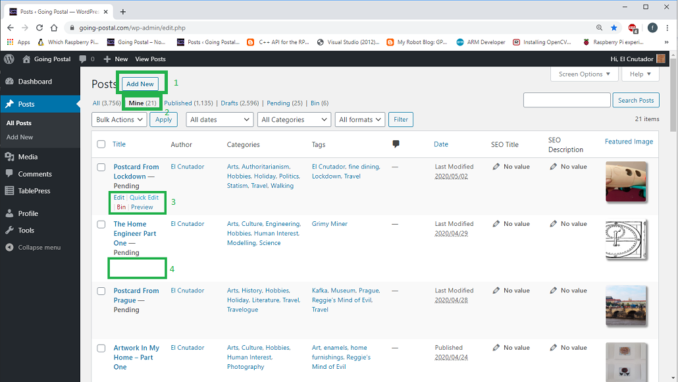
Of interest are the numbered green boxes in the picture above. Step 1 is to add new article, which will add something to your Mine filter (box 2). You will have edit rights (box 3) only on stories you are an Author of, so if you only see an empty box (box 4) when you mouse over the article title then you need to get SB to make you the author of that post before you can start editing.
Obviously, articles that you created are yours so you can get cracking on that right away.
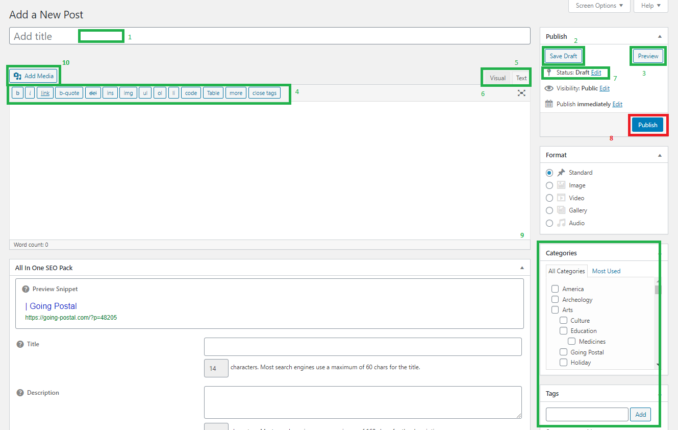
This is the Add New Post screen, in Text (not Visual) mode:
© El Cnutador, Going Postal 2020
Going around the boxes :
- This is the main title of the article which should be self-explanatory.
- Save Draft – this will save all of your changes so you don’t lose them. It will not move the Status of the article. Save early, save often, history is preserved so you can always go back to a previously saved version. There are links to previous versions of the story at the bottom of the Edit post page.
- Preview – this can also be right clicked to open in new tab, and will show your article as it would appear when published. Don’t forget to Save Draft first if you want to see your changes right now!
- These are shortcuts to html tags that will be inserted into the edit box to save typing
- Text mode. This toggles between visual and text mode. Text mode gives you a more raw access to the content, Visual gives you access to paragraph, heading and font formats, and special font modifiers like italic and underlined. It also lets you add complicated stuff like tables and horizontal lines. The article must finish with a “hard Line end” which in htmlese is “ ” (no quotes). Using Visual mode can remove this so make sure it is present before saving as draft. If this HTML is missing from the article, it knackers the rest of the page formatting and SB won’t be the only one displeased.
- Visual Mode. See (5)
- Status – when you’re mucking about with the article, leave this as Draft. When you’re done and need SB to publish it, set it to Pending Review so SB knows it’s ready to go, and ping him an email.
- Do not push this button, it publishes the article. If you do so by accident, email SB immediately.
- Categories – these are the searchable categories that WP defines. Note that if you want Culture or Education as a category you must also check the parent category, Arts.
- Add Media. Oooh, I can feel a section heading coming on a bit later.
Below the post editor there are SEO options, the only one you should touch is the second item, description, if you can come up with a 160 character precis containing key words and phrases it will help search engines find your article more easily. If you are an author your post will automatically appear under your name, additionally add your name as a ‘tag’.
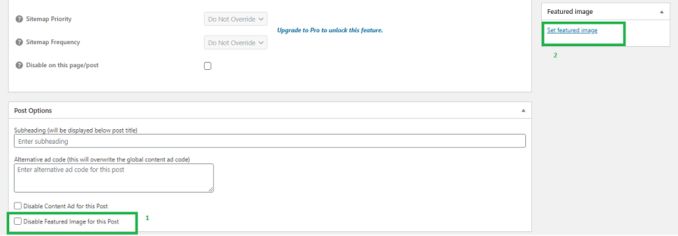
Scrolling down the page you should see the following:
© El Cnutador, Going Postal 2020
A Featured image is the little picture you see next to the article on the headline page. It will also be prepended to the article itself unless you check the “Disable Featured Image for this Post” box, which will allow a different image to be used as the article picture vs the thumbnail.
To set the featured image, click the link in box 2 – Set Featured Image. This will open a dialog that will let you choose an existing picture or upload another.
Both Text mode and Visual Mode do all the fancy HTML crafting behind the scenes for you, or you can put your own HTML in if you feel confident to do so. WordPress has it’s own metalanguage which will appear in your article text when editing, like 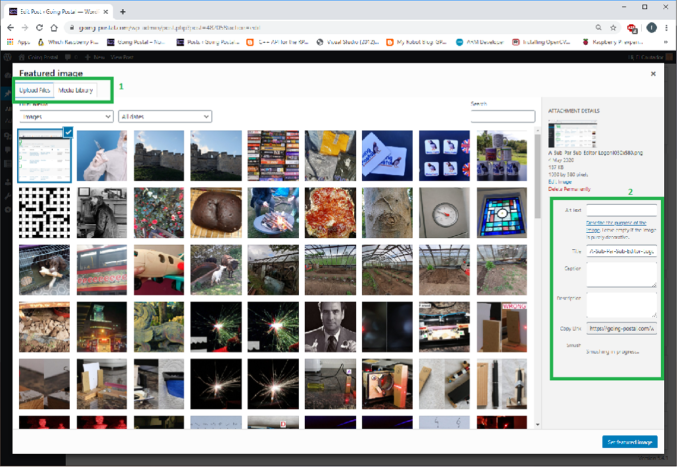
Only use images you own the copyright to, or that are free to use. This is critical as it is SB in the firing line if there is a copyright claim against GP.
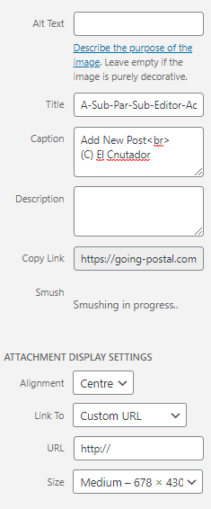
The image upload tool on WP (box 1) allows you to upload and then define the attributes to the image – the caption. WP will munge this into some special, non-html text – the caption block. You can mess with this but at your own peril. Image title should be in italics, accreditation should be below and link to license and content creator. You can upload a full size image and link this to the image using the URL field which is useful for Postcard From type travelogues where a clickthrough is nice. In the caption field, you can use any valid HTML to format and link to content.
© El Cnutador, Going Postal 2020
WP will resize and rename the image on upload, so leave Size as Medium unless it is a document that will suffer readability from shrinking. Note that the caption is a bit limited as it’s my work and not downlo9aded from anywhere.
This is what a caption for a Creative Commons image should look like, the name of the picture in italic font on the first line, a link to the picture (RogerRabbit888) and the licence (CC BY-SA) it us used under on the second line:

© El Cnutador, Going Postal 2020
Add Text. And Media.
You can now go ahead and edit the article. You don’t need to override the fonts; GP has its own styles that it applies when it displays your article. Copy and paste from a Word document will remove the hard paragraph endings so you will need to add these in.
Headings start at h3 (style Heading 3), not h2. No underline, no bold, no full stop at the end. If HTML is a bit scary for you then learn to code use Visual mode.
Footnotes should be as font 10pt.
Don’t forget to save as Draft from time to time in case the server throws a wobbler and you lose your edits.
A Journey into Sound
We have our Goodnight Vienna audio file at the end of the article named in honour of Sue, sadly no longer with us. She was an old blogging friend of SwissBob’s who worked with him on his first site. This is not dynamically generated so you need to complete your article then use Preview and copy the text (subtracting any crap), and paste it into http://www.fromtexttospeech.com/ and use the British English voices Emma or Harry depending on the gender of the contributor. This site can sometimes be down so wait until they’ve fed the hamsters and try again, sometimes overnight. I find the morning UK time more likely for success. Save the mp3 file out as Your-Article-Title.mp3 and upload as normal with the Add Media button.
Don’t forget the   at the end of the article! Always finish in text view.
The Happy Finish
Make sure you save as draft one last time and then preview to proof read, check links, check formatting and speeling. Set the story status to be Pending Review and send SB an email with the link to the story. You have now earned your PNW.
Contributoring
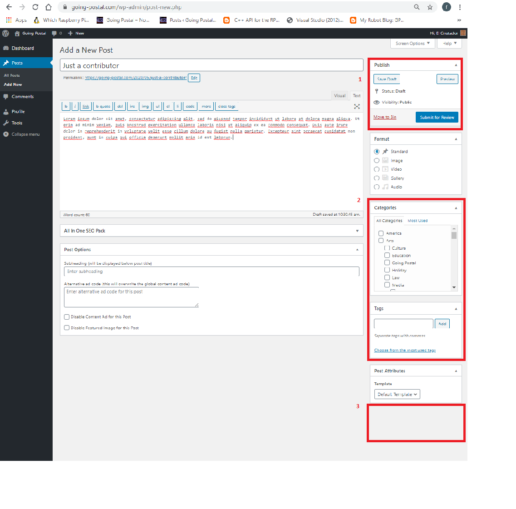
This is most likely your first role that SB will allow you to have and it is a cut down version of Author role. You can add a new and write an article but you can’t upload images nor add any media. It’s a bit more straightforward and less busy than the Authoring screen:
© El Cnutador
As you can see from Box 1 you can only move the story to “Pending Review” status. You can set the Category as before (Box 2) – don’t forget to check the parent node of the category for inclusion. Box 3 shows the missing “Set Featured Image” link – WordPress gives you a different UI experience based on your role.
Leave obvious tags in the article text eg XXXX My-Article-Name-picture-name.jpg goes here XXXX, preview to check links and speeling etc then email SB the link to the preview and any images you want.
Sending stuff to Swiss Bob
If your text is in Word format (Apple turtleneck smugs have Word, Loonix beardies can use OpenOffice) it makes it really easy to copy and paste it into WP.
Image faffing – the less faffing about I have to do then the better and I am sure SB feels the same. Get your images to 1030 pixels wide if you can please. It is a pain in the arse to extract images from a document, just put a placeholder xxx image here and send the images with the text to SB. Send the images with a descriptive name as pic1, pic2 etc are going to be easy to lose. You may also request which voice, Emma or Harry is to be used for the GoodnightVienna audio track depending on how you identify that day. Sadly there is no “Apache Attack Helicopter” option.
Don’t try and pass off copyrighted images as your own or Public Domain as it is SB’s arse in the wind not yours if you do. Attributable links to pictures are most excellent as it gives SB the best chance of using an image with confidence he’s not going to be looking at a megabucks lawsuit for copyright infringement.
It takes anything from 20 minutes to a few hours sorting out an article so bear this in mind as you cast your missives forth.
For non-contributing puffins, please acknowledge the work that goes in by both the writers and the editing work to feed the 3 stories a day cycle, especially Roger Ackroyd and AlwaysWorthSaying for their selfless service on the QT reviews.
© El Cnutador, Going Postal 2020
The Goodnight Vienna Audio file


