First, for those people in the UK and other countries where it is illegal to distil spirits without a licence, here’s the legal bit:
“It is illegal to manufacture spirits in the UK without a distiller’s licence which is required under the provisions of section 12 of the Alcoholic Liquor Duties Act 1979 and this includes manufacture for “own/domestic use”.
Public Notice 39 – “Spirits production in the UK” dated July 2006 provides further information about HM Revenue & Customs’ requirements.
If you require further assistance, then please contact the National Advice Service on Telephone 0845 010 9000 or www.hmrc.gov.uk Where you can obtain & view Public Notice 39”
However, in the UK it’s perfectly legal to use a still to make distilled water or aromatherapy oils without risking any duty penalty or fine, equipment confiscation and embarrassment (it’s a civil matter only, no criminal record).
OK, this is my nirvana. My holy grail amongst the alcoholic beverages. Making drinkable whisky from my home distillation kit. Is it possible? Can we get the flavours? Will it be drinkable? Do I need to keep it in an oak barrel for years?
Puffins, all will be revealed in this wondrous journey that started with beer making to distilling my own whisky.
This quest started as a curiosity: could I make drinkable beer from a beer kit? Apparently, I could. I then started making beer from scratch with kit that costs around £300. It tasted just like proper beer. I then made vodka. Tasted just like the real deal. Then gin. And finally, whisky.
What Is Whisky?
Whisky or whiskey is a type of distilled alcoholic beverage made from fermented grain mash. Various grains (which may be malted) are used for different varieties, including barley, corn, rye, and wheat. Whisky is typically aged in wooden casks, generally made of charred white oak.
How Do We Make It?
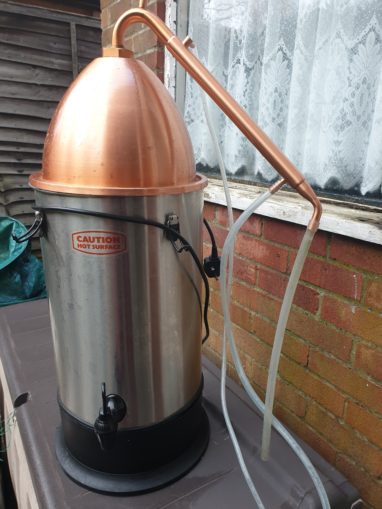
Unlike the process of making vodka where we are after pure, flavourless alcoholic spirit, in whisky making we are interested in capturing some flavours. We cannot use the packed column like we did with the vodka because it would just give us pure, tasteless alcohol. Instead we use something called an alembic head. This isn’t as efficient as the packed column – for instance, the alcohol content in the returning liquor is around 40 – 70%, which means there’s a fair amount of original liquid in there.
© Going Postal 2019
The good news is that if you have bought the packed column T500 still, this alembic head simply fits on top of the existing boiler, so you are not really buying another complete still.
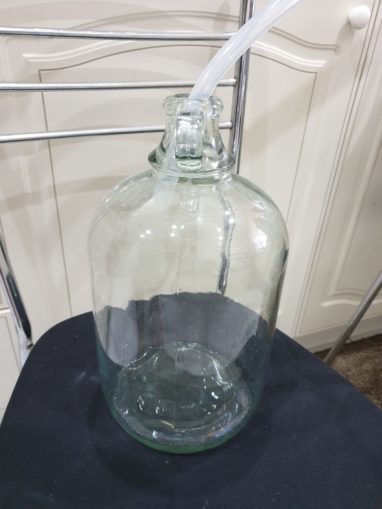
The process remains the same: we are boiling some fermented liquid, which vaporises and the vapour travels up to the copper alembic head and through the condenser tube. Surrounding the condenser tube is a running water jacket which cools the vapour into a liquid which drips into a glass demijohn. There’s a temperature probe at the top of the condenser which is very important in identifying the “cut” of the spirit that is coming off.
The Recipe
If you make your own beer from scratch, then this part is easy. We are going to make some peaty beer! Yes, it’s that simple.
Fill your fermenting tub with 19 litres of hot water at about 83°C and add 6kg of lightly peated malted grains, 1kg of Maris Otter Pale Ale malt and stir so there’s no clumps. You can add a teaspoonful of calcium sulphate to soften your water. You want your final temperature to be 67°C. Leave this for around 90 minutes to mash out.
The next step is to remove the peaty, sweet liquid from your container and slowly add 15 litres of water at 85°C to sparge the remaining sweet liquid from the grain mash.
You should have around 25 litres of liquid in your sanitised bucket. Cool the liquid to around 25°C using your copper cooler coil and add the Whisky Distillers Yeast and cover with a lid and bubbler.
After around 7 days or so, you should have peaty beer. It’s sweet, so not great for a beer (and we haven’t boiled it with hops so there’s no bitterness) but it’s ready for whisky. You should be able to smell the slight peaty smokiness. If you want to go for the true knockout Laphroaig peaty whisky, then use some very heavily smoked peated malt, although it’s harder to obtain.
The Distillation Process
As with all distillation processes, we want to concentrate the alcohol from the base liquid. With our packed column we used previously to make vodka, this efficiently separated out the pure alcohol from the liquid to a concentration of 93% ABV and the resultant alcohol was tasteless and flavourless. With our alembic head, we only condense the vapour in a tube – it’s effectively a one theoretical stage distillation process so the liquid that’s condensed contains around 40-70% alcohol and the rest is made up of the original liquid. In other words, it has carried over flavours from the base liquid. This is what we want.
If you take this distilled liquid and re-distil it repeatedly, you will eventually end up with pure flavourless vodka like we did in the packed column still (but it would take many, many runs to do this).
The Stripping Run
We need to take the sweet liquid and concentrate the alcohol and take some of the fermentation by-products away. We call this first-pass distillation run the stripping run. We add the sweet liquid to the boiler and switch it on. Once the condenser temperature reads around 55°C, start the water flow to around 2.5 litres/minute.
Discard the first 50 ml of liquid and collect the rest until the temperature reaches 98°C. Place the container somewhere safe and carry on collecting the liquid in another container until no more liquid is coming out of the condenser. This can be used in future stripping runs to improve yield.
© Going Postal 2019
A word of warning: some of the whisky mashes can be very foamy and no amount of distilling conditioner will cure this, and you may get surging of non-distilled liquid into the condenser and into your container. To avoid this, rather than putting in the full 25 litres of fermented liquid into the boiler, put half in and do two stripping runs.
The Spirit Run
This is where the fun begins. I do like this form of distillation, it’s very artisan and the skill in consistency and taste is what makes or breaks your whisky. Make sure you have several small containers at hand as you will be collecting a lot of different “cuts”. I use about twelve coffee cups all lined up and half labelled as “heads” and half “tails”. Keep them in order!
Dilute the liquid you collected from the Stripping run to about 40% ABV and add this to the boiler and switch on. Once the condenser temperature reads around 55°C, start the water flow to around 2.5 litres/minute.
The first 200 ml or so that comes off initially is called the foreshots (or foreskins when I first misread the term!) and contains the nasties of the fermentation process, both in flavours and in chemicals (methanol, for instance, isn’t particularly good for you in large quantities). Discard this.
Start collecting the next 150 ml of liquid in your first coffee cup labelled “heads” and put aside. Keep doing this in separate cups until the temperature reaches 83°C. Once that temperature is reached, start collecting the “hearts” into a larger container or glass demijohn. This is the good spirit and does not need to be collected in separate containers. Once the temperature reaches 90°C the hearts are completed.
Start collecting 150 ml of liquid at a time in your coffee cups labelled “tails” until the temperature reaches about 93°C. Then take another large container and collect the result of the liquid that comes off until around 98°C. This liquid is not required in our whisky but can be used in future stripping runs to improve yield.
Blending
This is the interesting bit. Not all the cups are going to be added to the “hearts” in the large container. Normally the “heads” and “tails” closest to the “hearts” are fine.
What you now need to do is taste all the cups for flavours. Some will be harsh or smell slightly unpleasant so just add those to the “waste” container which will be used in future stripping runs. Add the nicer smelling cups to your “hearts” container. These cups contain the flavours which give the whisky its characteristic body and aroma. Here lies the skill in blending.
Ageing
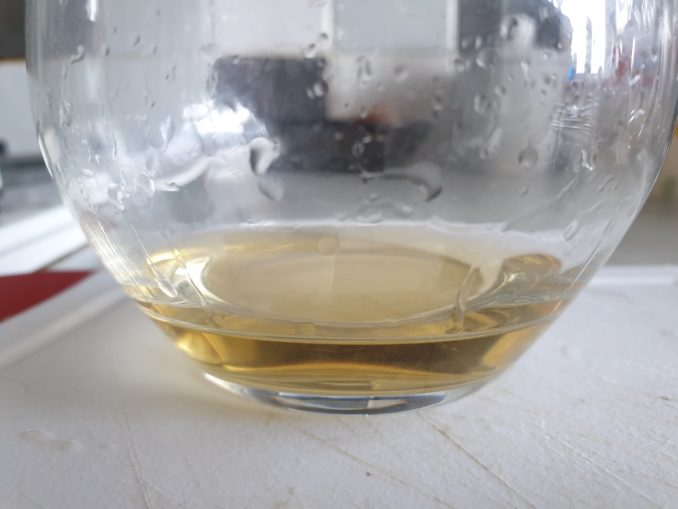
Your whisky will be colourless and at around 65% ABV. Take a small sample and dilute it to around 40% ABV and taste. It tastes bloody nice, doesn’t it? You could drink it as it is. I was so surprised when I tasted my first whisky that I distilled. I expected it to be like rocket fuel, a Tesco cheapest blended throat stripper. Instead, it was pleasantly sweet and aromatic, with a slight hint of peat.
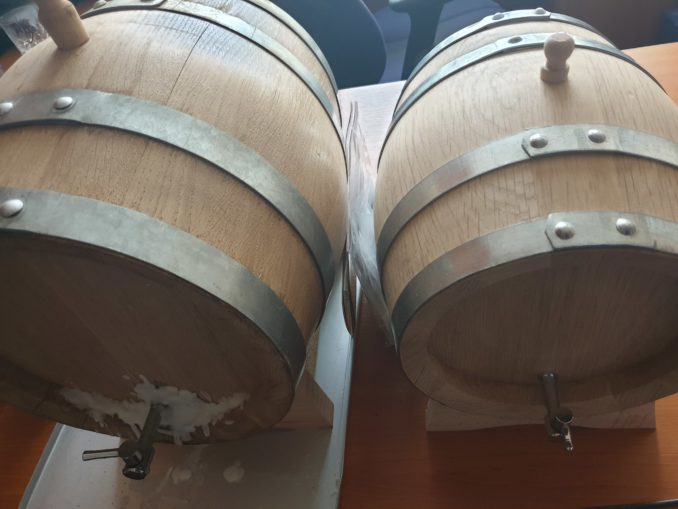
Ageing a whisky in an oak barrel gives a certain vanilla flavour overtone and changes its colour to a light brown, deepening in intensity the longer it remains in the barrel. It also reduces any harshness and creates a more aromatic, complex flavour to your whisky. The oak barrels themselves have had their insides slightly charred as well to impart some flavours.
You can either put your whisky in an oak barrel or add some oak chips to the demijohn container to age your whisky. I chose the barrel way – to go the whole authentic hog.
© Going Postal 2019
However, you cannot just add the whisky to the barrel. The barrel needs to be sealed with water for a week or so to expand the oak wood and create a tight seal, otherwise your whisky would seep out through the gaps in the barrel and you would be heartbroken! Simply fill the barrel with water and keep topping it up for a week, or in extreme cases, soak the entire barrel in a tub of water for a week.
When you are confident the barrel doesn’t leak, empty the barrel and add your whisky to it. A few things happen to your whisky. Firstly, after a week or so it will start to change colour to the ubiquitous brown hue we are so familiar with. Secondly, the whisky will start to take on some of the water from the barrel and its ABV will drop from 60% to around 54%. This ABV, in the trade, is known as “cask strength” whisky.
© Going Postal 2019
After about 3 months your pleasant tasting whisky will become “oh my god, this is really great” whisky. If you bought this from the shops, you wouldn’t be disappointed. I’ve got 9 litres sitting in a 10 litre barrel – I’m keeping it in there as long as possible. It can only get better!
So, what a journey! From beer to whisky. It’s a great fun hobby and I’m astounded at the results I’m getting. My future projects are a brandy (I’ve already bought the oak barrel), some rum, tequila (I’ve sourced some Agave plant) and the big one at the end of the year: cloning a proper Laphroaig. I’ve sourced a 25kg bag of super-heavy smoked peat grain which I have to buy trade, but I intend to make a 4-bucket batch and fill a 20 litre oak barrel with it.
Can you imagine having 20 litres of Laphroaig at your fingertips?!?!? #PrayForGeeksLiver
“Here’s to alcohol: the cause of, and solution to, all of life’s problems.” – Homer Simpson
© Beware of Geeks bearing GIFs 2019
The Goodnight Vienna Audio file