I have always enjoyed sewing and particularly hand sewing. When my first grandchild came along I decided to make him a quilt. Not just for his cot, but big enough to go on his first real bed. I wanted it all done by hand.
In my time I have made most of my own clothes and those of my children. My mum was the head fitter at Norman Hartnell Artelier. She trained at the Bloomsbury Trade School (London) having won a place when she was 14 yrs old and was offered a job by Norman Hartnell when she finalised her apprenticeship aged 18yrs old. She taught me dressmaking and tailoring. However, I had never made a quilt.
Oh it’s very simple said a friend. You just cut shapes and sew them together. Mmmmm….not quite, as I found out. Traditional patchwork quilts need extremely accurate cutting and sewing. They also need many hours of preparation and planning.

I bought a book.
On perusing the book I found that patchwork didn’t appeal to me. I wanted to create a picture by using ‘window’ quilting. I was also very attracted to applique quilting. Both were time consuming in their planning and design. So paintings, drawings and indeed historical picture books were researched. Nothing inspired me until one night I dreamed of beautiful azure blue seas teaming with corals and for some unknown reason, mermaids, mystical beasts and fish.
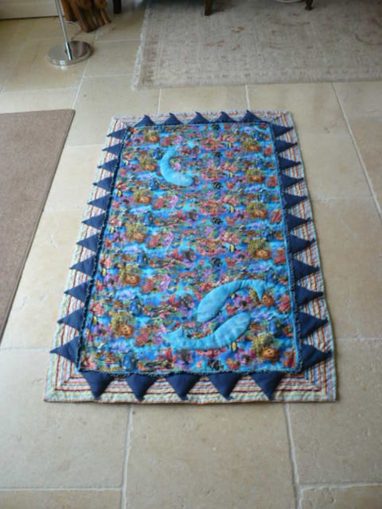
This excited my creative juices and so began the search for a beautiful blue fabric as my base. I couldn’t find a plain blue but did come across a vibrant, underwater world cotton. I made Koi fish shapes from other fabric to applique onto my fabric. I made little boats to bob along the side of the quilt and I finished off with piping and banding.
I chose to start simply as everything was being hand sewn. When cutting shapes it is easy to make them too small and intricate. I learned that 3/8ths” turn in was better than 1/4” turn in round the shape to be appliqued. I also learned that it is better to sew the shape in position, leaving a small opening to add a little soft filler to give depth. When adding my turtles I decided to cut a few out from my left over pieces. I then overlaid them on a random few on my quilt, filled them lightly as with the fish and quilted round them after adding the batting but not the back of my quilt.
Once my design had been completed and the fish in place with a couple of small turtles too, it was time to sew the piping and the boats in place. My piping edged a gentle frill to give the impression of waves. My boats were design licence. I cut triangles, turned in the edges and placed them evenly round the quilt. I then cut smaller triangles and used them as little flags at the top of the sails. As you can see by the pictures below the flags have more or less disappeared with wear and tear over the years.
Whey hey!!!!! Front completed. This took me a good few weeks using every spare hour I could. We were in the middle of moving house and I was also selling my small business. I am certain if I had more confidence and more time this could have been completed in a couple of weeks. Hand sewing is time consuming but I wanted something very special for my first grandchild. I also needed ‘quiet’ time with the stress involved in selling a house and a business at the same time. Another story, maybe for another day.
On to stage two of my quilt. Once the front was complete, the batting (or filler) of my quilt was added. batting is a cotton or bamboo interlining which makes quilts the beautifully soft, light and comforting heirlooms we all love. Anything can be used as batting as long as it is a stable weave. Heavy cotton lining was often used, as was silk for more delicate work such as quilted jackets. I have since used cotton lawn in a small cradle covering for a newborn. When visiting an Art Deco museum in New Zealand we noticed that lambs fleece had been used in a quilted mattress on a child’s bed.
The batting needs to be held in place via stitching or quilting. Originally this was always done by women at home. Often in poorly lit rooms. Women would also get together and quilt one bedcover. Working for each household or often a wedding present. It was a time for social interaction and bonding within a community or a family. Quilting was very popular in the UK and the skills taken to America with the women on the Mayflower. Many women on the Mayflower were presented with a quilt from the families they left behind, using scraps of fabric from dresses, baby clothes, furnishings so the travellers had a constant reminder of those left behind. Of course many quilts were lost or just wore out. But the skills were passed down as well as the traditional patterns which were gradually transformed into the more recognisable American star pattern.

“LeMoyne star quilt” by moon angel is licensed under CC BY-SA 2.0
The American Museum at Claverton, just outside Bath in Somerset, has the biggest collection of traditional American quilts created by many of those original settlers and their descendants. Well worth a visit if in the area. The quilt collection is open to students for research and regularly opened to the public.
I had thought of a plain backing so the quilting would be shown to best effect when done. However, I had chosen a rather fun striped fabric as my band to set the boats on, so I decided to use that instead. It gave a ‘beach’ feel to my quilt. So all three layers had to be sewn together. The front of my quilt, the filler or batting, then the back of my quilt laid right sides together to the front of my quilt. This I actually did by using my sewing machine and a walking foot, leaving a four inch gap to turn the quilt right side out and slip stitch in place. A walking foot is not essential when sewing the fabric and filler together but it certainly makes life a lot easier when keeping the fabric from ‘walking’, ie, the top layer being pushed along the second layer and the batting, creating an uneven and difficult base with which to quilt.
I was now ready to quilt. Quilting can be done by hand, by sewing machine (depending on how large your finished piece is going to be) or more popular with many quilters, Long Arm Quilting. Long arm quilting machines vary from table tops to larger machines used by universities and quilting workshops. You can pay for your work to be professionally quilted. However, the joy of quilting, for me, is to do everything myself. It means the wonderfully intricate patterns are beyond my ability but the simplicity of traditional home quilting is more than satisfying.
I chose to quilt by hand as all my designs and components had been achieved this way. Apart from sewing back, front and batting together which I did in order to give a strong framework for hand quilting. Quilting basically stabilises the interlining and stops it from moving around with wear and tear. Quilts were made to keep humans warm on winter nights but would be light enough to pack in a chest during the summer or when travelling. Some quilts were so beautiful it became fashionable to display them across the bottom of the bed or draped over a chair instead of packed away.
Quilting usually uses very small stitches. Hopefully uniform and neatly executed. Quilting needles are called ‘inbetweeners’ because they are very delicate, short with a tiny eye and can be manipulated very quickly by an experienced seamstress.
First the piece to be quilted needs to be pinned or tacked in wide squares to stop the layers moving around. The quilting design is drawn out on the top layer with chalk or a quilting pen. Then quilting begins. Because of the vibrancy of my fabric I kept my quilting design simple. I also decided not to use the traditional inbetweeners but chose a large darning needle with a sharp point. Modern chunkier designs with the wonderful choice of threads gives a whole new avenue to hand quilting. I chose a heavy gauge mercerised cotton and large stitches on the diagonal. Creating a knot at the end of the thread and then embedding that knot through the first layer of fabric on the edge of the quilt, off I went.
It took me three afternoons to quilt. This was quite quick as I used large stitches and heavy cotton. When using traditional quilting needles and fine quilting cotton the process takes much longer. Even on small projects.
I was so pleased with my first attempt I went on to do cushions and indeed a couple of pram quilts for neighbours and other family members. I have since created a quilt for each of my grandchildren. Each designed and made by hand with their family connections in mind. I think it is very rewarding to give your grandchildren something special that connects these two generations. Their quilts belong to them and whatever they chose to do with them, is their decision. My eldest grandchild is now 7 years old and still likes his quilt on the end of his bed to be used as an extra layer in cold weather. The Star quilt is my middle grandchild as her father comes from Galway bay where the fishing is amazing. My third grandchild has the Chinese love symbol of the Crane. Half Hong Kong with a family history of flight during Mao’s Cultural Revolution down to Hong Kong and given asylum by the British.
Mojo 2021
The Goodnight Vienna Audio file