
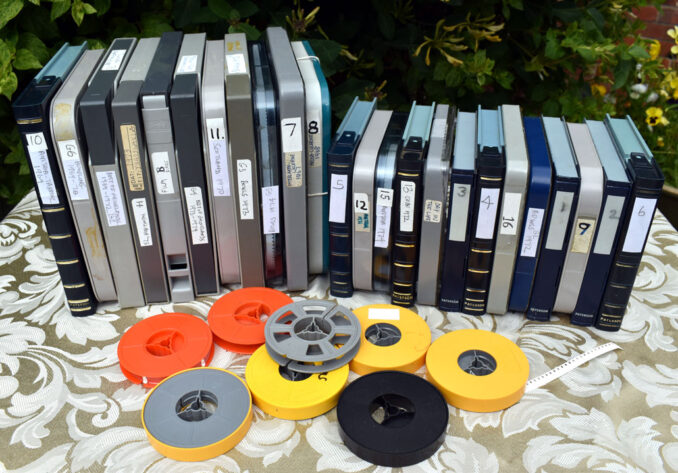
Having modernised and saved the old family photos and audio recordings for ‘posterity’ by converting them to digital format, attention turned to the family cine films, shot in the 1960s and early 1970s: 24 reels of Standard 8mm colour film of varying lengths, amounting to about 6 hours and 45 minutes of footage.
One of the amusing things about shooting amateur 8mm movies back then, was that there were very few movie cameras around, so they were a bit of a novelty on the streets.
Everyone around could hear the motor noise, especially if you were using one of the clockwork cameras, but most people realised what was going on, and would ‘act’ normally, rather than freeze, as if waiting for a photo to be taken.
It was always great fun to make home movies, and order the rest of the family around as scenes were organised, and finally shot, but there was always a lot of faff involved in getting stuff into the can.
Each reel of film was 25 feet long, and only lasted 4 minutes. The film was actually 16mm wide, so you first exposed one half of the width of the film, then after 2 minutes of filming, you had to turn the reel over to expose the other half, then remove it completely from the camera when the second 2 minutes of filming was complete.
The film was then sent to the manufacturer for processing. They would develop it, split the film down the middle, splice the two sections together, add blank leader tape at the start, and wind it onto a spool for viewing on an 8mm film projector, before returning the film to you by post.
These were all silent films, and our footage was invariably shot hand-held. A tripod was rarely used, mainly because much of our filming was done spontaneously, and you’d have missed the shot by the time the camera was set up on a tripod.
Sadly this means that camera shake is noticeable a lot of the time – some shots are worse than others, and the shake was always worst when using zoom.
Looking back, we did have a tendency to over-use the zoom facility. What the cameraman thought at the time was a smooth and artistic zoom into a particular part of a shot, would turn out to be a very shaky experience when viewing the finished product.
Something else we also did too much of was panning. This is where the camera is rotated horizontally to capture a panorama, or simply to get everything you want to capture into a shot.
From a quality point of view, 8mm cine photography simply isn’t good enough to get decent results from pans, which can end up ‘blurry’, especially if the camera is rotated too fast. A few separate shots, with no camera movement, are a better option in most cases, but the temptation to pan was often too much.
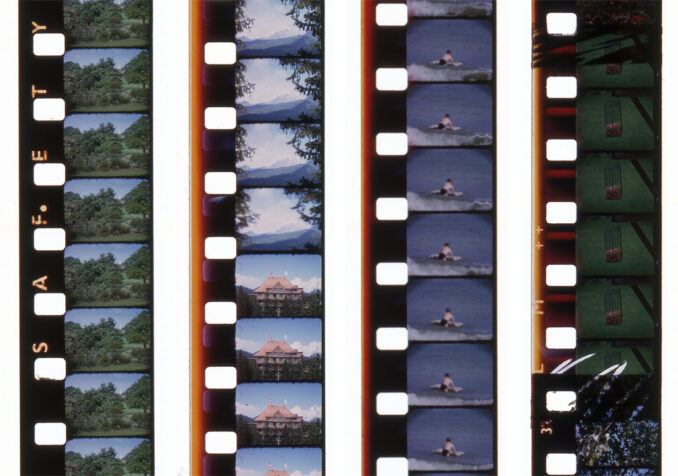
When filming, you never knew exactly when the film actually started, or finished, meaning up to four of your shots could come back from processing with either the start or end missing.
It was important when turning the film over, or removing it from the camera, to do this in a darkened room, and definitely in the shade (at a bare minimum), while out and about.
The final developed film could end up with yellow/orange edges in some places, normally at the ends, if any stray rays of light crept into the spooled film.
As these films only afforded 4 minutes of shooting time, and were quite expensive, there was a real need to be economical, and to be sparing with your finger on the trigger.
In some ways, this was very good discipline. You had to assess a scene, plan your shot carefully in advance, and decide what the best moments to capture might be before they actually happened – certainly at ‘live’ events, anyway.
In effect you had to do your editing BEFORE shooting. I wonder how today’s film-makers with their point and shoot cameras and phones, which they can set to record for endless minutes, would cope?
Myself (Max Smith) (Error fix & Mag stripes by User:Janke), Public domain, via Wikimedia Commons.
Once your film was exposed, it had to be sent away for processing. The excitement mounted as the days passed, waiting to see what you’d captured when the film arrived home – whether it was well-exposed and had good colour, or it had out of focus, under, or over-exposed shots, and whether any light had got in.
As we normally used about 4 to 6 reels of film on a typical family summer holiday, those reels had to be joined together, the bad bits cut out, titles added, and the whole film wound onto a medium to large-sized spool.
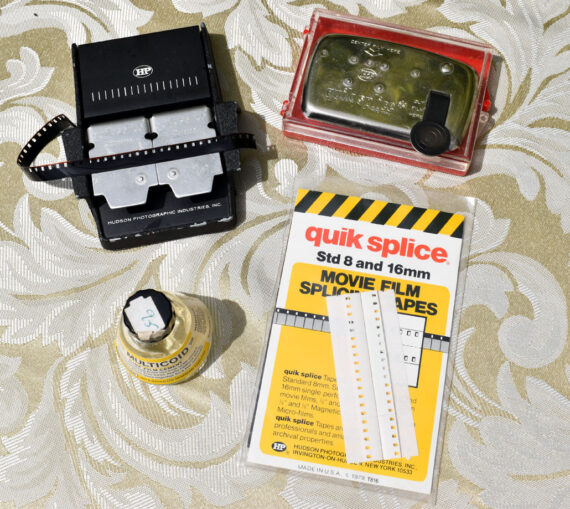
When we began splicing our films, we used sellotape-type film splices, but soon switched to proper film cement, which works by dissolving the film base.
The film emulsion had to be scraped away on one section, and the shiny surface on the other piece also had to be scraped to provide a key for the film cement. This enabled one film strip to be laid over the other, and the two to be fused together.
This jointing method is rather more permanent than tape splices, and you only ‘ruin’ a couple of frames with cement, rather than the 3 or 4 frames you lose when they are covered with a tape splice.
We shot our last home movie footage in 1976, 12 years after we entered the movie business. Little brother and myself had grown up, and from 1972 onwards, the Old Man just shot films of his bowling club, which he used to show at the club’s annual Christmas dinner.
As well as including film of the year’s tournaments, prize-giving ceremonies, and speeded up footage of matches for laughs, he used to film various bowling tableaux and comedy sketches to entertain members.
About eleven years after the camera had been retired, I dug it out of the cupboard, and remembering the golden rule about never opening the film compartment door in bright conditions, and only in total darkness if you thought the film inside may only have been part-exposed, I crept into a wardrobe at night, and discovered there was a half-finished film in the camera.
I ran the film through to the end, and sent it away to be developed, and although the film had deteriorated over those years, there was some content on it, badly degraded in colour terms, and sadly not the full 4 minutes of ‘lost footage’ I’d hoped to see.
Cine Film Hardware
It was in 1963 that the Old Man came home one evening with a movie camera – just in time to film our Isle of Wight family holiday that summer. He’d bought a Kopil Zoom 8EE camera, with f/1.8 zoom lens, made by Japanese company Kobayashi Seiki Seisakusho, which translates as Kobayashi Precision Works.
This was a bog standard, clockwork-powered, Standard 8mm cine camera, equipped with a pretty ordinary zoom lens, that nevertheless took reasonable quality pictures.
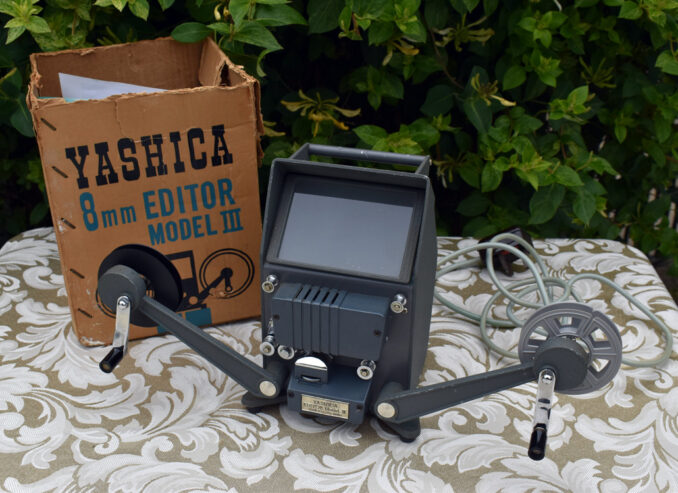
A few years later, Dad purchased a better quality movie camera – a Yashica 8U-Matic with f/1.8 Zoom Lens. It boasted a battery-powered electric motor, and a better quality zoom lens.
It also had a film rewind mechanism that made it possible to include lap-dissolves in your films (more widely known as a ‘fade out/fade in), and three different frame speeds of 8, 16, and 24 frames per second. These differing frame speeds enabled you to film in slow motion, fast motion, and at normal speed, which was 16 frames per second (fps) for Standard 8 film.
After trying out a few lap-dissolves, we decided they weren’t worth the effort, because you never knew what you would be filming next when shooting spontaneously, without a storyboard, so you never knew exactly when to insert a fade for the best effect.
The fast speed facility was used a few times, but not the slow motion, because that effect simply ate up our precious film.
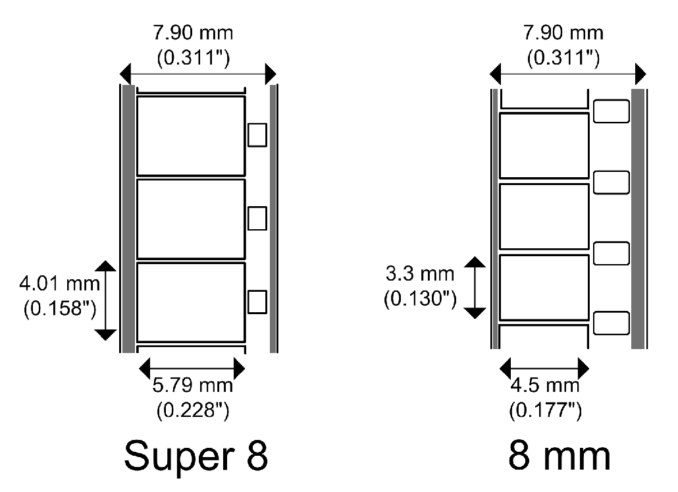
The Yashica was a Standard 8mm camera, like the Kopil, but it would have been nice to have purchased a Super 8 camera instead.
Super 8mm film had been introduced in 1965 by Eastman Kodak. This film came in a cartridge, which made loading and unloading film much easier. Image quality was superior to Standard 8 because more of the film was used for the subject, and less of the film taken up by the sprockets. Also the frame rate was 18fps, not 16, which meant there was less flicker and more visual ‘data’ was supplied each and every second.
However, as we already had a Standard 8 projector, Dad stuck with the Standard 8 format, to avoid having to buy a new projector to go with a new Super 8 camera.
I used to badger the old man to get a Bolex cine camera, because I was beginning to think I might like to be a film director when I grew up.
The Bolex was a superb movie camera. It had a high quality three lens turret, and was pretty much a state of the art camera for 8mm. This would have enabled us to film extreme close-ups of things like insects in the garden, and other small objects.
But we weren’t affluent enough to buy one of those, and we certainly weren’t in a position to have a 16mm camera.
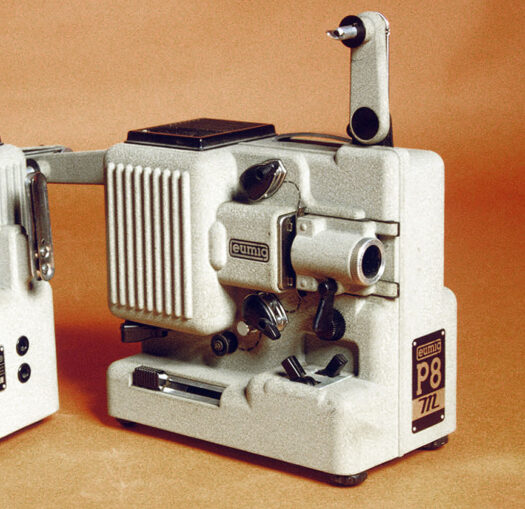
Once edited and titled, our finished movies were projected onto a screen. We had a very solid Eumig P8 projector, and a beaded, reflective screen, which showed films to their best effect.
(Cropped) By indeciso42 – archiivo personale, CC BY-SA 4.0, Link
Many years later, in 2010, I bought a Canon pocket digital camera, which, like most digital cameras, had the facility to shoot video – with sound! So after 47 years, I started making movies again, the family’s silent film era came to an end, and I was shooting talkies.
Outsourcing Digital Conversion To Experts
Quite frankly, our films haven’t been stored in the most suitable conditions. They spent the last 20 years in the loft, subjected to all the extremes of temperature you get in the roof – very high temperatures in the summer, and very cold, and damp conditions in wintertime.
When it came to making a decision about digitising the old movie films, it was easy. I chose to hand the job to the experts, because I simply didn’t have the equipment to do the job.
After a quick visual inspection and examination of a few reels, plus a few splice repairs, things didn’t look too bad, so I was ready to get the job done. It was now or never.
I’d been thinking about this task over the years, and looking at ways to accomplish it.
Back in the 80s and 90s, it was quite common to see equipment in the gadget catalogues that used to be inserted into magazines that claimed to enable you to convert your old home movies into video tapes.
Basically, those converters were just mirrors. You pointed your movie projector at the mirror device, and also aimed a video camera at it. This enabled you to film your movies again, but this time onto video tape.
This always seemed like a very unsatisfactory method to me, and I decided to wait until something better came along – and we all know what happened to video tapes.
Researching my project again a few years ago, I found that some cine film digitisation companies still used the mirror method, although they didn’t make it obvious in their sales material.
These companies were a definite No No for me. Don’t go there. The results won’t be that good.
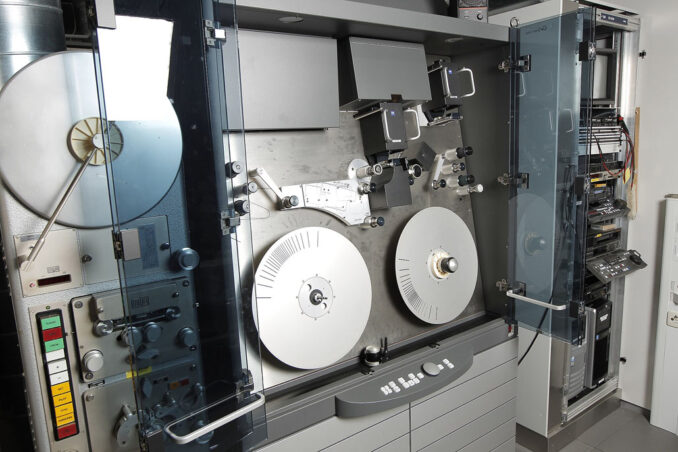
The best solution is to have your films digitised on a telecine machine, and to find a company that uses such a machine, and does good quality work.
The telecine principle has similarities with the mirror technique, as the film is run through these machines with a light source on one side, and a camera on the other. The conditions are much better controlled than with the rather haphazard ‘mirror’ technique.
DRs Kulturarvsprojekt from Copenhagen, Danmark, CC BY-SA 2.0, via Wikimedia Commons
There are of course different quality telecine machines, and different levels of expertise amongst those who use them, so rather than hand all my films to the company I picked out, I decided to only submit a couple, to see what the results were like.
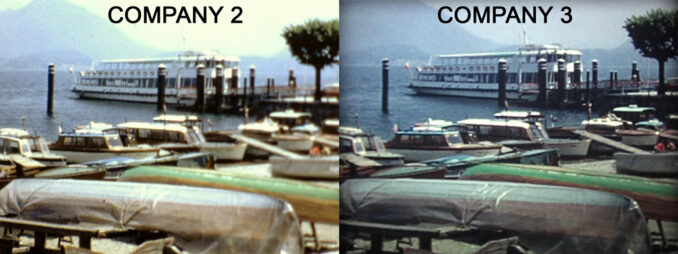
This was a sensible idea, because I wasn’t happy with the results produced by the company I chose. The colours were rather unnatural, and it seemed to me they hadn’t carried out any film cleaning or dust removal, so I decided not to use this company for the rest of the films.
I found another digitisation company, and sent them three films to work on. Months passed, and I heard nothing. In the end I insisted they get on with the work, and when I finally received my three digitisations, once again I wasn’t happy with the results.
The films were returned with a rather odd and unnatural colour balance, and worse still, I could see little tiny spots of moisture on the scans in places. I later learned they’d used a bit too much cleaning and lubrication fluid on the films, and had caused some damage, even up to the point where film splices were dissolving.
So after receiving test scans from two companies, I’d discovered the quality of work of both firms was poor. There was quite noticeable graininess to the scans, and colours just weren’t natural.
Both these companies offered digitisation of all sorts of formats: audio, photos, computer file recovery, and so on. Perhaps a case of jack of all trades, master of none?
Dissatisfied with the work of both companies, I resumed my search, which would now be for a company that specialised in moving pictures only – film and video tape, and nothing else.
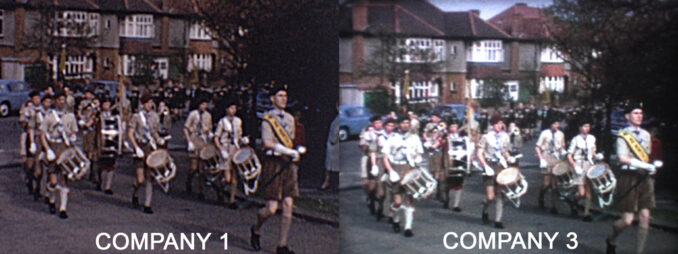
I thoroughly investigated Company #3, and established to my satisfaction that they knew exactly what they were talking about, they had years of experience, and their work was good. I felt confident enough to send them 6 films to start with.
Satisfied with the results, I sent the remaining 18 reels of my 24 in three batches to their workshop in Crawley, having decided to have the five films already digitised by companies 1 and 2 rescanned, so all the films would visually match.
Company #3 rescued the films that had been ‘over-cleaned’ by company 2, and overall, I was very pleased with their work. The colour on their digitisations was natural and true, and well-balanced. However, I did notice a couple of things about their scans, namely that:
Exposure levels were set at the very top end of the limit, meaning that very white objects in some shots, such as snow scenes, sky, faces and suchlike, lost a little bit of detail; and secondly that the exposure control on their machine took a couple of frames to adjust when a dark shot cut to a light shot, or vice versa, meaning the first 2 or 3 frames of some shots had to be discarded at the editing stage.
But then I’m a bit of a perfectionist.
The Cost
I compared the services and costs of 22 cine transfer companies before I chose to use the company within easy driving distance. I took 2 reels to Company 1, and they charged me £49 for the pair (or £25 each).
Dissatisfied with the results, I sent 3 reels to Company 2, and they charged me £80 for the three (or £27 each).
Still not happy, I found Company 3, and eventually sent them all 24 films, which they scanned well at a total cost of £1050.50, or £43 each. Rather more expensive than companies 1 & 2, but as the old saying goes, you get what you pay for.
(The work was done in the hot summer of 2020, during the Covid lockdowns, and I imagine prices have risen since then).
Editing and Finishing Off
It’s perfectly possible to be satisfied with your film conversions just as they are when they come back from the digitisation company, without doing any work on them yourself.
If the movies are visually ‘clean’, and the order of shots is acceptable and logical, there is little need to do any editing or tidying yourself.
We used to have great fun back in the day, trimming, editing and splicing film strips, removing faulty frames, and sometimes modifying the order of shots to make a slightly more coherent visual story.
There was no doubt our conversions needed some tidying up, so I now found myself with 24 digitised films to edit and complete.
The films had been digitised in today’s ubiquitous, default, 16:9 aspect ratio, while our old cine films films were 4:3, so the first task was to trim off the vertical black bars on either side of the frame.
Next the scans had to be split into individual shots and both ends trimmed and tidied.
Where there were splices, the frames obscured or damaged by the join had to be removed. That can be quite a loss when each shot was as short as reasonably possible in the first place.
Also two or three frames had to be removed at the start of some clips where the exposure level was being adjusted from the previous shot by the telecine machine.
I chose a programme called Davinci Resolve to do the trimming and splitting. It’s a high-end, broadcast-quality programme, but when it came to chopping my movie scans down to to size, and splitting the film into individual shots, it was perfect.
The free version you can download was more than adequate for my requirements. I didn’t look at any of the fancy tweaking gizmos the programme boasts – all too complicated for me, and not really necessary on low quality, 8mm footage, anyway.
Once the black sidebars had been cropped out, the Scene Detect facility was used to split a source file into separate shots, each of which was given the same source filename, but numbered sequentially. 24 reels of film, and 6.75 hours of footage was soon turned into 4,796 individual clips.
To make it easy to find clips featuring particular people, or items, all the filenames were imported into a database which was set up to play each clip in a small window, so that who or what was starring in that clip could be noted.
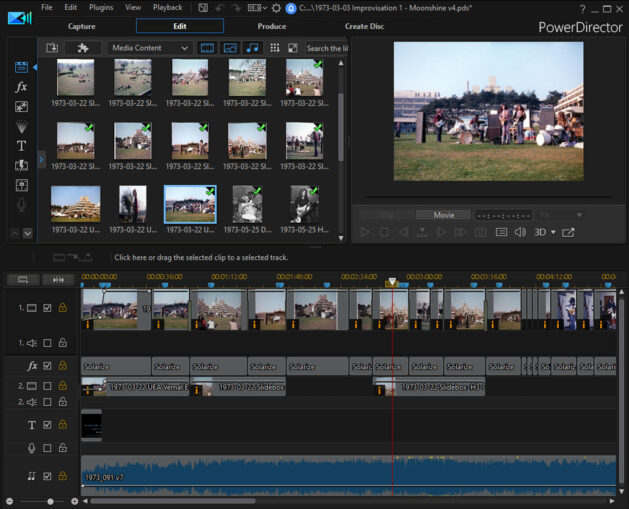
I then turned to the rather more basic video editor which I use for all my modest little videos – Cyberlink PowerDirector.
Here I put the clips from each reel of film back together in sequence, sometimes moving the position of a clip to make the video sequence look more logical, and improved the colour, contrast or brightness of some clips, where necessary.
Because of the ‘short shot’ problem mentioned earlier, the first or last frame of a shot was occasionally frozen for about one half to one second to give the viewer more time to register what they were seeing.
A two second freeze of the final frame was always added to any clip made to be posted on YouTube, so viewers wouldn’t have to endure an appalling and abrupt cut at the end of a video, straight to an advert.
To create videos comprising all the footage of a particular family member, or friend, or of all school football matches, or of trains (for example), a quick search of the clip database would reveal all the relevant clip names.
Drop in some titles, export (‘produce’) the finished video, and you’re done!
And now some short excerpt videos from the family cine films. I hope one or two may be of interest.
Get the projector out, erect the screen, play the soothing 60s middle of the road instrumental music tape, and turn down the lights……………
Newmarket Races, 6th August 1971 (01:56)
Krimml Waterfalls 1971 (01:36)
Continental Cable Cars 1967-1971 (03:47)
Inverness Military Tattoo 1970 (01:28)
Salzburg, Austria, July 1971 (01:50)
Sandown Airport, Isle of Wight 1963 (01:16)
Overnight Journey UK to Switzerland 1968 (02:45)
Achenseebahn 1971 (00:45)
Mount Pilatus Summit Round Trip 1967 (01:51)
Three Continental Glaciers 1968 – 1971 (02:57)
See also:
Text, video clips, & unattributed images © 2025 NeverUpToTheJob


.jpg)