Things have moved on a bit this episode, with some visible progress for once! I must thank you all for your kind words in the unread comments, which do spur me on to do a bit more and also to put pen to paper each time.
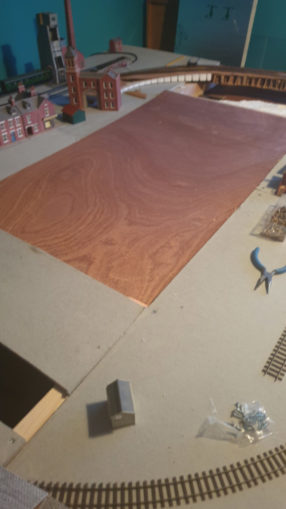
Despite the layout being 7ft x 6ft, it was getting a bit crowded with Puffin street taking up so much room – just where the tracks were due to go!
I decided to fill in the centre, to place the town. As it is simply going to be used for scenery, it is an area not needing great strength or much electrically, I simply cut a bit of plywood board out of the garage to fit. A trip to Lidl middle aisle blessed me with some corner brackets, along with a few other DIY items sneaked into the trolley.

© Sweaty Dave, Going Postal 2021.
The board doesn’t have to be fixed, it simply sits upon four corner brackets that are attached to the surrounding beams – don’t forget this all has to be able to break down and go into a cupboard at some point – Mrs SD did ask ‘can all this still go into a cupboard’ a few days ago..
© Sweaty Dave, Going Postal 2021.
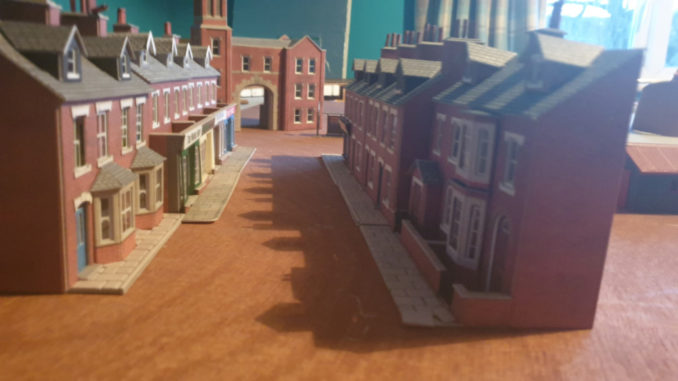
With the extra acreage, I’m sure there is room for more houses and to make more than one street, I have ordered some ‘backs’ for the parade of shops – they are only half depth at the moment and the kits have arrived – one for next week.
© Sweaty Dave, Going Postal 2021.
I’ll work out a proper plan, likely a road ending with the mine at the top of the street, a pub somewhere along there and the chapel at the other end. Once confirmed, some asphalt will need to be painted on. I have a couple of bus stops and other items will be needed to build up the street scene. You can see the ‘backless houses’ in this next shot – those on the right hand side. Adding the rear and back yards will fill it all out. Any makeshift garages & shed can go on the other side of the back row.

© Sweaty Dave, Going Postal 2021.
I mentioned in the last ramble that I was buying some connectors for the various point motors. Peco do small push on connectors so it is easier to wire them up than having to solder every joint while upside down under the layout. They’re not cheap – £3.10 or so for about a dozen with half a dozen insulating sleeves. I had a first go at working out what would be needed to run the three way point – it is a beast, needing two motors and having three sets of wires coming out to enable the correct polarity go to each rail. To wire it up needs to serve two functions, the first is to power and control the two point motors, they need to be connected to a local controller that takes messages from the main one and converts it into pulses of power to change the points in the right direction. The second function is carried out by those small switches slung under the point motor. They set the polarity of the rails by the changing of the points – so they need connections too. It looks a bit complicated but do-able from the instructions. I thought it best to try it out at the comfort of the desk first, rather than stressing about it under the layout, stripping and crimping wires as needed.
The connectors are fine, but pretty standard – I managed to use them all up while doing this one point, so ordered some generic ones from ebay- carefully measuring the sizes, but getting 50 for a similar price to the original dozen.
As you can see from the pic, colour coding is important as it quickly turns to spaghetti (this pic is taken before the final three wires are crimped and added! The crimping isn’t perfect, the odd wire slipping out so I think I will solder the wires into the connectors to give a more permanent solution. In total we have – rail switches – 3 wires (2 of them), point motors – 4 wires (2 of them) plus power – so around 18 connections just for this one piece of kit!

© Sweaty Dave, Going Postal 2021.
Pleased to say I managed to get a small track set up, connecting point controller, main controller and one of the solenoids. The electronics seem to fire up correctly with all the necessary flashing lights and pressing a button on my phone did make one of the solenoids jump. It will need a lot more configuration before being ready to use.
Before I can install all that I do need to make a start on the trackbed – an undercoat of brown earth paint has gone on first where I am confident of the track position. It will be followed by some ballast grey and sprinkles (Note: pop to Wickes for a grey matchpot). After that I can confirm the exact location of the three way point, drill holes for the connected wires and point motor shafts and glue it down, to then start wiring it up underneath.
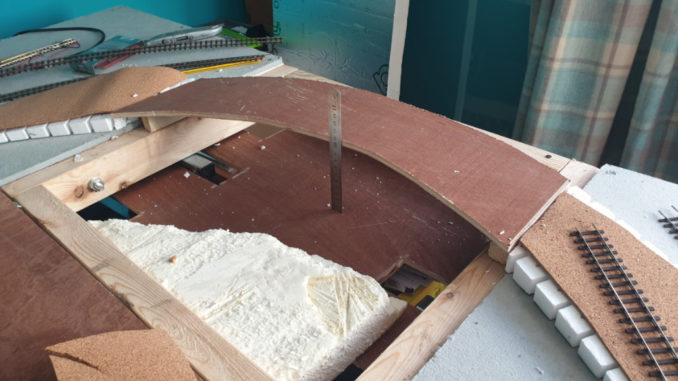
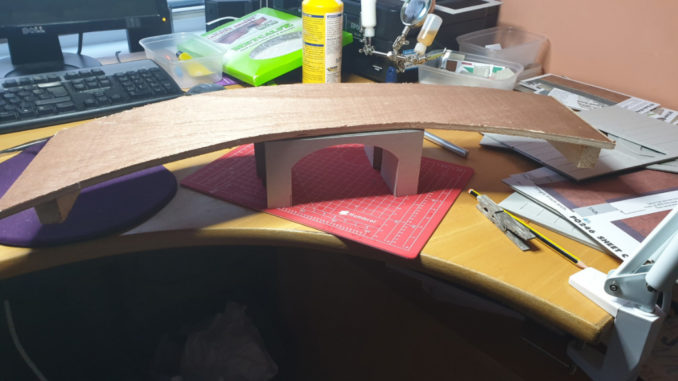
What about the buildings? Well after the successful creation of Coronation street, the next structure is a bit more tricky. You may recall the start of a bridge was forming at the top end of the layout, taking inclined track over an open baseboard. I had made something out of some cardboard packing, but once cut to shape that was never going to be strong enough. Back into the garage and found more of that offcut marine plywood – using the cardboard as a template to cut the necessary shape. It is a bit rough and ready, the curves done by hand, but it serves the purpose. Adding 3cm blocks under each side bring it up to the correct height.
© Sweaty Dave, Going Postal 2021.
I have a bridge kit (Metcalfe naturally) but it is for a straight bridge. If we used a straight bridge here, I’d never get the line around the corner in time and would mean the main lines being out at the edges of the layout – not a good option with the mine over there. That means the bridge has to curve – not an easy thing to do when most of the kit is strengthening cardboard, made to very accurate tolerances to get everything in line just so.
© Sweaty Dave, Going Postal 2021.
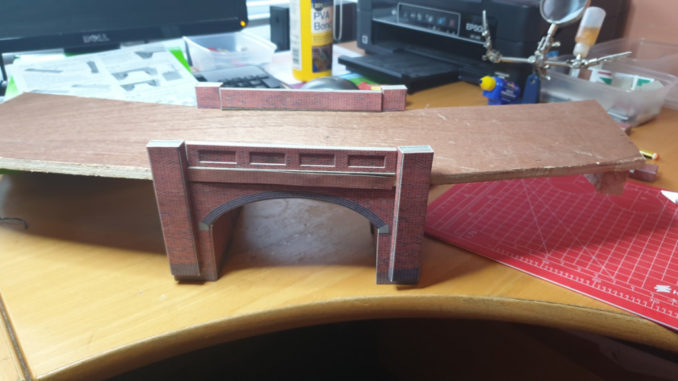
The marine ply fitted in nicely, digging around the offcut bin found some wood 3cm high needed to get it to the right height – so the whole bridge is supported by the plywood resting on the frame either side, the full span does not need any support. The space underneath the span is enough to fit the arches of the bridge – in fact slightly too much, so I can build up the land under to fit. The bridge itself is slightly broader than the kit – to space the tracks a little to give room for trains passing on the bend. The part where the arch is sited is pretty straight, with the two elements on each side at slight angles but again themselves, not particularly bent. The arches glue to the underside of the plywood, so I added a small extra line of brick paper to hide the wood itself. It is not perfect, as you can see the purple bricks at the bottom do not line up with the ones on the abutments but I have some somewhere to finish that off.
© Sweaty Dave, Going Postal 2021.
The edges will also need some bricks added to fully hide the wood approaches. In the end the scenery will cover some of the brickwork as the cutting it crosses will drop from rail level down to the stream below.

© Sweaty Dave, Going Postal 2021.
© Sweaty Dave 2021
The Goodnight Vienna Audio file