Introduction
To the Looking-Glass world it was Alice that said,
“I’ve a sceptre in hand, I’ve a crown on my head.
Let the Looking-Glass creatures, whatever they be
Come dine with the Red Queen, the White Queen and Me!”
Lewis Carroll, Through The Looking Glass, 1871.
A looking glass is an antiquated term for a mirror and one that I like. Lewis Carroll could be describing the observation of a holograph in the opening verse of his poem. A ‘transparent reflection’ (if you’ll forgive the contradiction) of another world’s view. You look through a holographic film and see a three dimensional world beyond.
Mirrors are fascinating things, although they don’t do flattery very well. Depending on the angle at which you look, a mirror reflects a true three dimensional view of the world around us. If you stare into a mirror and close one eye you’ll see just one side of your nose, close the other eye and you’ll see the other side. The same thing would happen if you were to look at a holograph of your face as all the points of view are recorded on the film. This is not true for a photograph where only one single point of view is captured. No matter how you look at a photograph you’ll only ever get to see the same viewpoint.
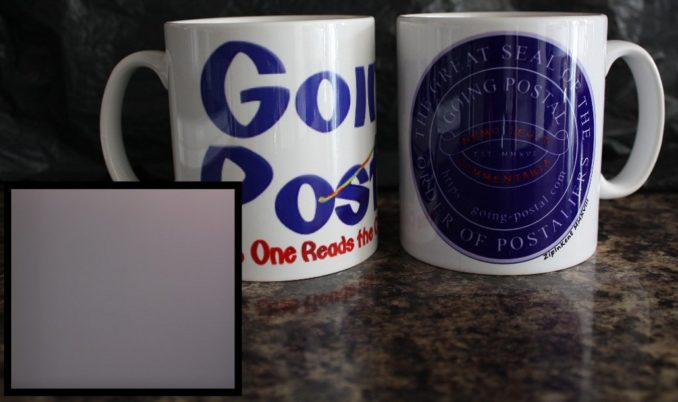
Hologram. A concatenation of the words holos, meaning complete and gram, meaning message. The above photograph is essentially no different than a Daguerreotype. Invented by Louis Daguerre in the 1820s, a lens focuses a set of light rays from a single point of view onto a sensitive film (or electronic sensor) to form a two dimensional image.
The inset image is exactly the same scene but I’ve removed the camera’s lens. All points of view are captured by the camera’s sensor. Buried inside of that image is the main image only we don’t have enough information to reveal it. We now have a complete message – we also have a complete mess! What we need is some extra information to reconstruct (or, to see) our original scene. Not only that but all the other possible viewpoints would become visible. We could look inside of the picture rather than at it.
To understand how this is possible we need to appreciate two Nobel physics prize winners. Gabriel Lippmann and Dennis Gabor.
The Foundation Of Holography
By the late 1800s physicists and chemists were starting to think of ways to produce colour photographs. In the 1890s Gabriel was playing about with a colour photographic process using high resolution monochrome film. He used the film’s emulsion to ‘trap’ the light’s standing wave pattern – i.e. the colour. If the developed film is looked at with daylight (and at the right angle of incidence) a full colour image can be seen. The principal of photographing light waves using high resolution film emulsion is a major key to making a hologram.
This guy creates modern versions and explains the process better than I could do.
In 1947 Dennis Gabor was interested in electron microscopy. To look at finer detail with a conventional optical microscope you need the shortest wavelength possible, which is about 4000 angstroms – or ultraviolet. Electrons can easily achieve less than one angstrom. Enough resolving power to see the structures that join atoms together, theoretically.
The problem was that the magnetic lenses in early electron microscopes weren’t very good. There was a lot of spherical aberration which simply means that the image was blurred. The electrons would focus in front of the film, some on and some behind.
To get around this problem Dennis had a brilliant idea. Why not capture all of the electrons from the object being magnified (including the out of focus ones) onto a high resolution film using a ‘background’ or ‘reference’ electron wave. This reference wave caused interference patterns in the film’s emulsion, just like in Lippmann’s colour photography.
What Dennis had done was to capture the phase of the electron wave as it hit the film. When the film was developed, and with a clever arrangement of optics, he was able to view the different phases and therefore select only the electrons that were in focus. Dennis had made a hologram – the word that he invented.
To turn the shaded grey box in the above photograph back into our GP mugs we need to record the phase of the light. If we can do that we’ll make a hologram or holograph.
How A Holograph Works
Light is a radio wave. Just like water waves and sound waves or even waggling a washing line up and down, it has an amplitude and a frequency. In standard photography the amplitude gives us the brightness of an object and the frequency gives us its colour.
But that’s it. These two components are directly measurable as they are an absolute value to our eyes. Phase is a relative measurement and needs to be compared to something else for us to ‘see’ it. The process of seeing the phase is called interference.
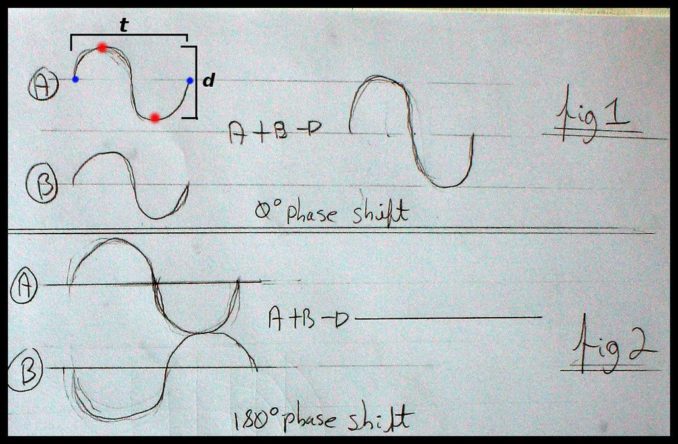
Looking at fig.1(A), t represents the frequency of the wave (or colour) and d represents the amplitude (or brightness). And that’s all that is needed for a standard two dimensional colour photograph.
To measure the phase we need a second light wave or reference, fig.1(B). You can see that it’s in perfect step with wave (A). In fig.2 the two waves are now opposite or out of step with each other. How much the waves are in or out of step can be measured in degrees and is called the phase shift.
When these two waves meet they add together and the resulting waves can be seen in figs.1 and 2. The technical names for this process are constructive interference and destructive interference, respectively. With destructive interference you can imagine the crest of an ocean wave falling into the trough of another – the result being a calm sea!
On its own this simply changes the amplitude (or brightness) of the wave and seems to not help us obtain a three dimensional image. For the magic to happen we need to appreciate just one other thing…
Diffraction
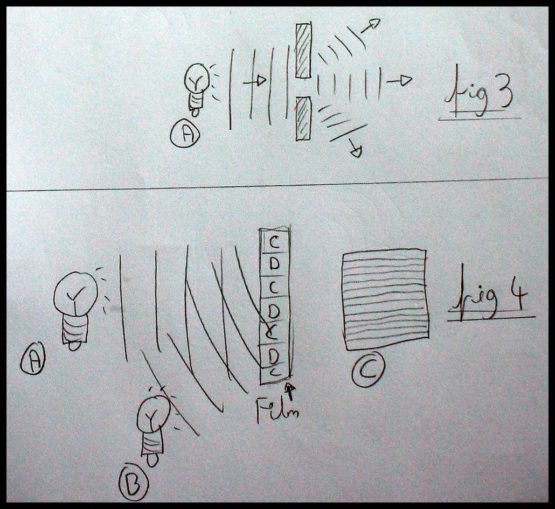
With fig.3 we’re looking at an idealised light source (A) in two dimensions. It’s emitting a perfectly parallel wave as represented by the vertical lines. These waves strike two plates that block the light but with a small gap between them. Some of the waves just carry on forward without a care, but for the waves that strike very close to the edges of the plates something interesting happens. Some of the light is ‘bent’ upwards and some downwards. This process is called diffraction and is the key to making and seeing a hologram.
To understand how let’s look at fig.4. Here I’ve added a second parallel light source (B) and replaced the two plates with a photographic film. The film records the interference pattern between the two waves. When developed the film will have a set of very fine clear and dark bands on it, fig.4(C). This is called a diffraction grating. The rainbow of light that you see from the surface of a compact disc is caused by diffraction. The microscopic grooves on the disc bend the different wavelengths of light to different angles.
Now for the magic bit.
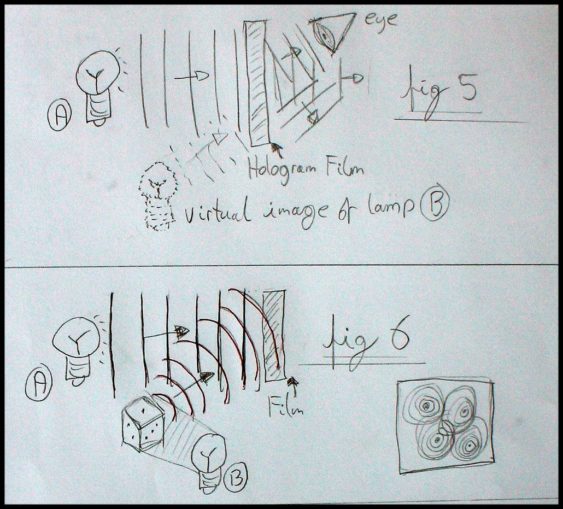
If we remove lamp (B), as in fig.5, and leave lamp (A) shining onto our holographic film an observer looking through the film would be able to see lamp (B) as if it were still there. The diffraction grating bends some of the light from lamp (A) towards the eye creating a virtual image of lamp (B).
What about holographs of actual objects? No problem, nature’s on our side.
Fig.6 shows a simple set up. Lamp (A) we’ll now call the reference lamp as this is needed to measure the phase. Lamp (B) we call the object illumination lamp. It provides light to shine onto the object that we wish to holograph. It’s to be noted that both lamp (A)’s and (B)’s waves are in near perfect phase (or step) with each other.
When a light ray from lamp (B) hits the surface of our object (a die, in this case) it gets diffusely reflected in all directions. You can imagine it as an expanding ‘dome’ of light waves. This spherical light wave mixes with the parallel light waves from (A) inside of the film’s emulsion and the resultant pattern is very special. The developed film will contain concentric light and dark circles or interference fringes, fig.6 inset. These act like tiny Fresnel lenses bending the light to many different angles. The diffraction pattern forms (what’s called) a zonal plate.
The process of viewing a hologram is known as a reconstruction. If we shine lamp (A) – on its own – through the developed film you would see a virtual image of the die, fig.7.

It would appear to ‘float’ behind the film’s surface plane. Not only that, but a real image of the die could also be projected onto a sheet of paper. This is not only because the light waves that are bent upwards continue to diverge from the original object, but the ones diffracted downwards converge and therefore focus to a point.
If we break a looking glass we can still see ourselves in each individual piece. Unlike a photograph, if we took our holograph and cut it into bits you would still be able to see the full image in each piece. Very easy to understand if you accept that the holograph contains every point of view in every part of the film – a complete message, just like a looking glass.
© text & images Doc Mike Finnley 2020
The Goodnight Vienna Audio file