In previous episodes I’ve talked about starting a project to keep Marine tropical fish and corals. Such an endeavour is not to be taken lightly or if you are short of cash! With the tank purchased and drilled, the plan in place and pipework started, the next part is a sump.
Why do you need a sump? It is not necessary for freshwater or coldwater fish? With this sort of setup a sump is needed for a number of reasons. As you’re looking to achieve such a high degree of build and make the tank look as natural as possible, the inclusion of a sump allows a lot of the gubbins needed to keep it all alive hidden away – so no unsightly heaters, pumps or filters. If you’re in a garden centre and see a marine aquarium, have a peek in the cabinet below – it is usually like something from a steampunk film.

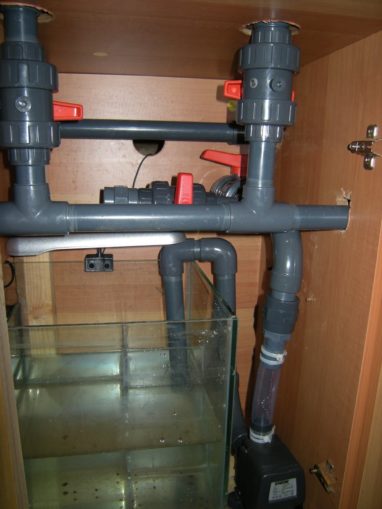
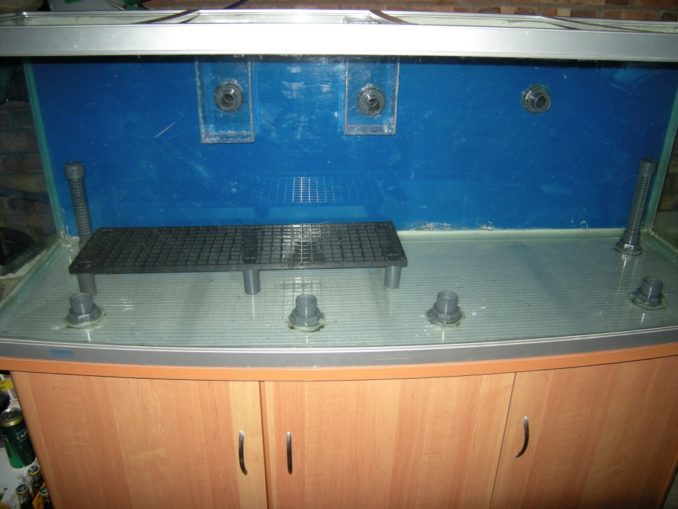
You can see from the pictures two pipes at the back of the first image with valves on them just above the tank level, they bring the water from above, put it into the leftmost chamber. It then has to pass below one set of glass and over another, removing bubbles and turbulence. The two heaters warm the water as it goes through. The second image is the others side of the tank. The top up equipment is to be added, the sand and plants in there too with space behind a protective acrylic box for the outflow, pumped back into the tank. The sump tank takes up two cupboards so the wall between had been cut just enough to admit the tank and strengthened to compensate. There are many different sump designs, no one is better than another. This was as close as I could find to this one.

The main reason for the sump is to keep the water clean. Marine fish need the purity to be much higher than freshwater fish for one reason – they almost constantly urinate. Any cellular creature requires a certain amount of salt. For freshwater creatures their bodies have a higher level of salt than the surrounding water, getting it from digesting food and plants. For marine creatures the opposite is the case – their salt levels needs are not that different from freshwater creatures – but are lower than the surrounding water. That creates problems as every salty drink adds to their levels. To survive they need to flush the salt out and therefore drink much of the time, with the consequent frequent urination. That much water passing through them means any pollution within it collects in their bodies, leading to illness and death.
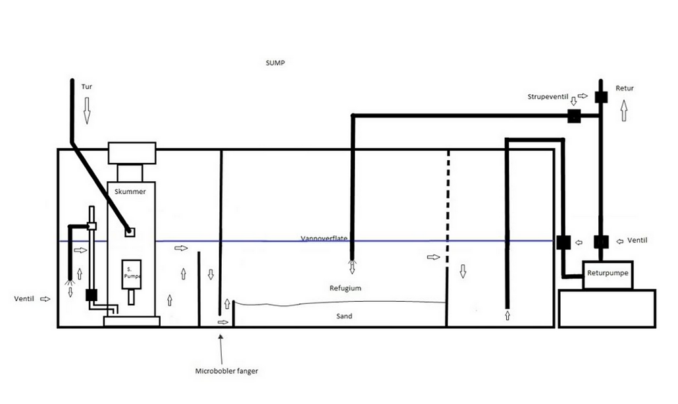
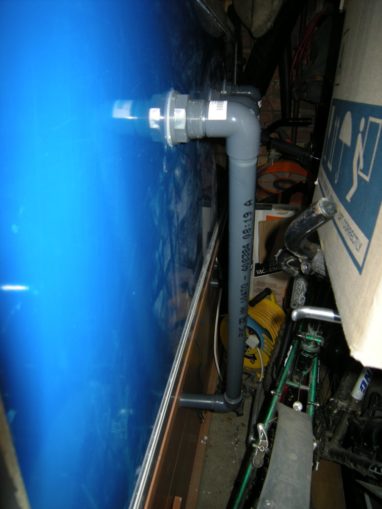
The sump takes water from the top of the tank, runs it through a comb to collect any floating debris then passes it over a medium which removes nitrates. It is then pumped back into the main tank. The three holes you see in the back of the main tank are there to cater for this – two to flow down to the sump (the usual duplication to avoid blockages causing floods) and one return of cleaned water. You may notice the holes are only halfway up the tank, so how does it not all just flood down into the sump and flood the house? Remember the sump is open, it is not a pressured system like the pumps, so if there is too much water in there, it will spill.
Firstly I had to build a couple of weirs to set the level of the water at just above the top of the visible tank, to give the impression of always being underwater. These were made by taking a sheet of acrylic and making a couple of box structures with comb like teeth at the point of drainage to catch any floaters. The height of the weir then sets the height of the water level in the tank.

The pump in the sump is in effect constantly trying to empty the sump into the main tank, which increases the water level up top, meaning more water then runs over the weirs until it finds a balanced level. As warm water naturally involves some evaporation that level will drop. The pump pushing water to the balanced level means the lower water level shows up within the sump as the amount available to that pump. At this point in the sump we add a measuring device that keeps an eye on the water level and a small pump that can top that water up from an external source (basically a bucket in the next bit of the cabinet). When the water hits the low point, the pump slowly adds a trickle of fresh water until it hits a high point and shuts off. You have to remember that when water evaporates, the salt is left behind, so you have to top up with fresh water or the salinity would increase over time – something that probably explains why salt water swimming pools in places is dry places such as Tenerife are so salty.
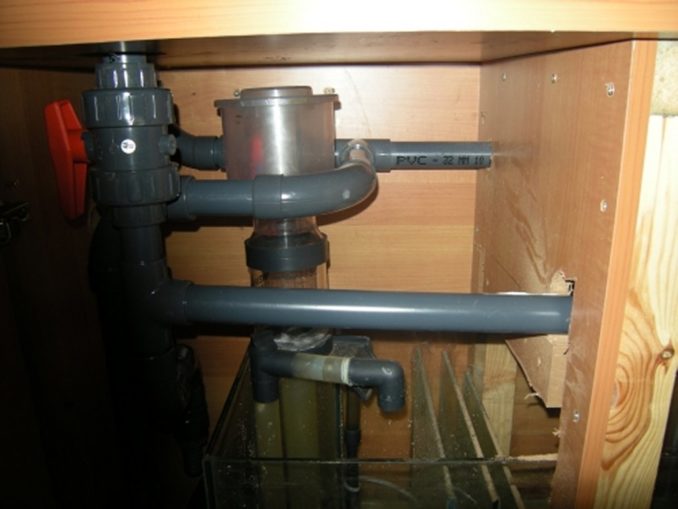
The media that filters most of the filth out is one of two options, the usual is a thick bed of coral sand with some plants in. They are similar to those found a saltwater marsh, taking up what to them are nutrients. Naturally that means a light in the sump to keep it alive. The alternative is something called miracle mud – a sort of live mud that is ridiculously expensive but contains the necessary micro-organisms to consume the nutrients. The sump also holds the water heaters needed to maintain the correct temperature – as ever two smaller ones rather than one large – duplication in case of failure. There is also a rather strange looking item called a protein skimmer – costing between £30 and £300 around which is basically a plastic pipe with a cup on the top. An airstone in the bottom (so another airpump required), creates a column of bubbles which pop when they reach the cup at the top. The surface tension on the bubbles carries tiny pieces of dirt and after a few days that cup contains a rather foul layer of slime. One of the weekly jobs is to clear that out.
Once all that is in place the biggest test to carry out is what happens in a powercut? The temperature will be fine – in such a large body of water in a fairly warm living room, it will stay in the correct range for a number of hours. The big worry is how much water will drain from the main tank before the weirs are dry? It may only be 1cm of water, but draining a 7ft tank into a 2ft one… all of that volume will go into the sump. The depth in the sump when operational needs to be low enough to have spare room to accommodate that powercut overflow – it took a couple of go’s to get that right, so I was glad of being in the garage!
Next time – the tank is placed and it is time to fill it. I promise to mention humidity control too.
© text & images Sweaty Dave 2018
Audio file