As well as researching “Desert Mysteries” and the exploits of the “Desert Fox”, amongst my other hobbies is the construction of scale model dioramas.
For a diorama, I design and build by hand the baseboard, scenery and buildings myself and then assemble and paint the vehicles and figures using commercial kits to place on it although usually with some degree of customisation to match the concept I am looking to achieve.
My aim is to create a 3D “picture” that at first sight immediately tells you what the diorama is about but where it also has detailed vignettes within, that can only be found when viewed closer from different directions. Also, I aim for laying it out so that by using diverse models and figures, different time periods can be created.
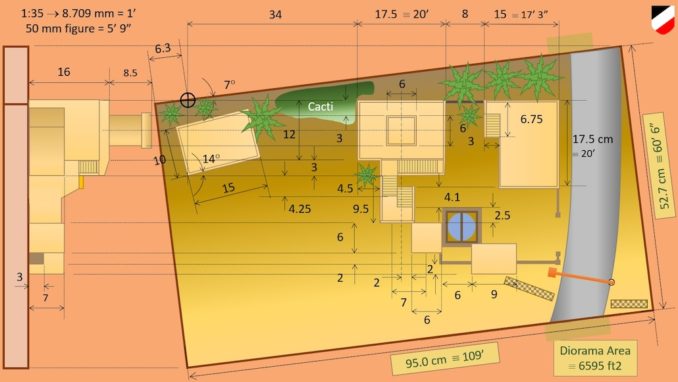
I model in 1:35 scale due to the wide range of suitable kits available, especially those made by Tamiya, Hobby Boss and the AFV Club, and more recently of resin figure kits produced by rapid-prototyping methods. In 1:35, a typical figure is about 50mm tall which equates to a real person’s height of about 5 foot 9 inches.
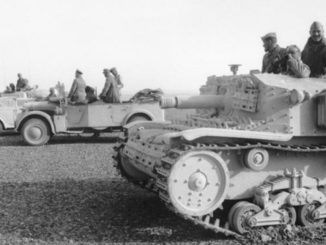
This particular diorama, “Vorwärts mit unserem Rommel!”, is themed around Tripolitania and the “Deutsches Afrikakorps” when they were in their ascendancy.
To start, I first created a “story board”, basically a PowerPoint set of slides made up of images taken either from my own collection of photographs and books or gleaned from the internet to get ideas for scenarios that I could create and the colours and textures I would need to use.
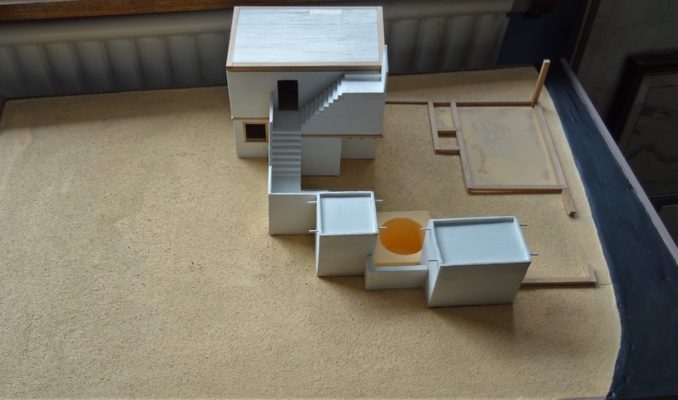
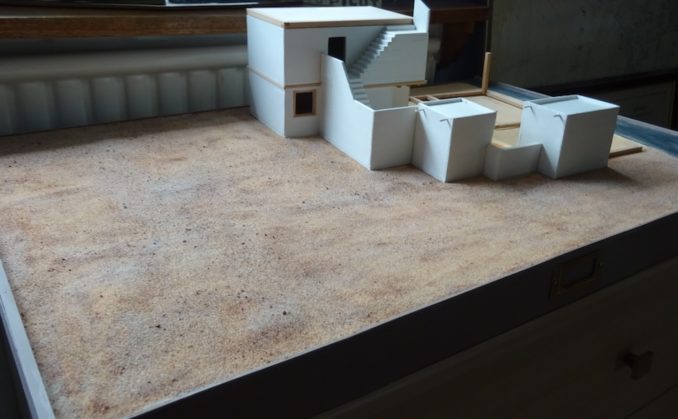
For this diorama, I began by researching the type of buildings to be found in colonial Tripolitania. I found on a commercial photograph website, a suitable modern colour photograph of an old Arab compound set in the open desert in Tripolitania that has a main building with a wind tower and lower buildings surrounding it. The architecture fitted in with the contemporary buildings in black and white photos in my collection that were taken by DAK soldiers in Tripolitania and Cyrenaica.
Based on scaling the photographed building dimensions into 1:35 equivalents, I then planned out the size of baseboard that would be needed and set out the buildings, so as to present distinct aspects depending on where they were being viewed from, along with placing key features such as a road, a well and palm trees.
The only scale compromise I have made is that the DAK would never have had a large number of vehicles within a relatively small area (the diorama is equivalent to an actual area of around 6,500 ft2) as usually in laager they were spaced out at least 200 to 300 yards from each other, but, as that would make for an unfeasibly large diorama, I have used artistic licence and assumed that this diorama is set when the Luftwaffe had air superiority so that any risk of air attack was minimal.
A “rule” of diorama modelling is probably “whatever size baseboard you set out to use, it is always too small.” You will see in some later photographs that to improve the aesthetic balance of the buildings to the desert area and road, I did end up later extending the baseboard on each short side.
© John Tull 2024, Going Postal
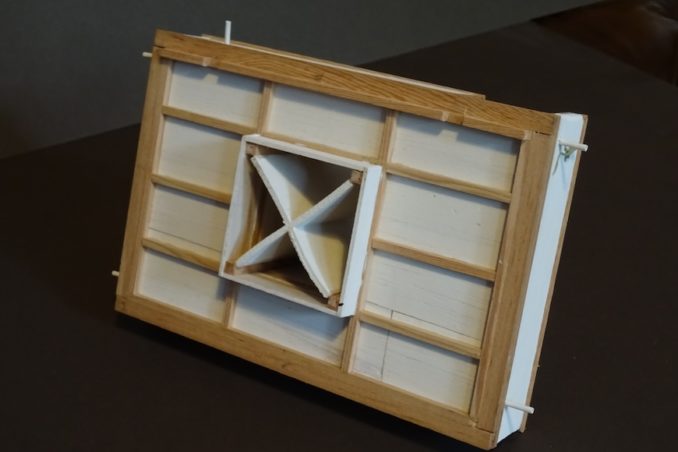
Next I constructed a baseboard framed with planed pine for rigidity, topped with hardboard supported underneath with cross-framing. The hardboard was then covered with a thin layer of cork sheet and marked up with where each building and feature was to be set so that I could create “sockets” by cutting away the cork and using thin spruce strips to edge the holes into which the buildings would be set.
© John Tull 2024, Going Postal
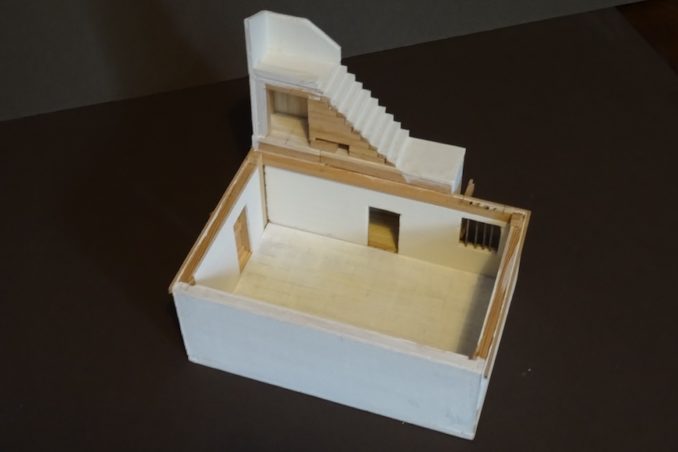
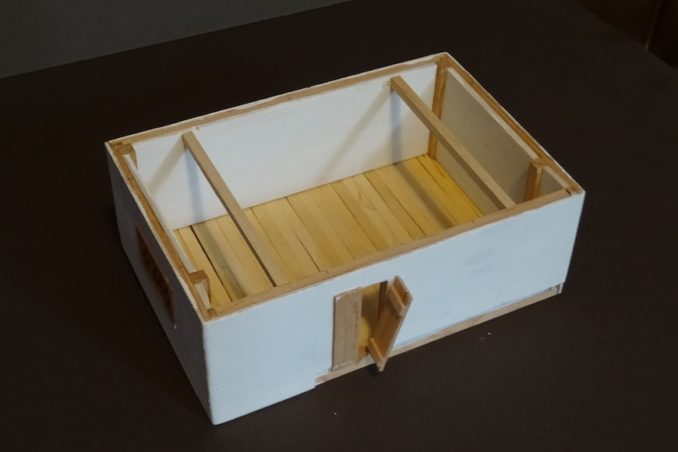
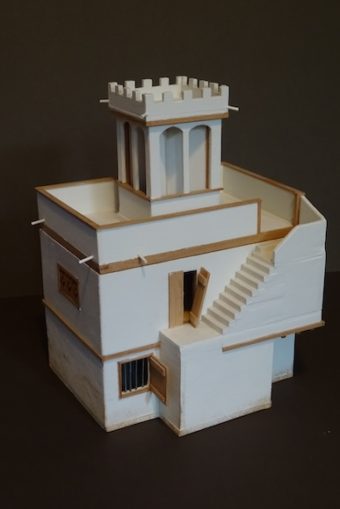
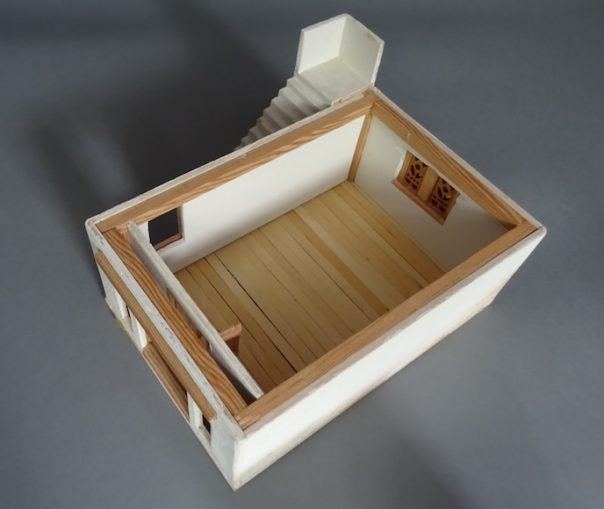
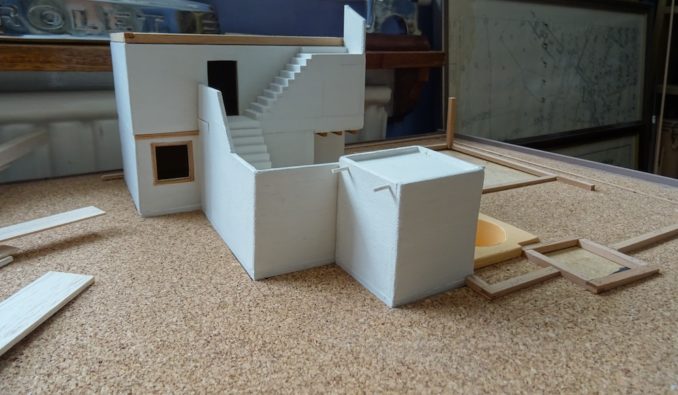
I designed the buildings by first scaling off photographs and then structurally framing them with lengths of square-cut spruce with glued joints. Floors were then fitted, built from a mixture of spruce and birch strips.
© John Tull 2024, Going Postal
Walls within the structural frame with suitable window and door openings were then created using layers of balsa and spruce sections before each building was painted internally and externally with white masonry paint and all exposed wood with a matt varnish.
© John Tull 2024, Going Postal

© John Tull 2024, Going Postal
The buildings are all constructed so as to come apart at each roof and floor level so that the interiors can be populated later and to allow for future updates such as either adding more interior detail, lighting or perhaps battle damage.
© John Tull 2024, Going Postal
© John Tull 2024, Going Postal
The building “sockets” edging was also used to define the thickness of the final desert surface and to ensure that the buildings are set in the ground and not, as you see on a lot of model railways, appearing as if they just been dropped on to the surface. I also placed spruce strips around the edges of the diorama on top of the cork sheet to hold it in place and to retain the “desert sands” when the loose surface was added.
© John Tull 2024, Going Postal
© John Tull 2024, Going Postal
A hole for the embryonic well was cut into the ground with the well itself created from a painted, rigid plastic glass. Water to be added later using coloured resin.
At this stage, I did not add any significant patina or weathering as I prefer to concentrate first on creating the overall “big picture” before getting into the detail.
© John Tull 2024, Going Postal
To start to create the “hard” desert surface, a thin layer of coloured “Polyfilla” was spread over the cork sheet and then smoothed by sanding after it had set. The cork layer helps to stop the “Polyfilla” cracking when the baseboard is moved around but, as I found from previous dioramas, it also swells and warps slightly during filling and painting, as it adsorbs moisture, so creating a more subtle and realistic, undulating ground surface.
The “loose” desert surface was then created by applying assorted colours and grades of grits and sands, held in place with sprayed dilute white glue. This surface was added to during the build, to get variation and shading, including using actual fine desert sand brought back from trips to the Middle East.
In Part 2 – The DAK turn up and the diorama starts to take shape.
© John Tull 2024