
I thought I might share my limited knowledge and experience with fellow GPers regarding solar panels or solar PV. From Wiki: ‘Photovoltaics (PV) is the conversion of light into electricity using semiconducting materials that exhibit the photovoltaic effect.’ Around 2022 electricity was priced at around 16 pence a unit, a unit being 1kWh or 1 Kilowatt hour, ie the amount of energy consumed by the old one bar electric fire switched on for an hour. Like many others my supplier, Symbio went bust primarily due to the cheap prices they were offering and I found myself forcibly moved to EON. My new tariff was 28 pence a unit, today it is at around 26 pence a unit which is pretty much a near doubling of unit cost.
At 16 pence a unit, the fag packet calculation PV panel investment payback was difficult to justify, especially if you factored in the replacement of expensive components with potentially limited life. But at 28 pence I suspected that a case could be made. I also fancied having a play and learning about new stuff and the reward would be savings, so it was jumping in on the bottom of the learning curve via YouTube, supplier web sites and various forums to glean information.
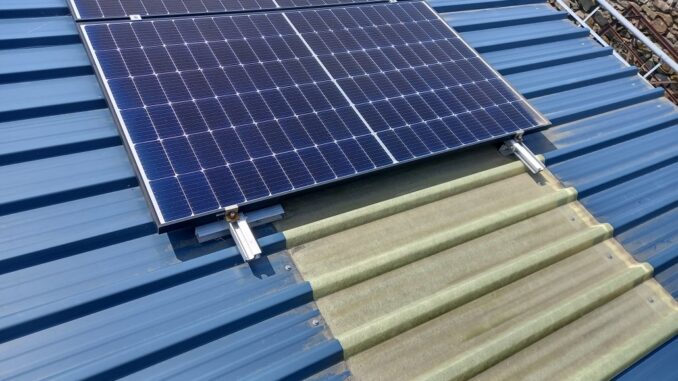
One big part of the install is fixing the panels to a pitched roof, probably either tiles or slates, various off the shelf mounting systems are available and the professional installers are well versed on the methods. I didn’t really fancy climbing about on our slate and stone flag roof, decided that access scaffold would be required and I was concerned about ending up with a leaking roof. However I had recently erected a 45’ by 16’ barn, steel portal frame construction with a box profile steel shallow pitched roof. I could use that, walking about on that practically flat roof would be easy and I could use long hex headed timber screws to fix the panels and pick up on the wooden purlins using the existing screw holes that currently secured the roof sheeting.
So the job of ordering components commenced. First task, solar panels, I decided to buy 6 initially and used Midsummer Wholesale. I decided upon 6 as they would produce meaningful power but not leave me too red faced if the experiment was a disaster. The panels were made by Longi and each produced 370 Watts. They cost £139 each with delivery at £110. With VAT I was looking at £1133. It should be noted that Midsummer use a specialist carrier for the panels and they arrived all stacked like a 2 dimensional pyramid on their own dedicated pallet. I was impressed by the effort and the lorry driver was very helpful. These days the prices seem to have decreased markedly and more powerful 535W panels are only about 88 quid.
Ok, so the power produced by these panels is DC or direct current and obviously completely useless when it comes to powering a dwelling as pretty much all the appliances need feeding with 230Volts AC or alternating current. Thankfully the boffins produce a device called a Solar PV Inverter and it’s simply a box of tricks that turns DC current to AC. In order for it to function it checks that you have AC power from the National Grid at the property and that it is good quality within defined values and then if the panels are producing power it closes an internal relay and parallels itself with the grid, in effect it tries to back power the grid and as it produces a slightly higher voltage it wins the war and your electricity meter slows down or stops. Of course the AC grid supply is sine waveform, as is the inverter but the clever electronics only parallel the systems when they’re exactly in phase with one another otherwise there would be a big bang and a tripped breaker. There’s also a feature that most manufacturers of inverters refer to as ‘anti islanding.’ Put simply the inverter will not produce any output if grid power is lost, this is a safety feature as theoretically grid technicians working on the cables in the street, thinking the power was turned off, could be electrocuted as the inverter attempted to back power the grid. If you want equipment that can provide power via battery back-up when the grid fails then this is also easily possible but of course the cost rises markedly.
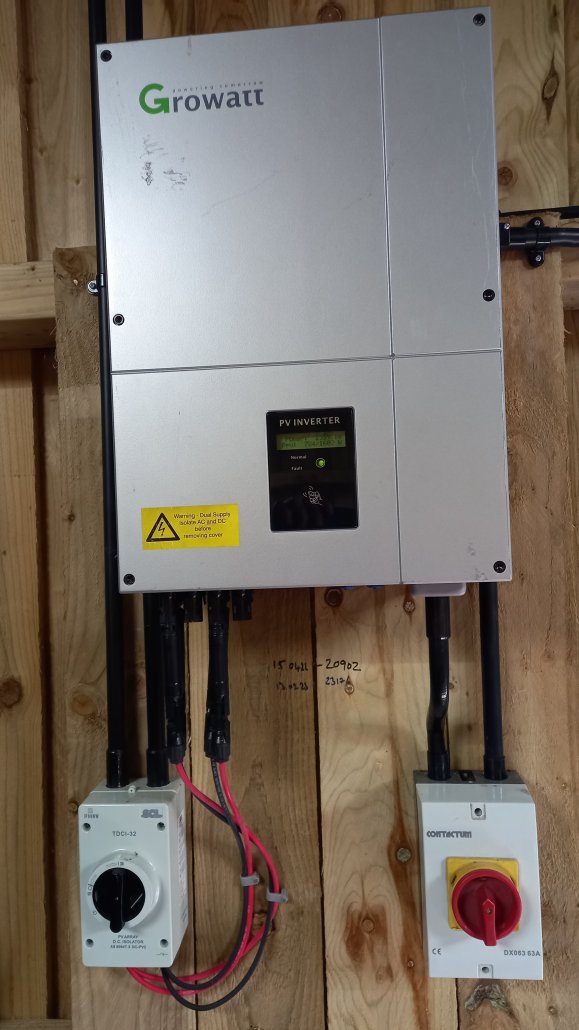
Inverters are an expensive component, but a perusal of ebay located a supplier than specialises in refurbished products at a decent price and I made an offer for £200 for an elderly Growatt 3600 unit. As its name suggests it can produce a maximum of 3.6kW and it has 2 MPPT’s or Max Power Point Trackers but more on that later. I particularly liked this unit as it weighed 20kg, much of which was a huge finned heat sink on the rear of the unit and it does not rely upon cooling fans like modern units. My experience of cooling fans on desk top PCs is that they clog the internals with dust and they need cleaning out every couple of years.
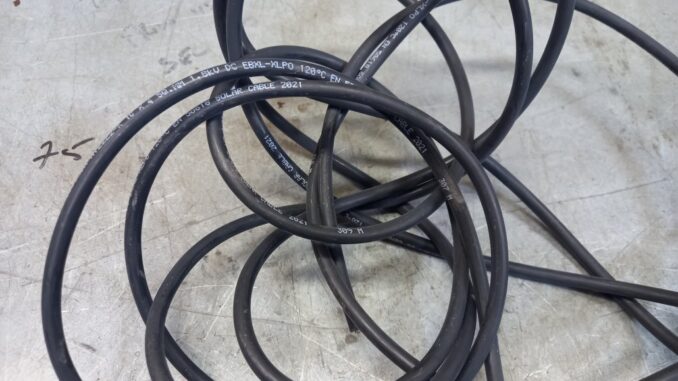
A note on PV panel connections: In rough terms the average solar panel produces around 35-50 volts DC and a maximum of 10 amps. Amps multiplied by volts gives power in Watts. Typically you join up a number of panels in series to form what they call a ‘string’ in the UK. If you parallel up a number of identical strings you get what they call an ‘array.’ So I joined my first 6 in series to provide a theoretical maximum output of about 220 Volts at 10 Amp, a total power of about 2.2kW. Connecting solar panels to the inverter should be done with specific specialist cable that can handle the high DC voltage and also survive sunlight and temperature extremes on the roof. It has thick insulation and a heavy copper cross section, accordingly it’s not particularly cheap.
Solar PV cable is joined via MC4 cable connectors, These are basically inline connectors with a crimped joint for the cable termination and have waterproof glands for the cable entries and an O ring to seal the connection, they push together bayonet style and obviously come in male and female so you need to get your thinking cap on to make sure you couple +ve to –ve etc. It’s really very simple, especially for the panels as they come with the connections already fitted and so connecting them in series is foolproof. You can purchase an inexpensive crimping tool from ebay, or you could maybe solder but that was not tried, I preferred to stick with the design method.
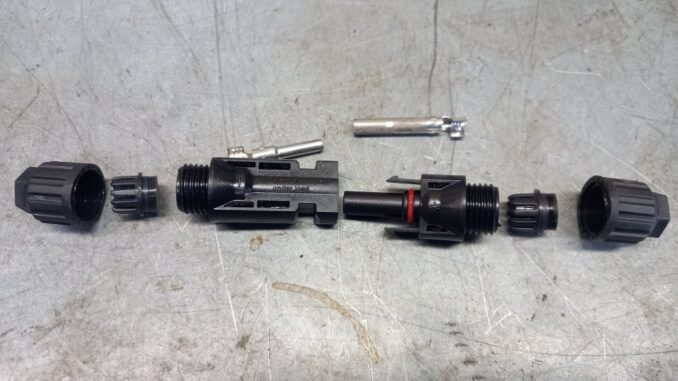
One has to take care with the DC system as a panel when exposed to light produces voltage which can’t be stopped. So you need to think out how you make the connections in advance, or do it in the dark or cover up the panels. PV panels in series easily make enough voltage to kill you, so this part demands respect. And I understand that the DC output is more dangerous than AC mains. Don’t let that put you off, driving a car is potentially deadly but if you remain alert and obey the rules you’ll probably survive. So I basically made all the connections inside the barn and finally connected the +ve and –ve to the pre-assembled string last.
A note on PV panel siting: obvious the panel produces its greatest output when directly facing the sun. It is possible to get tracking apparatus that steers the panel throughout the day to keep it perfectly aligned, I briefly looked into this and then realised that the cost and work required would far outweigh the cost of an extra few panels to compensate for the difference of fixed panel shortfall. Ideally a fixed panel should point South, (in our hemisphere) the optimum angle of inclination varies according to the season and latitude. In the height of summer a panel work best here if perhaps 10 or 20 degrees off horizontal, whereas in winter in should be perhaps 10 to 20 degrees off vertical. There is obviously a compromise between the two and then the compromise depends upon your desire to maximise total output or maximise the system to perform better on average all year, winter included. For most folk the choice is easy, you mount them according to the pitch on your roof, which needs to have a southerly aspect, although east and west facing aspects are OK too, just not optimal. For me I mounted them on the almost flat roof on my barn which drops at 1 in 16 for rain clearance. It’s not far from ideal in summer but output will be poor in the depths of winter, I’m in Cumbria and we get little sunshine in winter anyway so no great loss. For those without decent roof space, but perhaps access to a field or larger garden, ground mounting is also a very viable option and then you can get mountings that allow you to vary the panel in azimuth according to the season. Ground mounting is probably the most DIY friendly too as you won’t need to clamber about on a roof and the construction of timber mounting frames is also an easy option if you don’t like working with metal.
A note on MPPT, or max power point tracking. The solar panel output has a very sharp voltage/current curve, ie max power is produced at a very specific voltage which varies constantly according to sun strength. Allowing the voltage to rise or fall just a few volts from optimum drastically reduces its output. Thankfully our clever inverter constantly monitors the solar string and optimises their output. A string of solar panels must all be aligned together and share identical conditions, if you have 6 panels in a string and 3 are shaded while 3 are exposed to the sun then output drops off markedly. So what happens if you have an East/West roof and you have panels mounted on each aspect? Well obviously in the morning and evening there’s a big split in solar energy between the two aspects and so you wire them up as two individual strings and an inverter such as mine has 2 MPPT inputs, in other words in can manage the two strings of panels independently. You can also use the dual MPPT inputs if you have a mismatch of panels, say 6 times 370 watt panels and then 10 additional 500 watt panels.
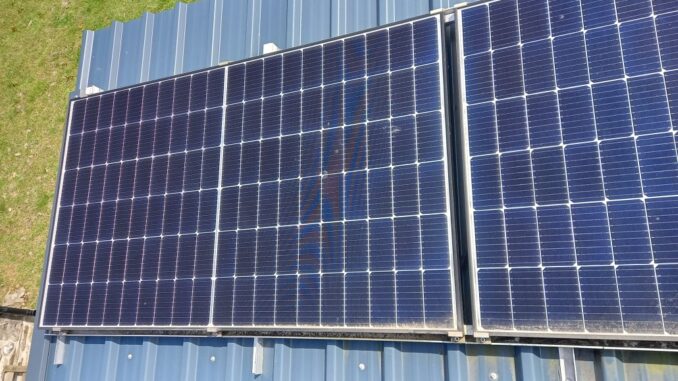
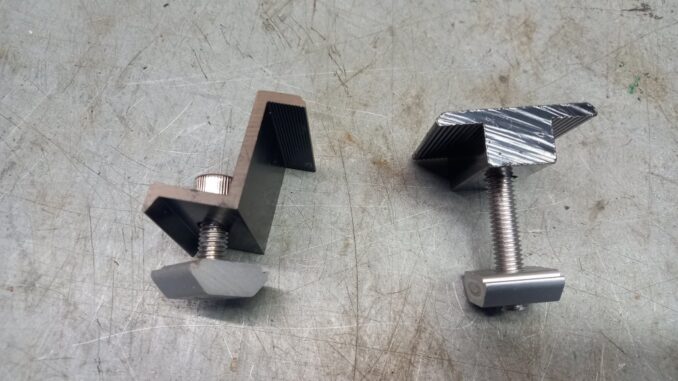
To mount the panels on my steel box section roof, I decided that I would use some aluminium angle sections bolted together to attach a dedicated bespoke mounting rail, an aluminium extrusion and then secure the panels with dedicated fasteners. The panels come with holes in their frame and it is possible to just fix the things with nuts and bolts, but I decided to spend a few quid and then everything should drop into place like Meccano and thus minimise the time spend on my hands and knees. It worked very well indeed and I was impressed with the result. The following pictures show the mounting system, and the various bits and bobs, a picture paints a thousand words and it really is child’s play. I got a free workout lifting the panels onto the roof and carting them about.

The DC wiring is simple, I took the wire through the roof using some cable glands, introduced some drip loops and then pushed it through some 20mm plastic conduit to keep it neat and tidy. The glands and PVC conduit are bog standard stuff available from Screwfix and other places.

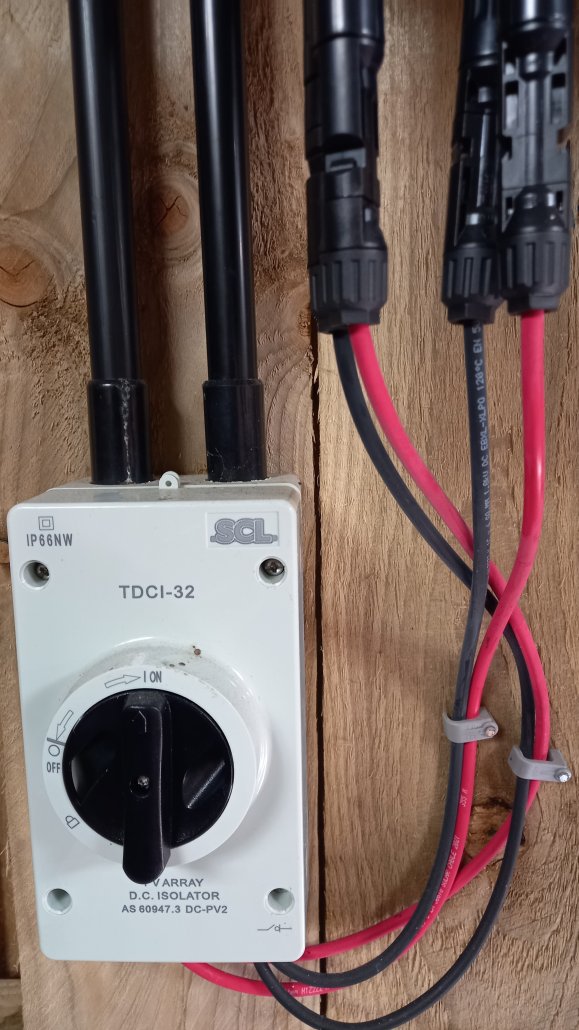
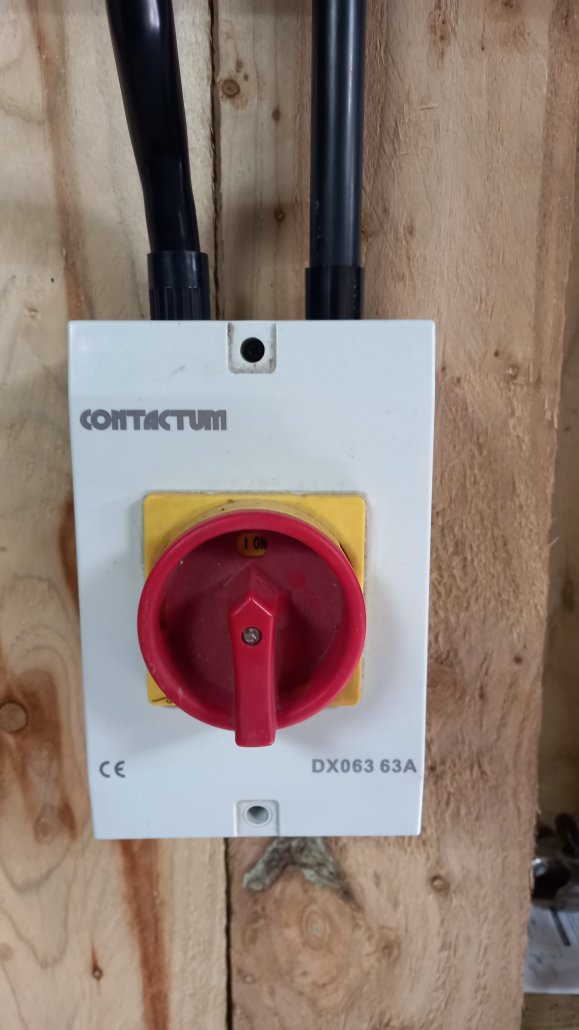
The DC wires must run through an isolator switch before entering the inverter and specifically, this must be a DC isolator switch which is a dedicated product. I understand that breaking a DC current can lead to a greater likelihood of an electrical arc and so the DC isolator is designed to mitigate this. Always remember that the panel output remains continuous as long as there’s daylight so if something goes wrong there is nothing that can be done to switch them off, so I considered the isolator switch pretty much essential. Also some DC specific inline fuses should be fitted, in the picture of the Inverter you can see them at the bottom and they’re the pukka MC4 format that I mentioned earlier. The DC isolator was a pretty expensive item and is configurable in many ways, I used it as a two ganged switches, double pole and so I can totally isolate all the panels if needed.
The AC output from the inverter must route via an AC isolator switch too, these are a very common item and available for a few quid from any supplier, mine came from Screwfix.
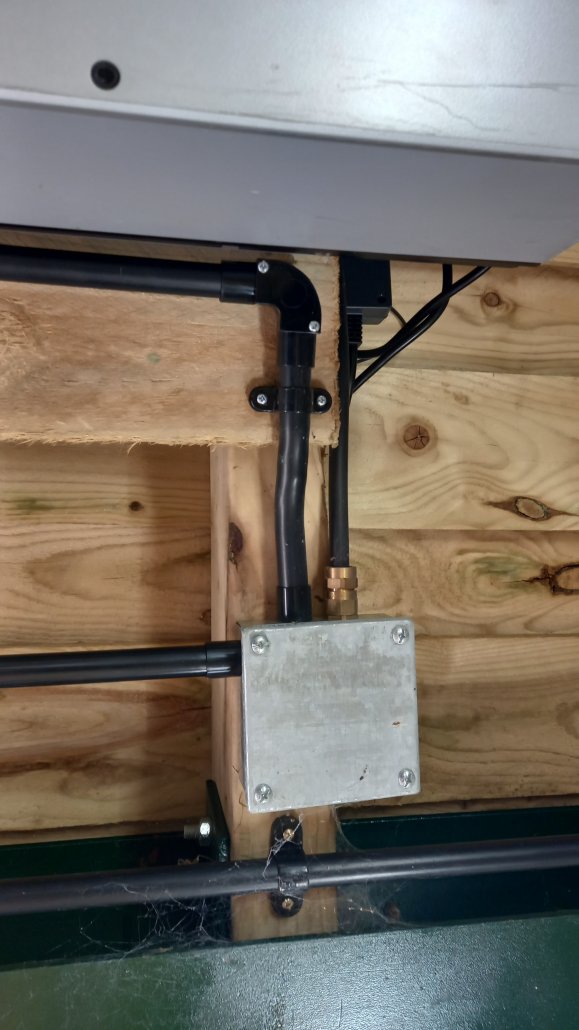
Then in general terms you take the output to your electricity consumer unit and wire it in via a spare way (if available) and a suitable breaker. For me I already had steel wire armoured cable running to the shed from my consumer unit so I picked up on this. I chose to use singles inside 20mm conduit for my AC wiring because I like to keep it all protected from rodents and possible physical damage and the job looks nice and tidy. Here you can see that I use an adaptable box to make the ‘T’ off from the SWA cable to the PV unit and barn supply. These days I believe that Wago make a system for connections that’s much quicker to use, the Chinese have of course flooded the market with clones. The consumer unit and meter box etc must be labelled as ‘dual supply.’
One issue on the horizon potentially is that I wired up the barn with 2.5mm cross section SWA so it is pretty much on the limit with the 3.6kW inverter . The RCD in the main consumer unit is 16amp which I believe to be the biggest one can use with 2.5mm cable. Any further expansion of this existing project is going to require some head scratching.
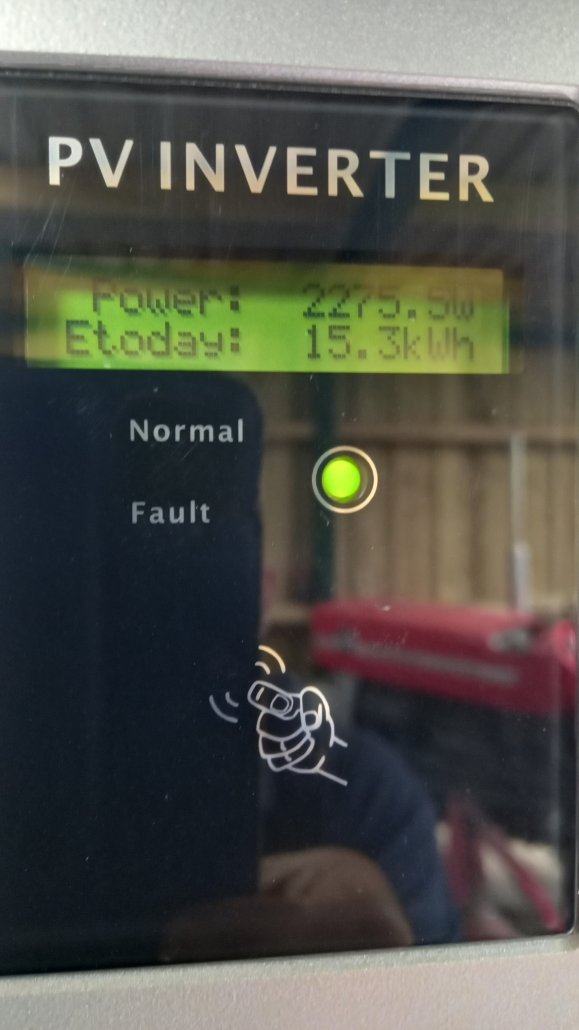
A few days work had it all together and I made the final connections and away it went without fuss. On very bright days at noon I could see the system producing its full 2.2 kW output, but realistically about 2/3rds of that was a good average on a good day and lesser during very dull days, although there is always some useful output. I have an old fashioned electricity meter with the wheel that slowly revolves and delightfully spotted it revolving backwards when output exceeded demand. The day will come when I have to accept a smart meter and then I expect the terms of electricity export to the grid will be poor so I will need a plan B. This will probably be a new hybrid inverter configured to produce zero export to the grid, to charge batteries during the day and to use this storage at night and/or on poor days. An interesting point regarding my meter, the units display will not rewind back beyond zero, thus in effect I have a 10kWh battery provided free by the National Grid. (don’t tell them!)
I was pretty impressed regarding the performance of my 6 panel string and so after a couple of months I ordered an additional 6 panels. I now have an 8 panel string and a 4 panel string (for mounting convenience alone) and so utilise both MPPT inputs on my inverter. I can produce a theoretical 4.4kW of solar power but my inverter can only handle 3.6kW. This is of no concern, I sometimes see the inverter pegged out at 3.6 and all it does is allow the strings’ voltages to rise and thus clip the output. The inverter manufacturer is happy with 10-20% over clocking. Of course this output is reached infrequently, so the power lost is negligible and more than offset by the extra panels.
Although I haven’t kept proper records of the purchases I should think that the cost of the install to be around £2500(ish) and since April 22, at the time of writing in August 25, I’ve produced 11,750 kWh or around £3000 of electricity. The figures would be better if you remember that the first summer was producing with only 6 panels, not the 12 that I have now. I am easily ahead and winning on a daily basis. Of course had I paid for installer’s labour, their mark-up on equipment and a new PV inverter and storage batteries then the situation would be very different and I would still be well behind financially. In my situation, with the old style meter than runs backwards, throughout the summer months I find that I use almost zero electricity. In the winter the situation is rather different and I keep a careful record of my electricity consumption, and overstate my readings in summer and understate in winter, thus on an annual basis I make everything balance and hence not make my supplied meter readings look odd. It provides us with all the hot water we need, and runs the fridge, freezer, dishwasher, clothes washer, cooker etc and of course all the other lesser power consumers like LED lights.
I hope the above gives the reader with some degree of DIY ability and basic tools the confidence to get stuck in and have a go. Panels seem much better value these days and standard inverters have dropped in price, it makes sense if you have an easy mounting solution that doesn’t involve climbing over the house roof like a cat.
© text & images Cardinal Puff 2025
