
How to fit convert an old pedal bike to electric
I’ve been keen on getting an electric bike for some time now. I used to do quite a bit of off-roading, but with advancing years, anything other than dead-flat is a struggle.
There are a plethora of ready-made electric bikes available to buy Ready To Ride, but unless I was willing to spend several thousand, the bikes in my budget (even those at just over £1000), are of varying quality. Even with money no object, I have been doubtful of the amount of work/fixes that can be achieved on a ready-made bike without a visit to a bike shop as all the electrics are hidden away. I like to do my own maintenance.
I therefore decided to get hold of a conversion kit and build my own using a donor bike.
The types of kit available
- Front wheel mounted ‘pancake’ motor (mounted in place of the hub)
- Rear wheel mounted , again with pancake motor
- Mid drive.
The pros and cons of each type
Front wheel kit: Advantages are that it’s dead easy to fit as it simply replaces the front wheel. The disadvantage however is that the motor torque would be applied at a point on the bike with very little weight on it. Likely to get wheel spin, especially on soft ground.
Rear wheel kit: Advantages – again relatively easy to fit, plus better application of motor torque, benefitting from the weight of the rider being over the rear wheel. A bit more expensive to buy as the wheel incorporates the multi-speed cassette.
Both hub motor designs require a separate speed controller. Not a bad thing as they can be replaced separately at a relatively modest cost if they should fail, but they take up space on the cross bar and spoil the overall look.
A disadvantage common to both the hub motor kits is that removing the wheel (i.e. for puncture repair) would require several tools as neither permit the use of quick-release mechanisms – you must use a spanner. Additionally, hub motors need anti-torque bars fitted to prevent the wheel detaching under load (if the wheel nuts work loose), which would need another tool to remove and the motor would need disconnecting (the plugs are a very tight fit to deter water ingress).
The biggest disadvantage with hub motor kits however is that if you damage a wheel, you have to replace the whole wheel and motor. This would be expensive.
Mid Drive: Disadvantage – trickier to fit. Advantages – fitted in the middle of the bike, replacing the existing crankset and incorporates the speed controller. Perfect application of torque as the motor drive mimics normal pedalling. Easy wheel removal.
Additionally the motor can be opened up with hex wrenches for servicing of the planetary gear-set (replacements are easily available), should that be required.
Unsurprisingly, I opted for the mid drive.
The donor bike
I had 3 mountain bikes to choose from that were lying in the shed:
- ‘Specialized’ bike with front suspension and hydraulic disc brakes
- Another Specialized bike with front suspension and normal V brakes
- My old ‘traditional’ Specialized Hardrock bike, no suspension, V brakes
Hydraulic brakes complicate matters as the motor has to detect brake application in order to cut the power. You can get sensors that will allegedly work by sensing the movement of the piston in the fluid reservoir, but I disregarded #1 on the basis that it was an unnecessary complication.
Although #2 has normal brakes, it (and #1) has limited space for the battery mounting as the ‘cross bar’ is not horizontal.
I bought my mountain bike (#3) in 1997. Cost then was around £350 and it seems pretty well made. More importantly, the cross bar is horizontal, leaving a good size gap for the battery. Ensuring the battery will fit in the space provided (unless opting for a more forgiving rear-rack mounted unit) is the most important pre-requisite. I actually mocked up a battery out of cardboard to make sure it would fit before purchasing the kit.

The Conversion
The Strip-down
To start with, all components that will need replacing, plus redundant components must be removed from the bike…
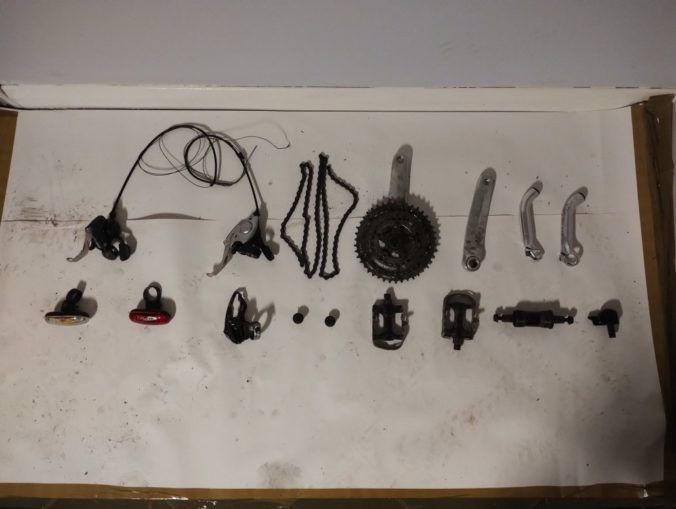
These comprised (from top left to bottom right)
- Left and right gear/brake sets. Unfortunately these are combined units so no parts are reusable.
- Chain. This will be replaced.
- 3-speed crank. Not reusable.
- Right crank arm. Not reusable.
- Bar ends. I won’t bother refitting these.
- Front and rear lights (Mark1 Cat-Eye). These couldn’t be reused as the batteries had leaked.
- Forward derailleur. This is now redundant, so the bike will go from 21 speed to 7 speed.
- Bar end caps. Won’t be reused.
- Pedals . These can be reused. The kit does not come with pedals but the special tool needed for removal is supplied in the kit.
- Bottom bracket cassette. See warning below.
- Bell . This can be reused.

The removal of the bottom bracket cassette is worthy of special mention, due to the effort required. A few years ago I decided to replace the cassette (that’s the bearing that passes through the bike from left to right and has the cranks arms/pedals attached) but hadn’t anticipated how badly seized the special splined retaining collars were. I actually had to resort to using a breaker bar and 4 foot length of scaffolding pole to get the collars to budge. When reassembling I used copper grease to aid future removal, so this time the collars came off using only a 210nm torque wrench (it still fought me a little). A special tool is required that is not included in the kit.

The other point to note is that the left hand side collar is a left-handed thread and the right hand side collar is a right-handed thread.
New parts
This is what you get in the kit (plus the fixings).
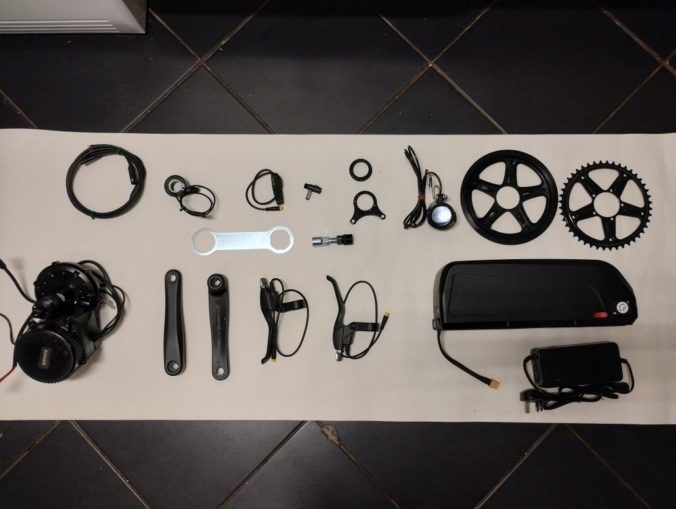
From top left to bottom right….
- Wiring Loom
- Thumb operated throttle
- Gear change sensor
- Speed Sensor
- Motor mount bracket and collar (a special tool is provided in the kit for the collar)
- Front light (won’t bother with that)
- Crank cover plate
- 44 tooth crank
- Special tools (middle)
- Motor
- Left and right crank arms (left one is marked as such and has a left handed thread)
- Left and right brake levers (these have a switch incorporated to cut the motor when braking)
- Battery and charger
There is one more part supplied that didn’t make it into the picture – the handlebar mounted Display/control unit.
In addition to the parts supplied, I had to purchase a new 7 speed gear changer.
The Build
With the bike stripped down the first part to fit is the motor. This is a heavy part (4.5kg) and is fitted through the bottom bracket and secured with a locking collar on one side only.
An unexpected problem cropped up when the motor wouldn’t slide all the way through. Something was blocking. It turned out to be the gear cable guide retention screw. It was protruding into the bottom bracket by about 0.5mm, which was enough to stop the motor assembly inserting.
I turned to my box of machine screws and thankfully found one 0.5mm shorter. Showstopper averted.

The motor could then slide through and be secured using the retaining collar and special tool (note use of copper grease)

Next, it’s the fitting of the handlebar display/control unit, battery bracket (uses the water bottle bracket mountings) and finally the speed sensor (this locates on the rear wheel/frame)
After that, it’s simply a case of attaching all the other parts in the same way you would a normal bike, using copper grease as necessary, and remembering to consider if the part has a left-handed thread.
Connecting up
There are quite a few electrical connections to be made to the wiring loom.
Starting at the front:
Left and right brake sensors. These are incorporated in the new brake levers and cut the motor when you apply the brake.
Gear sensor. This is the equivalent of a clutch and is attached in line to the rear derailleur gear change. It detects the movement of the gear cable and disconnects the motor when changing gear to prevent ‘crash’ gear changes and premature wear of the gear components.
Display/Controller. This enables the setting of speed limits, wheel size (for accurate speed display), pas (pedal assist) and other features.
Thumb operated throttle.

Once the front has been connected up, the last part to be connected is the speed sensor, and you get something looking like this..

Looks a bit of a mess. The part that seemed to take the most time, was the tidying up of all the cables . For this I used braided cable wrap (not included in the kit) for an almost factory finish.

Cost
The kit , including 20ah battery was £650 (of which about half was the battery alone)and I reckon I spent another £20 on sundries. Sounds a lot and I could have bought an entry level ready-made mountain bike for about £200 more, but then I reckon the donor bike I used was better quality, and I am able to fix it when necessary using standard tools.
Job Timings
Strip down : 1 hour
Build : 2 hours
Finishing/Tidying: 4 hours (on and off)
Performance
I’ve tried it up and down the road a few times.
It’s very powerful.
Terrifying.
In conclusion
Anyone who can wield a spanner, socket set and screwdriver can accomplish this, although be prepared to use brute force.
© text & images Dixie 2024


