In Part One I described the processes involved in reloading the (to me at any rate) ‘modern’ .303 British cartridge, all stages of which can easily be automated. Now let’s look at what is involved in the production of historically accurate reproductions of a complex 1860s paper cartridge. I should point out that so much faffing about is required before assembly can begin that I divide the tasks into bite-sized chunks and thus might spend a couple of hours casting bullets one day then an evening cutting and punching out paper and card components etc. so that a batch of 20 cartridges will be manufactured over a week or so. Again, describing this takes longer than doing it but here goes.
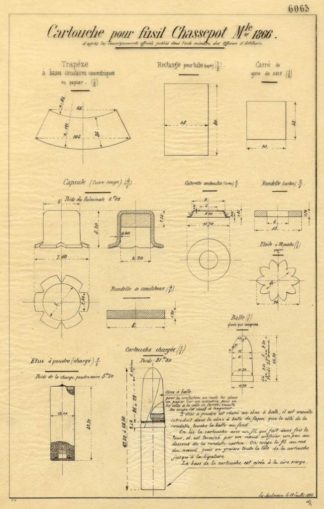
Fortunately the technical specifications and methodology for producing Chassepot ammunition are readily available online in the form of a very detailed and comprehensive 1868 French Navy document which once I’d translated it proved to be absolutely invaluable.
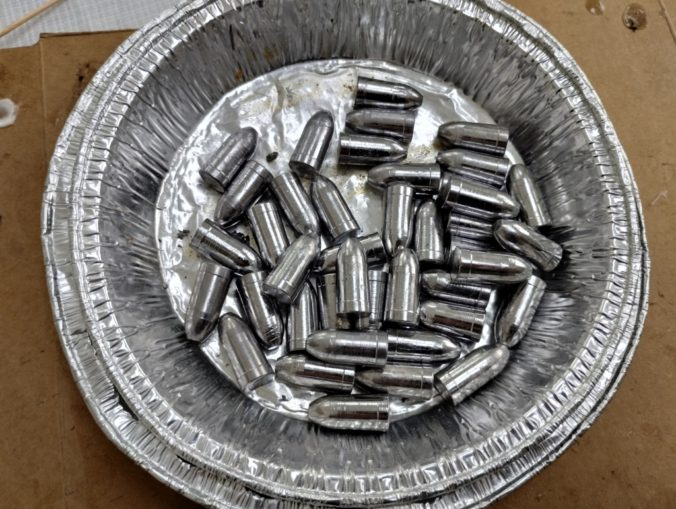
Step 1 – Cast the bullets
Although any .45 calibre bullet can be used in non-historically accurate cartridges, true replicas can only be made if authentic, tapered 11mm bullets with a 1mm deep driving band are used. I cast these from pure lead in a special mould imported from the USA at significant cost. In the French arsenals rather than being cast, bullets were formed from lengths of pure lead wire under hydraulic pressure thereby ensuring uniformity of weight and dimensions.
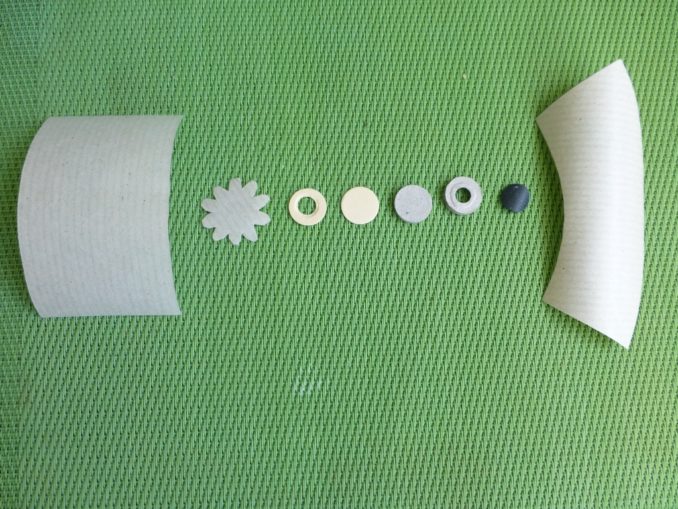
Step 2 – Cut out the paper, card and rubber parts required
Each cartridge is made from five separate paper or card components plus packing pieces to adjust length together with one rubber disc as follows:
- a paper rectangle that forms the powder tube (cut from ordinary brown parcel wrapping paper),
- a piece of brown paper in the form of a 10-pointed star that forms the base of the powder tube (these are an absolute pain to cut out by hand),
- a curved brown paper ‘patch’ or cone that attaches the bullet to the powder tube,
- a 12mm plain disc of thin rubber sheet (cut from an old bicycle inner tube) that covers the open end of the percussion cap and prevents the firing needle from becoming excessively fouled in use,
- a 13mm diameter ring of thin card with a 6mm hole in its centre for mounting the cap centrally in the base of the cartridge,
- a similar ring to the above but cut from 2mm thick cardboard for sealing the top end of the cartridge after it is filled with powder. The card and rubber discs are punched out using wad cutters and a hammer.
Step 3 – Form the powder tube
To do this a paper rectangle is rolled tightly around a 13mm diameter brass mandrel and glued along one edge with wood glue.
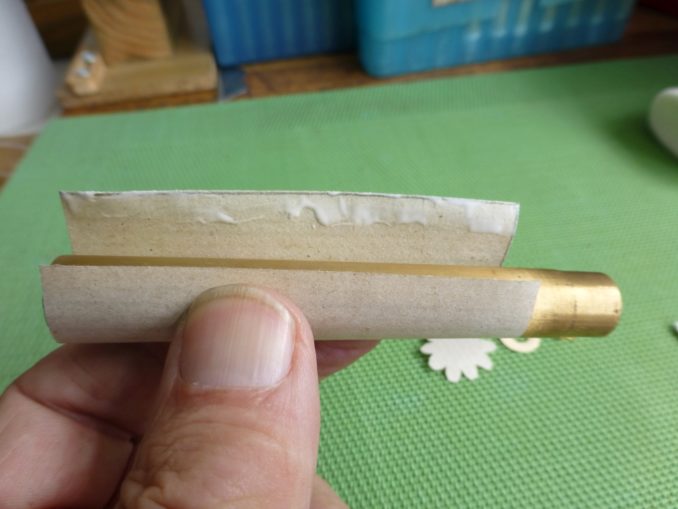
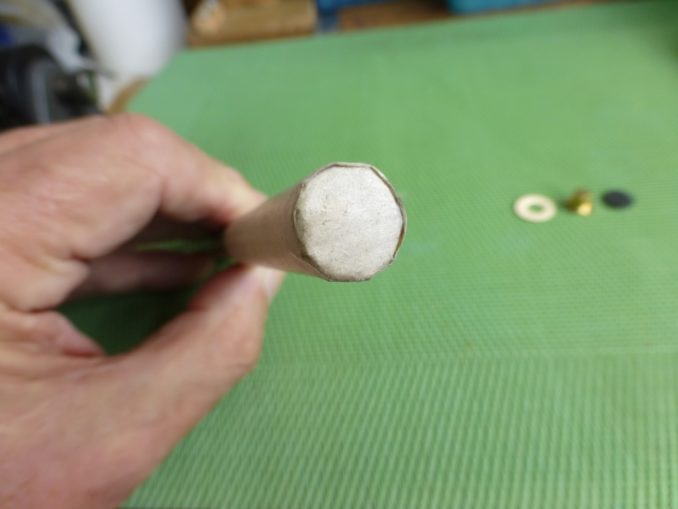
Next a 10-pointed star is pressed onto one end of the mandrel which has been machined down by the thickness of the paper so that the star points can be folded down into this reduced diameter area.
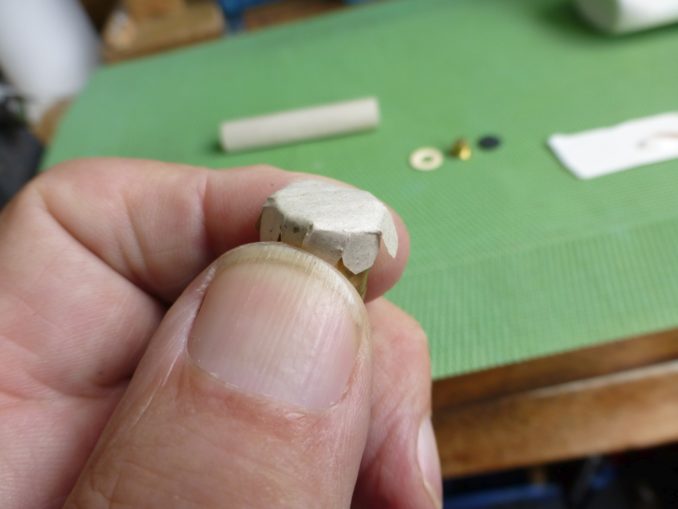
Using the mandrel, the star can now be pushed into one end of the tube almost to the other end. Glue is then applied to the inside of the tube end and the star is pushed level with the end of the tube to form a neatly sealed base with the star points hidden inside.
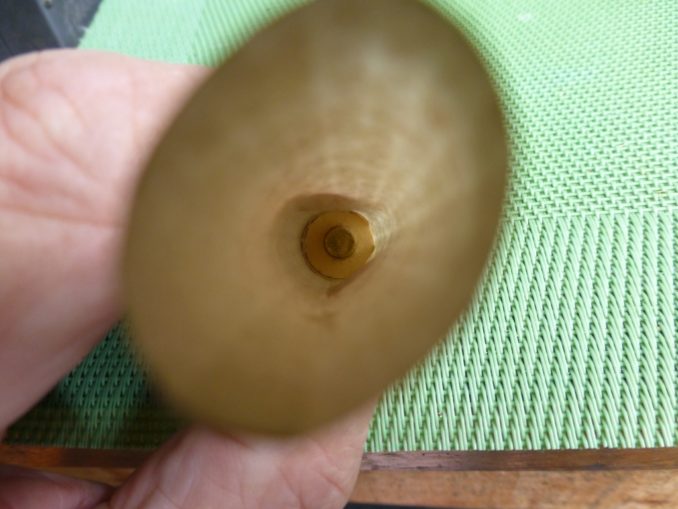
Stage 4 – Prepare and insert the percussion caps into the powder tubes
In order to centralise the cap in the tube and to hold it firmly in place, a standard four-winged ‘top hat’ musket cap is pushed through the central hole of a thin card disc and glued to it. Next a rubber disc is glued over the open end of the cap which when dry is inserted into the powder tube using a wooden dowel so that the rubber disc is in contact with its base.
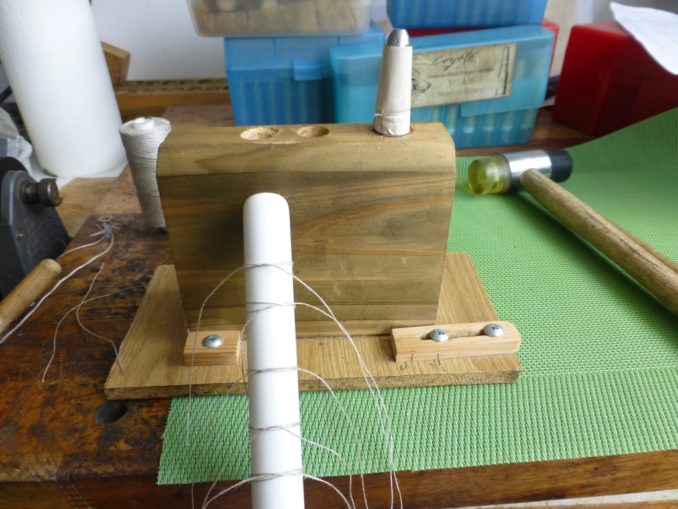
Stage 4 – Filling the tubes with gunpowder
The official load for this cartridge was 86 grains of black powder, one grain more than the 577-450 Martini-Henry cartridge; the Chassepot is a powerful rifle! If the powder were merely to be tipped into the paper tube it would have insufficient rigidity when loaded into the rifle chamber and would burst without firing. This happened to me regularly before I mastered the filling technique. In the French arsenals, racks of filled cartridges would be placed on vibrating plates and left until the powder had settled fully but this is not practical in a domestic environment. To overcome this I first place the empty case into a snug-fitting 14mm hole bored in a wooden (soon to be metal) support block and pour the powder into the tube in three portions tapping the block with a small hammer to settle the powder each time before pressing it down as firmly as I can with a piece of wooden dowel. The hole in the block is drilled to the depth of the finished cartridge so its length can be adjusted to specification by the addition of thin card discs before being topped off with a 2mm thick card ring.
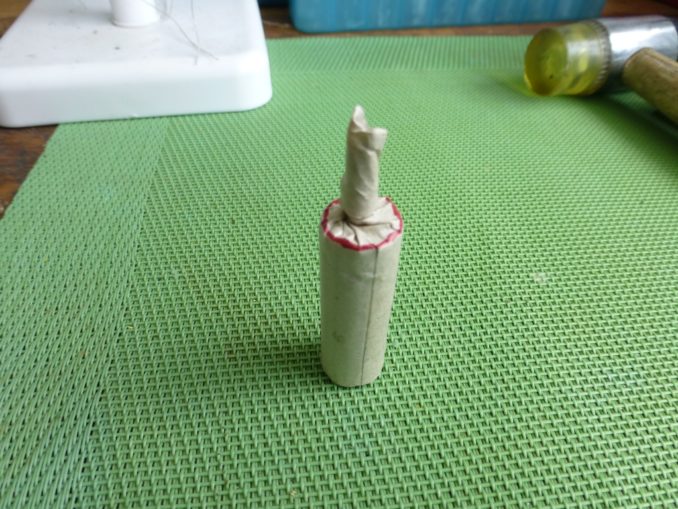
All that remains is to remove the filled tube from the support block and tightly twist the tail of the paper tube which is then trimmed down with side-cutters with the remaining small stub being pressed down into the central hole of the card ring to leave a flat and level surface upon which the bullet will sit.
Stage 5 – Silk reinforcing the cartridges
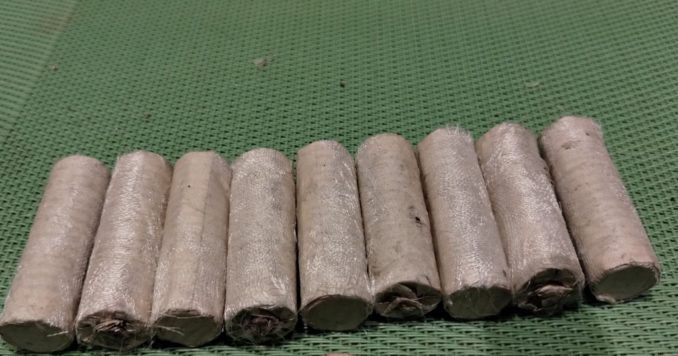
The final task so far as the powder tubes are concerned is to cover them externally with genuine silk mesh. This is designed to make them more durable and fire resistant so as to hold the residues together once the rifle has fired thereby ensuring that the debris is expelled after the discharged bullet rather than remaining in the breech where it would make loading the next cartridge impossible.
As I haven’t so far been able to examine an original cartridge, I can only guess at the thickness and coarseness of the silk mesh that they used and I have a feeling that the silk I bought on eBay may well be finer and flimsier than the original.
A rectangle of silk, which is difficult both to cut and handle, is simply rolled around the powder tube, glued in place and then trimmed with scissors that are reserved exclusively for cutting silk in order to keep them sharp.
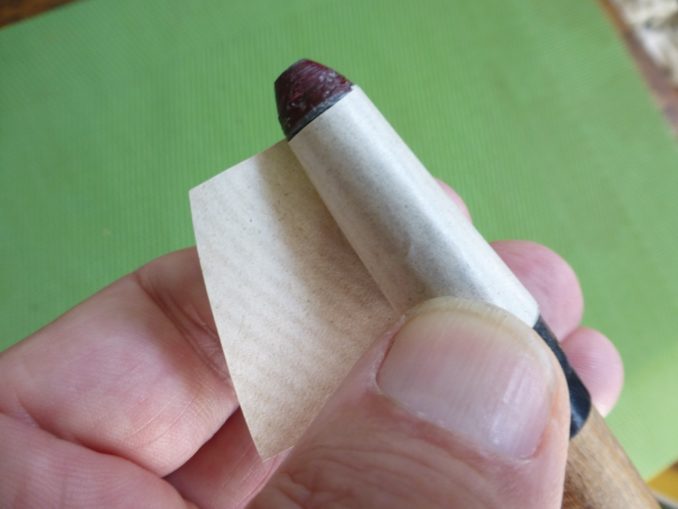
Stage 6 – Forming the bullet ‘patch’ or cone
Here an arc-shaped piece of paper is wrapped around a former made from a shaped dowel with a bullet attached and glued down one edge to form a truncated cone whose function is to attach the bullet to the powder tube.
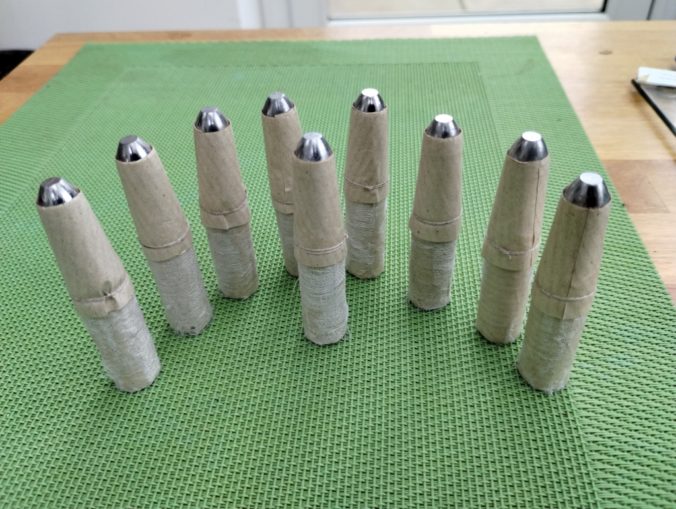
Stage 7 – Final assembly
All that remains is to drop a bullet into a patch, fit it onto the upper end of the powder tube and then tie them both together with thin linen thread using an ‘artificer’s knot’. To make things easier, I make up batches of knots using a toilet roll holder as a former. The knots can then be slipped off the former one at a time and over the powder tube/patched bullet when needed, pulled very tight and secured with a half hitch just below the upper 2mm card ring to hold the finished cartridge firmly together.
Stage 8 – Lubrication
The original specification calls for a small amount of grease comprising four parts of tallow (rendered animal fat) to one part of beeswax to be applied to the paper patch from its upper edge to a few millimetres above the ligature, this I do with my fingers, rubbing the lubricant well into the paper. The original cartridge also had a layer of pure melted beeswax applied to its base surface so as to protect the percussion cap from moisture and also to lubricate the firing needle as it penetrates the base of the cartridge.
Time/cost analysis
1. Cost and time per round – .303 British
So there we have it. Describing the processes involved in producing the two cartridges was the easy bit; the problem now lies in analysing the respective costs and times involved in creating a single cartridge of each type. Here I will have to make some assumptions and approximations. Firstly there was quite a bit of expenditure on the necessary specialist tools required to reload self-contained brass cartridges but as all that was incurred 23 years ago since when I have reloaded literally thousands of rounds in a variety of calibres, I think the costs can now be written off. What I need to concentrate on are the consumables.
For the .303 British cartridge and using July 2023 prices these come out at:
Case bought as once-fired 22 years ago so negligible but let’s say £0.05
Primer at £55 per 1000 £0.055
Powder at £116 per Kg (15,400grains)/39.5 grains per charge £0.30
174 grain FMJ Bullet at £31 per 100 £0.31
Total cost per round is therefore approximately £0.72
As I said earlier, the part that takes most time is cartridge preparation. Cleaning cases in the tumbler can be discounted as there is no personal involvement other than to dump the brass into the media, switch the machine on and then leave it to its own devices for four or five hours. Checking 50 cases for damage, neck sizing, de-capping, length checking, deburring if necessary and priming them would take around 50 minutes. Measuring, check-weighing and filling the cases with powder would take, say, another 50 minutes and seating the bullets possibly another ten minutes giving a total time for 50 rounds of approximately 110 minutes or just over two minutes per round.
2. Cost and time per round – 1866 Chassepot
The cost of the consumable paper, card and rubber components is negligible as I can get literally thousands from a roll of Tesco wrapping paper, a sheet of 2mm card, used targets and old bike inner tubes.
Paper, card, rubber parts and glue, say, £0.05
Top hat musket cap at £20.45 per 200 £0.11
Swiss No 3 black powder at £100 per Kg (15,400 grains)/86 grains £0.55
(Krank’s own black powder at £57.80 per Kg/86 grains) (£0.32)
Lead bullet cast from scrounged lead flashings and roofing offcuts £0.02
Lubricant – a smear of lard/beeswax mixture £0.01
Total cost per round (ignoring cost of bullet mould and electric melting furnace) is therefore approximately £0.74 or £0.51 depending on the powder used.
Unlike conventional brass cased rounds which as I have shown can be rattled off very rapidly once the cases have been prepared, paper cartridges can only be made by hand and consequently are both labour and time intensive for one person to produce. Using a batch of 20 cartridges as a basis, marking and cutting out the paper components will take something like 90 minutes as the 10-pointed stars are fiddly to produce. The card and rubber parts are punched out with wad cutters but centring the holes in the card rings requires close attention and takes time, say 45 minutes. Forming, gluing and sealing 20 powder tubes will take an estimated 30 minutes and filling, packing, sealing and checking for length another hour or so. Making 20 bullet patches will require perhaps another 30 minutes as they can be difficult to roll just right. Cutting out the silk, gluing it to the powder tubes and trimming off the excess will take another 45 minutes while tying the knots and attaching the bullets to the powder tubes will be another 40 minutes or so. Greasing the assembled cartridges takes perhaps five minutes at most. Adding on 60 minutes for casting the bullets leaves a grand total of 345 minutes for the batch or approximately 17.5 minutes per round.
Conclusions
Doing this exercise has been an eye-opening experience for me as previously I had no idea of the costs and times involved in processing ammunition for my old rifles. It was something I just did. I knew of course that .303 was easy, if tedious, to process but I was not aware that each round that I fire costs me nearly 75p or 15 shillings in real money (gulp!) One of my ambitions has long been to fire a magazine of .303 from a WWI Lewis machine gun but even I blanch at the thought of paying for a pan of 97 rounds costing more than £70 to be consumed in little more than 10 seconds. Nevertheless, it comes as a surprise to learn that if I use the best black powder available, the cost of a .303 round and a Chassepot round are practically identical. In future I think I will stick to using a cheaper but perfectly acceptable powder to keep costs down. It can be clearly seen though that the big difference between the two cartridges lies in the time it takes to produce them, nearly nine times as long for the Chassepot as for the .303.
Shooting .303 rounds is easy, just buy a couple of boxes of commercial ammunition and all you have to do is load it into the magazine, operate the bolt and pull the trigger. Many people never progress beyond this stage and nor do they develop an interest in reloading so at the end of each session they simply gather up their fired cases and dump them in the scrap bin. But factory ammunition for the Monkey Tail, the Martini-Henry or the Chassepot is simply not available so if you want to shoot one of these classic old rifles you have no alternative but to make your own. To many shooters this is unthinkable but to weirdos like me it’s what makes our hobby so interesting and rewarding.
© text and images; Tom Pudding 2023