

In these airy-fairy, love-y, care-y days of environmentally friendly practices, lessening one’s consumption and reducing waste is a big thing. One can, should one wish to, signal one’s immense virtue in all sorts of exciting ways.
There again, in my day we’d call this modern phenomenon ‘being sensible’ or ‘making do and mending’, to be frank. Not anywhere near as sexy a notion, but essentially the same idea. I suppose, growing up in a working-class family, with Dad a steelworker and Mum a housewife, we had the habit of being sensibly frugal. Ours was a household where ‘putting a bit aside’ and ‘make do and mend’ was simply a way of life.
Though the concept had begun during the 1914-18 Great War, my parents (both born at the start of the 1920s) would have grown up steeped in this ‘make do and mend’ ethos themselves. To reinforce their belief in prudent measures, it experienced a significant revival in the 1940s as the restrictions of WWII bit deep once again. At that time, the government regularly released steadying suggestions to make the most of scarce resources, with cheery pamphlets covering a wealth of topics.
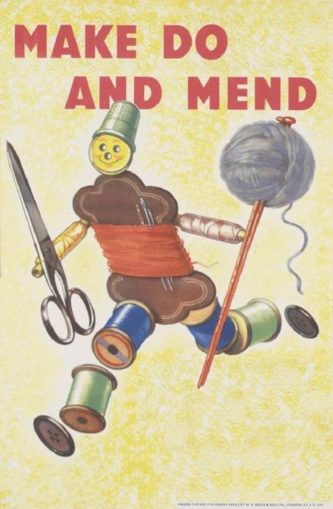
Figure 1: Make Do and Mend
These included instructions about keeping chickens, how to turn a flower garden into a veg patch, foraging for free food, and the many ways to mend or modify clothing, including ’How to darn and patch clothing’ by the wonderfully named Mrs Sew and Sew! Mum and Dad were experts at this. Mum made many of her own and us kids’ clothes, sewing on an old treadle Singer machine. Likewise knitting, not just plain and purl, but Arran patterns, providing warm woollies for all the family. Dad mended and gardened like a man possessed and scavenged whatever he could to make things for the house, garden, car… and that precious shed.
No wonder then that, a few years ago, this conscientious childhood mindset opened the window to a whole new hobby. It all started when I wanted a piece of pretty jewellery to enhance a summer dress. A necklace, perhaps, and some earrings? Whilst out and about one day, I spotted what looked quite an attractive costume jewellery necklace in one of the ubiquitous ladies’ clothing chains. Unusual for me, as those places usually make me want to run a mile…and I am not a runner!
But, drawn to it like a magpie, over I went for a closer look. It was indeed very cute and would go nicely with my rather plain linen dress. Then I made my mistake. I turned over the little piece of card it was attached to, and nearly keeled over in shock. They were asking over £20 for what was basically a piece of badly produced tat! It went straight back on the display stands and I stalked out of there in a huff.
Muttering arcane curses relating to this absolute bloody ‘rip-off’, I was stomping down the street when I passed a charity shop window in which was a selection of ‘pre-loved’ sparkly beads and baubles (apparently not loved that much mind, since it’d had all been donated).
Still quietly grumbling to myself, I went inside for a browse and spied a nice necklace in the pastel colours I wanted. It took a bit of patience, untangling it from a jumble of others, but when I finally freed it, it was pretty. Only a cheaply made piece, like the ones I’d seen in the high street store, but appealing. It was a great deal longer than I wanted and, of course, there were no earrings in a similar colour or style, so I was close to putting it back when a thought struck me.
As this necklace was inexpensively produced, the links in the chain weren’t soldered. I already had some fine-tipped tools from the fly tying, so could have a go at shortening it myself. In fact, if I did that, I could possibly make a pair of matching earrings with the leftover bits. If I stuffed it up, so what? I’d only be out of pocket to the tune of whatever price it was marked up as. This time, looking at the ticket gave me a shock of a different nature. They wanted the princely sum of 99p!
Sold to the lady with the plain dress, and home it came. Once safely there, I sat and looked at it for a while, pondering. I sat so long that I’d puzzled ’til my puzzler was sore. How to approach it? What did I want to achieve? OK, I knew I wanted the necklace to show above the neckline of that dress, so needed to shorten the (very pretty) chain by quite a bit. So far, easy-peasy.
But I also wanted, if possible, to make some earrings. Hmmm, that wasn’t quite so straightforward. As you can see from the photo, the two smallest sections of decorated metal that I decided to use were identical. “No problem”, I hear some of you say. But problem there was, as they curve slightly. Would they look alright if one earring curved slightly ‘in’ and the other ‘out’? Or should I make them so both curved ‘in’, which meant turning one section upside down? But then the colours would be reversed…
More head scratching ensued, until I decided to just give it a go and see how it looked in practice. Sometimes, planning and theory can only get you so far so out came the tools. At this point, I just had a mini side cutter, flat nose pliers and needle nose pliers. I’d bought a handful of earring hooks some time before, so had everything I needed.
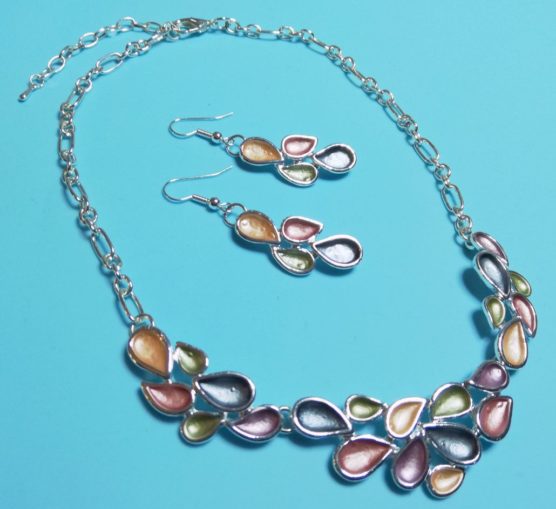
Figure 2: The first attempt
© SharpieType301, 2021
It took me a while, but for a first attempt, I was rather pleased with the result. I’ve worn the set on a number of occasions, and it has received a few compliments. That in itself stoked my enthusiasm, so I started looking out for new ‘projects’.
Pretty soon I fell in love with a truly hideous necklace, not for itself, but for the potential I could see. It had chunky squarish Mother of Pearl beads in iridescent smoky greys and black, with fabulously sculptural shapes and textures. In its original state, these were interspersed with ghastly cheap shiny ‘silver’ beads, making the necklace look truly tacky. Again, it was too long, so it just begged to be taken to bits.
Around the same time, I also found a string of ‘pearls’ in a similar smoky grey with a subtle sheen. No real deal these, all perfectly round with no shape or colour variations, but decent fakes, possibly shell or Majorica pearls. Happily, both of my ‘project’ finds cost me considerably less than a fiver.
I set to, stripping the beads from both of my purchases. Deconstruction was really straightforward, and redesigning the necklace wasn’t too troubling. I wanted those lovely chunky beads close together but free of the back of my neck, for comfort in wearing. A single ‘pearl’ between them, with a longer section of ‘pearls’ towards the clasp seemed to fit the bill.
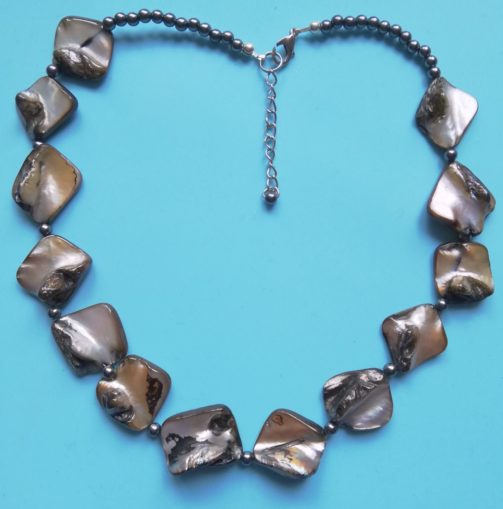
Figure 3: The smoky Mother of Pearl
© SharpieType301, 2021
I was restringing them onto monofilament nylon fishing line. Now this fine, slippery line is not something I’ve used in the past, except for fishing. Deciding how to finish it nicely so it couldn’t be seen meant mystified moments. I settled on knotting the line and using calottes (clamshell findings, tiny domed metal pieces, hinged, and with a hook) to conceal the knots.
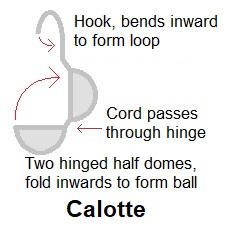
Figure 4: Calottes
© SharpieType301, 2021
This was where the challenges became apparent. Knots! Which to use, how to make them substantial enough so they wouldn’t slip back through the calotte hinge, but not so big that the two domed halves didn’t meet nicely. My first attempt led to a one or two rude words as the knotted line broke while I was clamping the calotte closed. Beads all over the floor and, like spilled milk, it’s surprising how far they can travel!
My next attempt was no better as there was too muck slack left in the line once knotted. Tied it again, now the knot didn’t sit nicely in the calotte dome. OK, try again, as this is how we learn… I settled on tying the line around a tiny bead to pinch it against the inner surface of the dome. Well, it worked, but would I do it again? Nope, it just doesn’t look right, so I’d have to rethink for the next project.
This wasn’t long to come. An opera length flapper style necklace, again from a charity shop, begged to be given new life. Two strands of shell discs (most likely tropical seas Spiny Oysters with their pinkish white exterior with streaks of orange and a creamy interior). These were interspersed with irregular glass beads, in clear, apricot, and Tyrian purple colours. Gorgeous, and unexpectedly elegant.
There was a mass of material and lots of potential here, so I decided that it should be possible to make two necklaces, some earrings, and a simple bracelet. Again, I set to. This time the process was very simple. No deconstruction and restringing needed, as by cutting three different lengths from the original buy, a three strand, tiered necklace was the first to be made.
Once again, I used short sections of smooth white glass beads towards the clasp for comfort at the back of my neck. Without these, it would have been quite bulky. Knotting the three strands of monofilament was a doddle, and the knots sat neatly in the calottes with no setbacks at all.
Next up, the earrings, and these took a lot more thought. Here I did deconstruct a length of the strand, to give me a pile of beads to choose from. I wanted the two earrings to be a close match, and those little white glass beads came in handy again, to separate the beads I’d selected from the necklace along the headpin (the bit that drops from the earring’s hook). Experimenting with the arrangement to achieve the required result took time, but the finished article was exactly as I’d wanted.
A simple single strand necklace next. Just a shade longer than collar length, this wouldn’t need a bead section near the clasp as it was so light. Finally for the bracelet, but here I was unsure. It would be easy to make a simple bracelet—a shorter version of the necklace I’d just finished. But this seems a cheat’s way out and, although pretty, not quite what I’d like to complete this set. What I chose instead was to wait a while and look around for inspiration. That could involve twining my strand with another string of beads, perhaps seed beads. Maybe I could use the Swarovski-type crystal beads, or small pearls (or pearl-like beads), pink or white, round or baroque. Decisions, decisions. The bracelet remains, as yet unmade.

Figure 5: The Shell and Glass set
© SharpieType301, 2021
More shell next, these beautifully irregular-shaped nuggets, most likely from oysters, or perhaps mussel shells from Southeast Asia. Dyed a soft green, their natural iridescence still shines though, making them very attractive. Two long strands, a steal at £1.50. This gave me plenty for a triple-stranded necklace, a pair of earrings and a simple bracelet. Those silver metal beads were part of the original strands, and didn’t look too bad, so may as well make use of them.
To conceal the ends of the line this time I used a crimp and an endcap. It looks alright, and is simpler to handle than those tricky calottes, but would probably have been better yet if I had chosen smaller beads for the last section of each strand and left a longer section of these as it isn’t the most comfortable to wear. Another learning point to remember. The earrings worked well, although I’d originally used three of the green nuggets—way too long, so I took them apart to start over. The bracelet is merely threaded on elasticated cord. Dead simple.
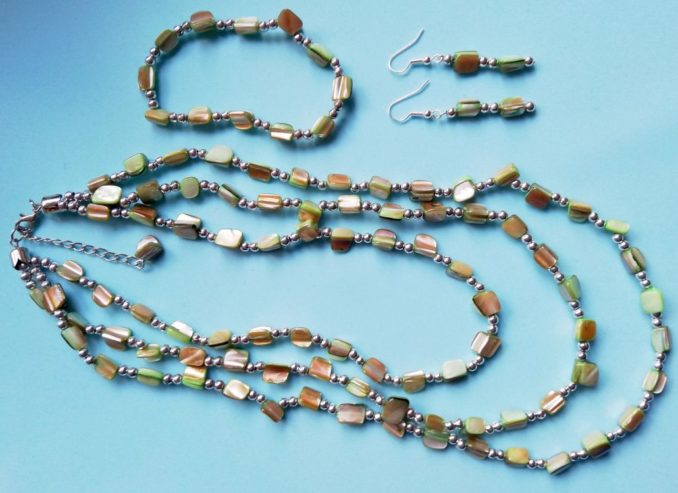
Figure 6: The Green Shell set
© SharpieType301, 2021
By working with shell beads, I have followed a very long tradition. It is likely that from an early date in prehistory, jewellery made from shells, stone, and bone, was worn as protection from the dangers of life or as a mark of status or rank. Thirty-three beads unearthed near the mouth of Morocco’s Bizmoune Cave have been dated to be between 142,000 and 150,000 years old, arguably the earliest shell ornaments in prehistory.
Made from Nassarius shells (dog whelks), each perforated and measuring roughly half an inch long, some have been coloured with red ochre. Though the discovery of how to work metals, ultimately gold, changed our concept of jewellery right up to the modern day, it’s obviously not just me who thought that that this natural material was worthy of merit.
Playing around with earrings came next, mostly using a variety of leftovers or bits and bobs picked up as I spotted them in charity shops, mainly for little more than pennies. The large shells on the left needed holes drilling in the tips, so the trusty Dremel came out to play. The pair on the right were made by weaving green embroidery silk around a bit of bent wire to form the mistletoe leaves, with some glorious little glass beads for the berries which were once part of an exceeding tacky child’s ring.

Figure 7: Earrings
© SharpieType301, 2021
By now I was getting ambitious, so the next project combined three completely disparate pieces of jewellery. This was going to be a Christmas spectacular, and I planned to wear it at the work’s ‘do’, which, of course never happened.
It comprised a wonderfully sparkly and Art Deco design heavy necklace that Mr S had spotted and bought for me (but with a curb chain that didn’t seem to be in keeping), a superb silvery, smooth-against-the-skin, wheat chain and, to help with making the earrings, a delicate, jewelled bracelet to dismember. As that final piece was missing several of its stones, the charity shop charged me 50p and it was a struggle to get them to accept that.
Firstly, two of the dark bejewelled elements were removed to shorten the decorative part and make the earrings, then the wheat chain was substituted for the curb, and reduced in length so it would break to sit nicely below the collarbones. All of this was relatively straightforward, but the earrings were to prove more of a challenge.
I had taken the bracelet apart, but the sections I wanted to incorporate needed a little gentle encouragement (OK, bending) to fit as I wanted. With the first, I was a bit ham-handed so the terminal broke. That served to focus the mind, and I took greater care with the others! At one point, I was thinking I might need to prise out some ‘stones’ from one piece to insert into a section I wanted to use but was missing some of its jewels. Thankfully, it didn’t come to that.
The next challenge was to adjust the earrings to hang as I wanted when worn. This once again required gentle encouragement and gave me a few scary moments. The finished set is definitely worth it though, and I can only hope that 2022 brings an appropriate event for its maiden outing.
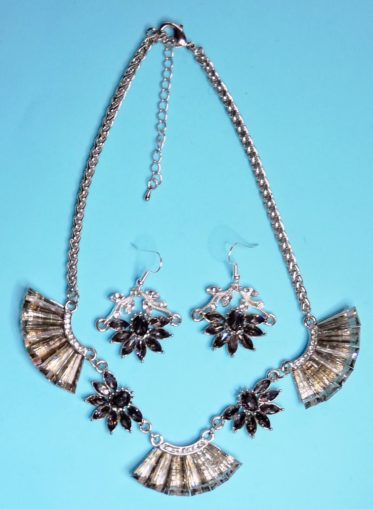
Figure 8: Art Deco spectacular
© SharpieType301, 2021
The smaller pieces from that broken-up bracelet have been incorporated into another, quite delicate and ladylike necklace, changing the design and making it my own. I moved a few of the decorative elements around and have indicated the new elements from the bracelet in the photo. Subtle changes, and perhaps unnecessary, but I think it is nicer now.
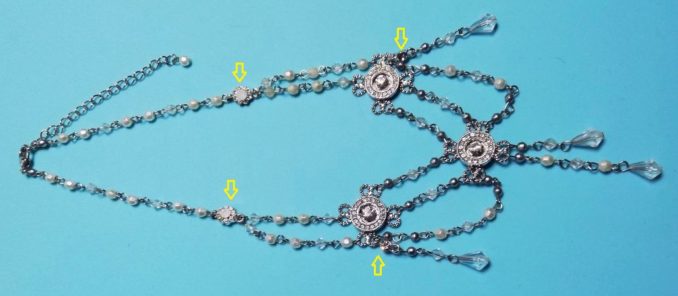
Figure 9: Delicate
© SharpieType301, 2021
That length of leftover curb chain? Some Puffins will already have seen it, in the red flower necklace and earrings I posted just before Christmas.
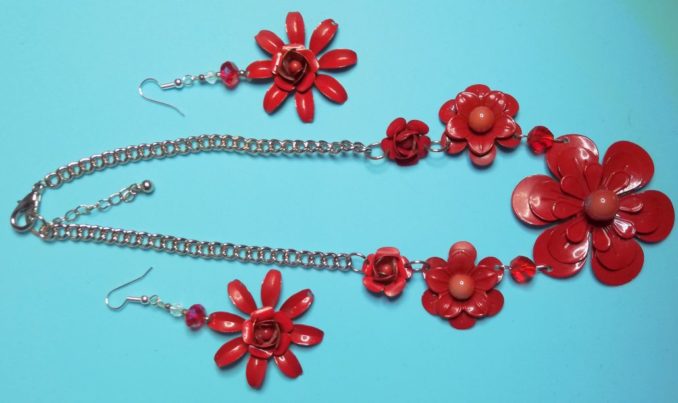
Figure 10: Red Flowers
© SharpieType301, 2021
I loved the bright red, one of my favourite colours, so went to town on another multi-origin set, most of which came from a £2.99 bag of odd broken jewellery. For those who are interested, Oxfam often put bags like this out, sold by weight. The bags are usually clear, so you can get a fair idea of the goodies inside before you part with hard-earned cash. Do look carefully, as bags are often stuffed with awful kiddies’ plastic tat. It’s a great way to acquire findings as well as the pretty bits, and anything unused or disliked can be re-donated.
The bits for this set came from a damaged troll bead bracelet (no, I don’t know why they are called that), and a couple of broken sparkly beaded necklaces with various parts missing. Amazingly, the centrepiece was just loose in the oddity bag, completely unseen until I tipped it out to sort through. Nice.
The earrings, I’m told are Christmassy. I wore them to work, and they attracted a lot of attention. I suppose they are snowman-like in a way.
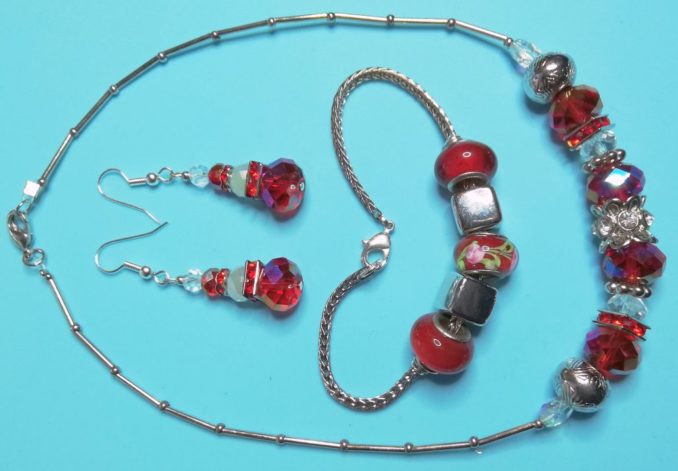
Figure 11: Red Sparklies
© SharpieType301, 2021
I can’t finish this without showing you the tools I use. You know what a Dremel looks like, and to be fair, I don’t use that often for this. My hands tend to act as a vice to hold whatever I’m working on, though they do get sore after a few hours. At some point, I’ll get around to buying some better-quality, more specialist tools, as most of these came from market stalls, but they do OK for now.
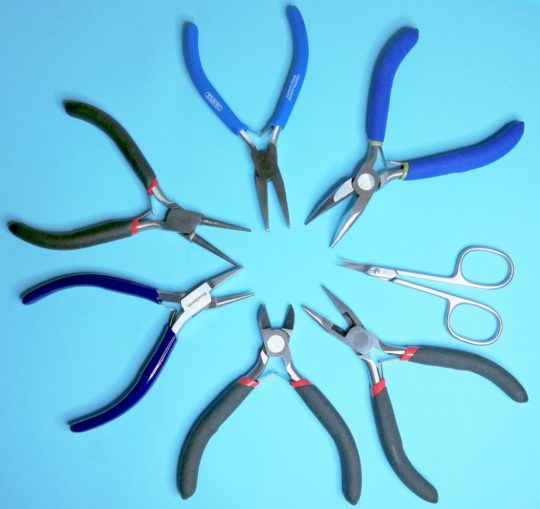
Figure 12: The Tools
© SharpieType301, 2021
It’s a fun hobby, which seems to align quite well with fly tying as it’s very hands-on and practical, incorporates design and some of the skills overlap. It can be pricey (have a look at some of the specialist jewellery making shops!) but, my way, it doesn’t have to be. It’s been nice figuring out the ‘how’ of making jewellery, though I may do a course at some stage as they will be skills to learn that I haven’t considered.
That leads me to a rather appropriate quote from the tenth Sikh Guru and warrior poet, Guru Gobind Singh (1666 – 1708)
The ignorant person is totally blind he does not appreciate the value of the jewel.
© SharpieType301 2022

