Introduction
First of all, it’s great to see that Going-Postal is still up and running. It’s always a pleasure to write an article and have it published here. It’s also good to see a lot of the – dare I say it – “veteran crew” still commenting and I’m here to bore you all with another laser project!
The idea for this came from a simple dye laser over at LaserKids , but I have made some changes/improvements to the basic design.
These include:
1) Easy to adjust ‘end mounts’.
2) A removable HR (High Reflectivity) mirror.
3) A peristaltic pump for dye circulation.
4) Using commercially available capacitors for the flash lamp.
This project is nearly two years old and there are a lot of photographs I thought that I had lost. They were recovered from a (currently) broken laptop. Pictures speak a thousand words – so someone wrote…
The Basic Design
Lasers are very simple and (generally) need three basic ingredients:
1) A “gain” medium or active medium. It can be a solid, liquid or a gas. It’s where the electrons do their magic; where the laser light is produced.
2) A “pumping” energy source to excite the electrons in the gain medium. This can be an electrical plasma – as in a gas laser. Optical – as in a ruby laser or even an explosion.
3) Feedback mirrors. These ‘stimulate’ the excited electrons back to their ‘ground state’ releasing more and more light – light amplification. One mirror is ‘highly reflective’ (HR) and the other is ‘partially reflective’ (OC, or output coupler) – it’s where the laser’s light is emitted.
Rhodamine 6G Dye
The gain medium for this laser is an organic dye called Rhodamine 6G or simply R6G. As the noun “dye” suggests this is a liquid. It is also a flash lamp pumped laser – the same as a ruby laser. Just to clarify, ‘pump’ will be used in the context of exciting the electrons in the dye unless it’s otherwise explained. This laser uses a liquid pump and a flash lamp pump.
You may not know it but you have probably made use of this dye. Have you ever used one of those pink highlighter pens? Chances are that’s R6G based. It’s used in biology for cell dyeing and forensics to enhance fingerprints. It can also be used as an aquatic tracer dye. Best of all, it makes for a really efficient laser gain medium. Except for the caveat(s)…
Nature Doing What It Does Best
..and that is to shaft! Dye lasers are four energy level lasers and therefore easy to pump. R6G would be almost perfect but nature has been a tad cruel at the atomic level.
R6G naturally lases at around 530nm to 540nm – the yellow/orange part of the optical spectrum. It’s a fast laser. In fact the upper excited state time for the electrons are less than four nanoseconds (4ns). This gives a basic laser pulse of about a hundred nanoseconds (100ns) or less. Speed is good and the world’s most powerful lasers are fast (the headline should read “ten to the power of twenty three watts per centimetre squared; it’s the Daily Mail!) . The main problem with R6G is something called the “triplet state lock”.
Analogy Time
As a child you might have played with a small toy car that ran around a plastic track and formed a ‘loop de loop’. If the car was travelling fast enough it would complete the loop, but too slow and – CRASH! Well, a similar thing happens with R6G dye. Nature has placed a ‘trap’ right at the optimal lasing point. Pump it too slowly and CRASH! No laser light. The electrons get sent off to the ‘triplet state’ energy level.
Fortunately, like the toy car, time is on our side. If we can pump the R6G dye fast enough we should be able to avoid most of the triple state lock (nothing to do with pensions!). Unfortunately, this leads us to some design complications.
The Laser Dye
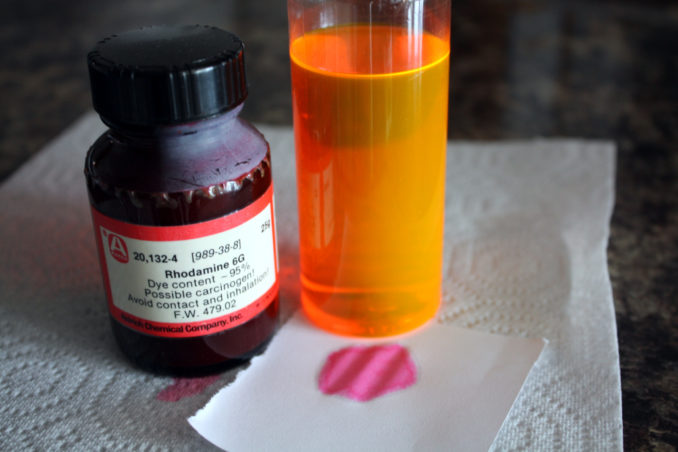
The top photograph shows a one hundred millilitre (100ml) bottle of R6G dye. The R6G that I’m using is a fine brown powder. It readily dissolves in any alcohol. I’ve used isopropyl alcohol here, but ethanol will also work and is probably better – in fact gin or vodka will lase quite well! You don’t need much dye, this is about 0.1 grams. You can see the beautiful yellow fluorescence from the dye which is caused by the daylight entering a window on the right.
Alcohol is flammable (duh!). Why is this a problem? Remember that we need a lot of speed for the flash lamp pump. The lamp that I have used is a small xenon photo flash lamp – about two inches long. This is NOT an ideal lamp. To make it work at the correct speed we have to drive it at a VERY HIGH VOLTAGE. More on that in the second part.
As you can imagine, very high voltages and flammable liquids are not a good combination.
My Design
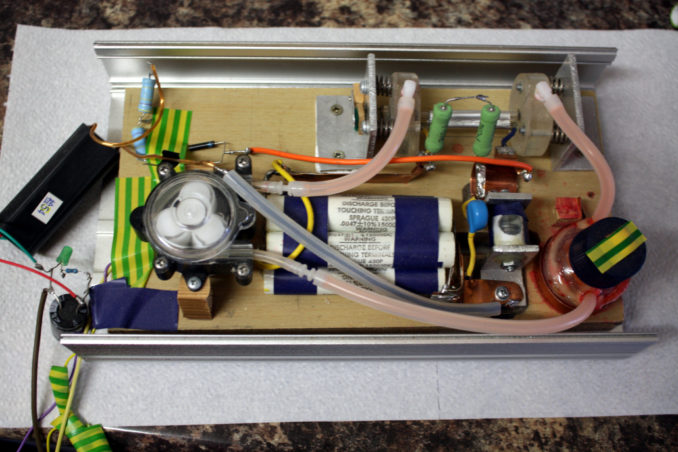
Okay, the above photograph does look like something that you might find by a roadside in Afghanistan. It’s not supposed to be an IED but the little beast can nearly be as dangerous.
The whole laser measures approximately ten by six inches. Top right shows the ‘laser cell’ and below that is the ‘spark gap switch’. The ‘sticks of dynamite’ are the main storage capacitors and are rated at fifteen thousand volts. The peristaltic pump and the dye reservoir can easily be seen. Finally, the black thing on the far left is a high voltage generator. Cheap Chinese tat, but it does the job (it’s the HV generator from a taser gun). It delivers about ten thousand volts with this laser’s electrical load. All the bits are screwed to a thick piece of MDF wood that sits inside an aluminium case. The laser never got passed the evaluation stage (project not finished) but it does prove that it works.
One other thing about the design, note the copper strips (rather than wire) that form the circuit. This is because of something called the ‘skin effect‘ that occurs with very high voltage electrical circuits. As the voltage increases the electrons tend to “flow” more toward the outside of a conductor. Transmission power lines, working at a hundred thousand volts (and a lot more!), use this to a sort of advantage. The core of the transmission cable is steel wire – not a good electrical conductor but it has a high tensile strength – and the outside is covered with aluminium (or copper). Poor strength but a good electrical conductor. Stringing wire cables nearly a quarter of a mile between pylons is quite an engineering feat.
In part two I’ll write about the laser cell’s construction and switching a very high voltage into a small flash lamp. I bet you can’t wait!
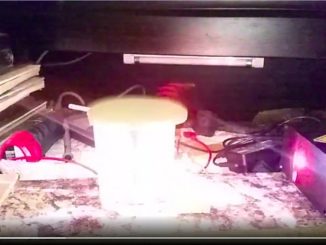
A note on the featured image: The R6G laser beam as viewed through some smoke. The smoke was trapped inside of a salad bowl. The bowl’s diameter is about ten inches at its widest point.
© text & images Doc Mike Finnley 2021
The Goodnight Vienna Audio file