
Clarke (Plt Off), Royal Air Force official photographer / Public domain
When he became Air Officer Commanding (AOC) of Bomber Command and at the start of the bombing campaign, Harris said, quoting the Old Testament:
The Nazis entered this war under the rather childish delusion that they were going to bomb everyone else, and nobody was going to bomb them. At Rotterdam, London, Warsaw and half a hundred other places, they put their rather naive theory into operation. They sowed the wind, and now they are going to reap the whirlwind.
The city of Dresden is the capital of the German state of Saxony. On the night of 13/14th February 1945 it was attacked by 720 heavy bombers of RAF Bomber Command. On 14th 15th February it was further attacked by 527 bombers escorted by 784 P-51 Mustang fighters of the USAAF, which dropped a further 3,900 tons of high explosives and incendiaries on the already destroyed city centre. Estimates put those killed in the raids as between 22,700 and 25,000. In the decades since the war, large variations in the claimed death toll have fuelled the controversy, though the numbers themselves are no longer a major point of contention among historians. In March 1945, the German government ordered its press to publish a falsified casualty figure of 200,000 for the Dresden raids, and death tolls as high as 500,000 have been claimed. The city authorities at the time estimated up to 25,000 victims, a figure that subsequent investigations supported, including a 2010 study commissioned by the city council.
Bomber Command and the Opposition in 1945
The aircrews and aircraft of RAF Bomber Command had evolved from a relatively blunt instrument in 1942, into a precision instrument of war that could attack with pinpoint accuracy, small but vital enemy centres of gravity, such as the V-weapon production plants and their storage and launch facilities. The bombers had paved the way for the D-Day landings, by destroying German transport infrastructure and had covered the Normandy landings themselves with electronic jamming and spoof countermeasures.
Bomber Command’s aircrews, ground crews and infrastructure numbered nearly 1.000,000 men and women and on any given night could muster over 1,000 bombers for attack and diversionary raids. The Short Stirlings had been withdrawn from the bomber order of battle (ORBAT) and were fulfilling an essential role in supporting airborne operations. The redoubtable Wellingtons were used in operational conversion units (OCUs) along with the rather tired Halifax Mk IIs and the Short Stirling. The aircrews were highly trained and motivated and there were thousands of men in the training pipeline to replace casualties. Perhaps more importantly, the German night fighter forces had been denuded and their fighter aircraft and their crews were were tired and often lacking in fuel.
Harris wanted his front line bomber force to consist of Lancaster IIIs and he had rather a poor view of the Halifax III bomber. This was because of constraints in the aircrafts’ bomb bay prevented the aircraft from carrying the 4,000lb high capacity “Cookie,” which was essential for attacking city targets. The “Cookies” were designed to blow off the roofs and windows, allowing the incendiaries to burn out the target with the resulting fire storm. These tactics were successful in Lubeck, Hamburg and Dresden, and in the case of the latter, beyond all expectations.
By Beata May her own work
Aircrew Selection and Training
All of Bomber Command’s aircrew were volunteers. A Bomber Command crew member had a worse chance of survival than an infantry officer in World War I; more people were killed serving in Bomber Command than in the Blitz, or the bombings of Hamburg or Dresden. A total of 126 squadrons served with Bomber Command. Of these, 32 were officially non-British units: 15 RCAF squadrons, eight RAAF squadrons, four Polish squadrons, two French squadrons, two RNZAF/”New Zealand” squadrons and one Czechoslovakian squadron. Most aircrew were aged between 19 and 25, although some were as young as 16, and at least one was in his sixties.
Because of the threat of Luftwaffe attack and the ever-growing need for trained aircrew, the British Commonwealth Air Training Plan (BCATP), often referred to as simply “The Plan” was instigated. It was a massive, joint military aircrew training program created by the United Kingdom, Canada, Australia and New Zealand, during the Second World War. BCATP remains as one of the single largest aviation training programs in history and was responsible for training nearly half the pilots, navigators, bomb aimers, air gunners, wireless operators and flight engineers who served with the Royal Air Force (RAF), Royal Navy Fleet Air Arm (FAA), Royal Australian Air Force (RAAF), Royal Canadian Air Force (RCAF) and Royal New Zealand Air Force (RNZAF) during the war. Under a parallel agreement, the Joint Air Training Scheme in South Africa and Southern Rhodesia operated training bases for aircrew. Multiple training schools also operated in the United States where bomber pilots, navigators and bomb aimers were trained. On completion of basic military training aircrew candidates would wear a white flash on the front of their service issue “side caps” denoting their “aircrew under training” status. No matter where they originated in Britain or the Commonwealth they could be shipped to the next available training course in any of those nations where pilots were trained to fly at “Elementary Flying Training Schools” and the other aircrew trades attended appropriate trade schools such as “Air Navigation Schools” or “Bombing and Gunnery Schools.” Following completion of training at a graduation ceremony aircrew were presented with their aircrew brevet and either handed their sergeant’s stripes or commissioned as officers. Unlike the RAF of today, around 60% of aircrew were Senior Non-Commissioned Officers.
The newly qualified aircrew would begin the next phase of training, usually in Britain at one of the Operational Training Units (OTU). Aircrew memoirs repeatedly mention arriving at an OTU in large groups of mixed aircrew trades all assigned to the next course and being left to mingle in a large hall to form crews. The process of forming a crew generally followed the pattern of one or two men who knew each other from training schools deciding to fly together then looking for other members from different trades to team up with. Most crews were formed in this manner. Instructors were usually experienced aircrew being “rested” after completing an operational tour and were tasked to lead the airmen for 5 or 6 weeks on night flying, navigation, bombing, cross country, all-weather and air gunnery/fighter affiliation practice operations in the types of aircraft they were likely to fly operationally. The process was hazardous and crashes due to inexperience cost over 8,000 casualties, including instructors who had joined a crew needing particular support or guidance. During mid-wartime many crews trained using “weary” Vickers Wellington bombers, at OTUs and then had to convert, learning to fly the four-engined Stirling, Halifax or Lancasters which they would fly after joining their squadrons. This process occurred at Heavy Conversion Units. During this time each crew would be joined by a flight engineer, and an additional air gunner to man the mid-upper gun turret although sometimes the gunners would agree to exchange turrets.
Royal Air Force official photographer, RAF Hixon / Public domain
Aircrew Trades
By 1945 most of the early war ranks and trades had gone or been killed, such as Observers and Wireless Operator/Air Gunners. The typical heavy bomber had a crew of seven consisting of:
Pilot. A qualified pilot flew the aircraft and in the RAF he was usually the captain (function not rank) of the crew, making the key operational decisions even if his rank was junior to other members of the crew. The pilot was often a commissioned officer but he could hold any rank from Sergeant up to Group Captain. Officers of higher rank did occasionally fly operationally but were discouraged from doing so due to concerns of them being taken prisoner. Captains were often informally referred to by their crews as Skipper or Skip. A pilot wore the traditional double-winged flying badge “pilot’s wings” on his tunic above his left breast pocket.
Navigator
Worked at his desk behind a curtain, behind the pilot in the Lancaster and below the pilot in the nose of the Halifax He instructed the pilot on route and airspeed required throughout the operation in order to arrive on target within the expected time period in company with the other aircraft due to attack, he operated any radar navigational aids carried aboard. Concentration was needed in flight navigation of the aircraft. Flight navigation was an inexact science and a lapse of concentration could be fatal. A navigator wore a single-winged aircrew flying badge with a wreath containing the letter N on his tunic, above his left breast pocket denoting his trade specialisation. At this stage of the war pilots and navigators were often commissioned on completion of training.

Devon S A (Flt Lt), Royal Air Force official photographer / Public domain
Air Bomber
More normally called the “bomb aimer”. This crewman rarely manned the nose-mounted gun turret (usually twin .303 machine guns) during the operation and provided assistance to the navigator Most of his time was spent shoving out of a chute, bundles of “Window” aluminium foil that masked the radar return of the bombers and disrupted the night fighters’ radar. To crawl into the bomb aimer’s compartment in the lower section of the nose of the aircraft to operate the bomb sight and press the button to release the bomb load onto the target at the necessary time. During the “bombing run” when the bombs were about to be released he would instruct the pilot on minute adjustments to course in order to release the bombs as accurately as possible, the release of the bomb load activated a flash photograph to record the target below. The Bomb Aimer was usually often a commissioned officer, he wore a single-winged aircrew flying badge with a wreath containing the letter B on his tunic, above his left breast pocket denoting his trade specialisation
Wireless Operator
In the middle years of the war it became more usual to train airmen specifically as “wireless operators” and no longer add air gunnery training to their instruction. These men graduated training schools to earning a single-winged aircrew flying badge over a wreath containing the letters S on his tunic, above his left breast pocket denoting his trade specialisation as “signaller”
Flight engineer
Chosen specifically for mechanical aptitude. The flight engineer sat beside the pilot and assisted him particularly at take-off, during the flight monitoring the engines and vitally the fuel efficiency, pumping fuel between the tanks as required. It was not unusual for these airmen to be a little older than their colleagues and often had prior mechanical experience. The flight engineer was usually a sergeant; promotion was very slow indeed. A flight engineer wore a single-winged aircrew brevet (actually a flying badge – the use of the word “Brevet” actually describes a certificate in French) with a wreath containing the letter ‘E’ on his tunic, above his left breast pocket denoting his trade specialisation. During the initial operational service of four-engined bombers second pilots were carried until sufficient flight engineers had been trained.
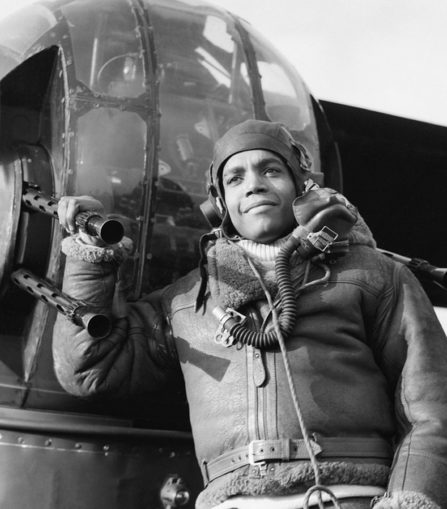
Air Gunners
To protect the heavy bombers from a German Luftwaffe night fighter force which had evolved at great speed to become extremely effective, most of the new heavy bombers had three power-operated gun turrets usually sited in the nose, dorsal (mid-upper) and rear (tail) positions requiring an additional gunner. The traditional tail end Charlie “Rear Gunner” continued in place facing rearwards with his quad mounted .303 Browning machine guns while an additional air gunner, known as the “Mid Upper” gunner climbed up into a sling harness to man a power-operated dorsal turret on the top of the fuselage. On the Halifax this turret was armed with four .303 Browning machine guns and on the Lancaster it had twin .303 machine guns. Within crews some gunners preferred one turret or the other would usually fly in that, in other crews the gunners might swap turrets regularly.
HQ Bomber Command, Royal Air Force official photographer / Public domain
Special Operators
Number 101 Squadron of Bomber Command carried an eighth crew member, to operate specialist jamming equipment. The Special Operators would listen in on the Luftwaffe “Running Commentary,” which plotted the course of the bomber stream. By 1945 the Germans had perfected the “Tame Sow” technique where the night fighters were vectored onto the bomber screen and the night fighters would use their own radar to identify and attack the bombers. The Special Operators were German speakers who would attempt to jam the fighter ground control radar or send false and contradictory messages. The Germans responded by using female fighter controllers. Because these operators if shot down were likely to attract “special interest” from their interrogators, they wore a brevet with RO to pass as radio operators or observers. Many of them were German Jews who had escaped to England and we can only marvel at their bravery.
The Contract
As payment for the long and expensive training lavished upon them, Bomber Command aircrews were expected to complete a tour of 30 operations or Ops. Always Ops, never missions or sorties. The USAF flew missions, Bomber Command flew Ops. Pathfinders and elite within an elite, initially had to fly 60 Ops which was reduced to 45 to encourage more volunteers.
Not all Ops counted as one off the tour length. Minelaying was worth half an Op and was often conducted by crews still in training. Targets in France also counted as half an Op. On completion of a tour, aircrew were funnelled into the flying training system and many were killed instructing trainee aircrews. The others who survived the dangerous training phase, went on to second or third tours and were unlikely to survive.
These young aircrews had a complex and ambivalent relationship with their Commander-in-Chief. To the media and civilians he was known as “Bomber” Harris. His aircrews would refer to him as “Butcher” Harris, because of his seemingly indifferent attitude to their losses. He conducted his war from a bunker at RAF High Wycombe and rarely visited the front line squadrons. Harris was driven and had absolute belief that the strategic bombing would shorten the war and perhaps end it.
Air Chief-Marshal Harris began his military career in the 1st Rhodesia Regiment as a bugler and was sworn in to the Regiment on 20th October 1914. The 1st Rhodesia Regiment briefly garrisoned Bloemfontein, then served alongside the South African forces in South-West Africa during the first half of 1915. The campaign made a strong impression on Harris, particularly the long desert marches—some three decades later, he wrote that “to this day I never walk a step if I can get any sort of vehicle to carry me.” South-West Africa also provided Harris with his first experience of aerial bombing: the sole German aircraft in South-West Africa attempted to drop artillery shells on his unit, but failed to do any damage. His war in Africa ended in July 1915, but he felt compelled to serve the mother country. He learned to fly at Brooklands and was prometed to Flying Officer in the Royal Flying Corps. He flew Sopwith Camels on the Western Front, claimed five enemy aircraft destroyed and was awarded the Air Force Cross (AFC) on 2 November 1918. Intending to return to Rhodesia one day, Harris wore a “Rhodesia” shoulder flash on his uniform. He finished the war as a major.
In the inter-war years Squadron Leader Harris was jointly appointed station commander of RAF Digby and commander of No. 3 Flying Training School RAF. He later served in different capacities in India, Mesopotamia and Persia. He said of his service in India that he first became involved in bombing during the usual annual North West Frontier tribesmen trouble. His squadron was equipped with poorly-maintained Bristol F.2 Fighter aircraft. In Mesopotamia he commanded a Vickers Vernon squadron. “We cut a hole in the nose and rigged up our own bomb racks and I turned those machines into the heaviest and best bombers in the command.” Harris also contributed at this time to the development of bombing using delay-action bombs, which were then applied to keep down uprisings of the Mesopotamian people fighting against British occupation. With regard to this period, Harris is recorded as having remarked “the only thing the Arab understands is the heavy hand.”
Harris returned to Britain in September 1939 to take command of No. 5 Group. Appointed a Companion of the Order of the Bath on 11 July 1940, he was made Deputy Chief of the Air Staff in November 1940 and promoted to the acting rank of air marshal on 1 June 1941. The Butt Report, circulated in August 1941, found that in 1940 and 1941 only one in three attacking aircraft got within five miles of their target. As part of the response Harris was appointed Commander-in-Chief (C-in-C) of Bomber Command in February 1942. He was advanced to Knight Commander of the Order of the Bath on 11 June 1942.
In 1942, Professor Frederick Lindemann (later ennobled as Lord Cherwell), having been appointed the British government’s leading scientific adviser (with a seat in the Cabinet) by his friend, Prime Minister Winston Churchill, presented a seminal paper to Cabinet advocating the area bombing of German cities in a strategic bombing campaign. It was accepted by Cabinet and Harris was directed to carry out the task (Area bombing directive). It became an important part of the total war waged against Germany. In October 1943, emboldened by his success in Hamburg and increasingly irritated with Churchill’s hesitance to endorse his tactics wholeheartedly, Harris urged the government to be honest with the public regarding the purpose of the bombing campaign:
The aim of the Combined Bomber Offensive … should be unambiguously stated [as] the destruction of German cities, the killing of German workers, and the disruption of civilised life throughout Germany … the destruction of houses, public utilities, transport and lives, the creation of a refugee problem on an unprecedented scale, and the breakdown of morale both at home and at the battle fronts by fear of extended and intensified bombing, are accepted and intended aims of our bombing policy. They are not by-products of attempts to hit factories.
The Aircraft of 1945
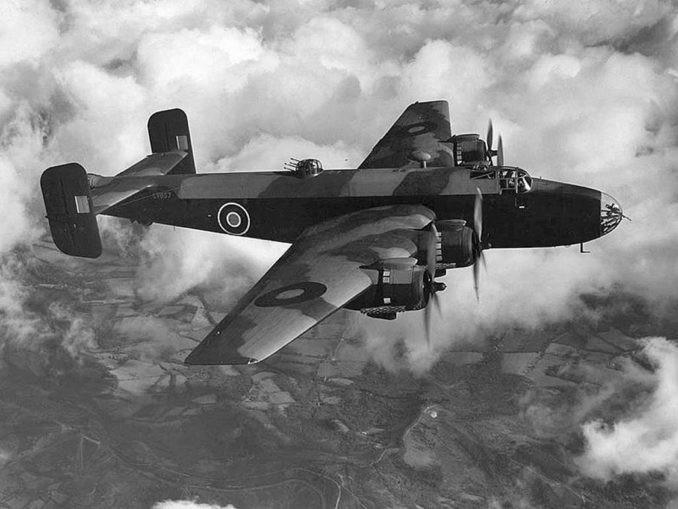
There were two types of heavy bombers in frontline service by 1945. The Handley Page Halifax was a mostly orthodox design, a mid-wing monoplane with a tail unit featuring twin fins and rudders. The Halifax featured all-metal construction with a smooth, stressed skin covering the majority of the exterior surfaces; the flight control surfaces were an exception, being fabric-covered instead. The slab-sided fuselage contained a 22-foot bomb bay, which contained the majority of the Halifax’s payload, while the cockpit was flush with the upper fuselage.
The Halifax was powered by four engines, two spaced evenly on each wing. Early production Halifax bombers were powered by models of the Rolls-Royce Merlin engine; later aircraft were commonly powered by the larger Bristol Hercules radial engine. To contain and attach the engines to the airframe, Handley Page developed their own design for the power egg instead of using the typical, slimmer Rolls-Royce counterpart; despite generating increased drag, this in-house design was readily adaptable to the alternative Hercules engine on later aircraft.
The bomb aimer’s position was in the extreme nose with the navigator’s table located behind it, sometimes both roles being fulfilled by the same crew member. Above the navigator’s position was the forward gun turret. The wireless (radio) operator was behind the navigator’s position, separated by a half-width partition.
The pilot (left side) and co-pilot (right side) occupied the cockpit, above the wireless operator. (The flight engineer filled in as a co-pilot, seated on a folding seat, during crucial manoeuvres such as take-off.) Aft of the pilots and on the same level as the navigator and wireless operator was the flight engineer’s compartment. Another compartment aft of the flight engineer contained two bunks originally intended for resting crew members, but almost always used for treating and berthing injured crew. This area led to the two-gun and sometimes a four-gun dorsal turret. The tail gunner occupied a four-gun turret at the extreme aft end of the aircraft.
Starting with the Halifax Mk II Series IA and from the Mk III onwards, the nose turret was deleted; instead the bomb-aimer occupied a streamlined perspex nose containing a single hand-held machine gun. On later-built aircraft, the two-gun dorsal turret was replaced by a four-gun Boulton Paul turret.
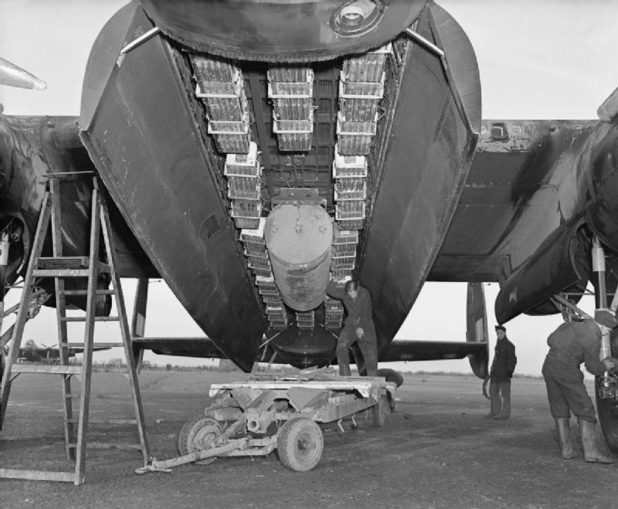
The maximum bomb load was 14,500 lb, which was primarily carried in a bomb bay housed within the fuselage, divided into six separate bomb compartments, with three bomb compartments in the inboard sections of each wing; this division of the payload between multiple compartments limited the maximum size of the individual bombs which could be carried to 2,000 lb.
Public Domain
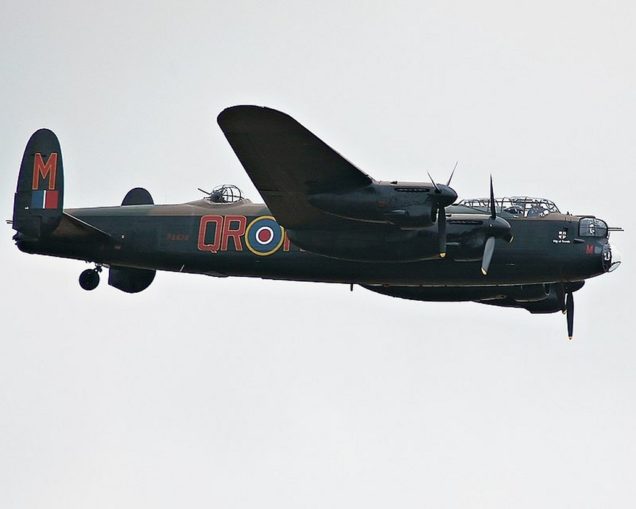
The Avro Lancaster was a British four-engined bomber that was used as the RAF’s principal heavy bomber during the latter half of the Second World War. The typical aircraft was powered by an arrangement of four wing-mounted Rolls-Royce Merlin piston engines, each of which drove a 13 ft diameter de Havilland Hydromatic three-bladed propeller. While not optimal, the Lancaster was capable of flying the return journey home on only two operational engines, along with very limited distances on a single running engine. Aviation authors Brian Goulding and M. Garbett have claimed that experienced Lancaster pilots were often able to out-manoeuver Luftwaffe fighters. It possessed largely favourable flying characteristics, having been described by Goulding and Garbett as being: “a near-perfect flying machine, fast for its size and very smooth…such a delightfully easy aeroplane to fly…there are instances of Lancasters having been looped and barrel-rolled, both intentionally and otherwise.”
The Lancaster benefited from a structure that possessed considerable strength and durability, which had been intentionally designed to maximise structural strength-per-weight; this resulted in the Lancaster being capable of withstanding some levels of damage resulting from attacks by hostile interceptor aircraft and ground-based anti-aircraft batteries. However, during the first year of the type’s career, some instances of structural failures were encountered on Lancaster B Is and a number of aircraft were lost in accidents as a result of the design limitations having been greatly exceeded. Compared with other contemporary aircraft, the Lancaster was not an easy aircraft to escape from; in a Halifax, 25 per cent of downed aircrew bailed out successfully, and in American bombers (albeit in daylight raids) it was as high as a 50 per cent success rate while only 15 per cent of the Lancaster crew were able to bail out.
The Lancaster uses a mid-wing cantilever monoplane configuration. The wing is constructed from five separate main sections while the fuselage is likewise composed of five sections. Aside from a few elements, such as the fabric-covered ailerons, the Lancaster’s oval-shaped fuselage had an all-metal covering. All of the wing and fuselage sections were manufactured separately, during which they were outfitted with all of the required equipment in advance of final assembly being performed, as a measure intended to accelerate the rate of production. The distinctive tail unit of the aircraft was outfitted with a large twin elliptical fins and rudder arrangement.
The standard crew for a Lancaster consisted of seven men, stationed in various positions in the fuselage. Starting at the nose, the bomb aimer had two positions to man. His primary location was lying prone on the floor of the nose of the aircraft, with access to the bombsight controls facing forward, with the Mark XIV bomb sight,by 1945 some had a SABS bomb sight. On his left and bomb release selectors on the right. He also used his view out of the large transparent perspex nose cupola to assist the navigator with map reading. To man the Frazer Nash FN5 nose turret, he stood up placing himself in position behind the triggers of the twin .303 in (7.7 mm) guns. Ammunition for the turret was 1,000 rounds per gun (rpg). The bomb aimer’s position contained the nose emergency hatch in the floor; at 22 by 26.5 inches (560 by 670 mm) (two inches narrower than the Halifax escape hatch) it was difficult to exit through while wearing a parachute. Operational research experts, including British scientist Freeman Dyson, amongst others, attempted unsuccessfully to have the escape hatch enlarged, but it was feared this would compromise structural viability.
On the roof of the bomb bay the pilot and flight engineer sat side by side under the expansive canopy, with the pilot sitting on the left on a raised portion of the floor (almost all British bombers, and most German bombers, had only a single pilot seat as opposed to American practice of carrying two pilots, or at least having controls for two pilots installed). The flight engineer sat on a collapsible seat (known as a “second dicky seat”) to the pilot’s right, with the fuel selectors and gauges on a panel behind him and to his right. The pilot and other crew members could use the panel above the cockpit as an auxiliary emergency exit while the mid-upper gunner was expected to use the rear entrance door to leave the aircraft. The tail gunner escaped by rotating his turret to the rear, opening the door in the back of the turret, passing into the fuselage, and clipping on a parachute that was hung on the side wall. He could then exit through the rear entrance door. He might be lucky that the burning fuel cascading past his turret would allow this.
Behind the pilot and flight engineer, and behind a curtain fitted to allow him to use light to work, sat the navigator. His position faced to port with a chart table in front of him. An instrument panel showing the airspeed, altitude, and other information required for navigation was mounted on the side of the fuselage above the chart table. The wireless operator’s radios were mounted on the left-hand end of the chart table, facing the rear of the aircraft. Behind these and facing forwards the wireless operator sat on a seat at the front of the main spar. On his left was a window, and above him was the astrodome, used for visual signalling and by the navigator for celestial navigation.
Behind the wireless operator were the two spars for the wing, which created a major obstacle for crew members moving down the fuselage even on the ground. On reaching the end of the bomb bay the floor dropped down to the bottom of the fuselage, and the mid-upper gunner’s turret was reached. This would be where a “special Operator” was located. The mid-upper gunner’s position allowed a 360° view over the top of the aircraft, with two Browning .303 Mark IIs to protect the aircraft from above and to the side. The mid-upper gunner sat on a rectangle of canvas that was slung beneath the turret and would stay in position throughout the flight. Ammunition for the turret was 1,000 rounds per gun.]
To the rear of the turret was the side crew door, on the starboard side of the fuselage. This was the main entrance to the aircraft, and also could be used as an emergency exit. The Elsan chemical toilet, a type of aircraft lavatory, was located near the spars for the tail plane. At the extreme tail-end of the fuselage, the rear gunner sat in his exposed position in the tail turret, which was entered through a small hatch in the rear of the fuselage. Depending on the size of the rear gunner, the area was so cramped that the gunner would often hang his parachute on a hook inside the fuselage, near the turret doors. Neither the mid-upper nor the rear gunner’s position was heated, and the gunners had to wear electrically heated Taylor Suits to prevent hypothermia and frostbite.
The Avro Lancaster was initially equipped with four Nash & Thompson Frazer Nash hydraulically operated turrets mounted in the nose, tail, mid-upper and underside. The original tail turret was equipped with four Browning .303 Mark II machine guns and all other turrets with two such machine guns. Late on in the war, as a result of statistical analysis, Freeman Dyson put forward a case for the removal of the majority of the Lancaster’s defensive armament. He argued that this would reduce the overall loss rate as it would have the benefit of increasing the Lancaster’s cruise speed by up to 50 mph (80 km/h) (assuming the bomb load was not increased at the same time), and thus make the bomber harder to shoot down.[31] He also considered that the modification would be justified regardless of the envisioned decreased loss rate as, by requiring fewer crew to serve as defensive air gunners that would be a lower number of human losses incurred with each aircraft lost.
Kogo / GFDL
The de Havilland DH.98 Mosquito is a British twin-engined, shoulder-winged multirole combat aircraft, introduced in 1942 Unusual in that its frame was constructed mostly of wood, it was nicknamed the “Wooden Wonder”,or “Mossie”. Lord Beaverbrook, Minister of Aircraft Production, nicknamed it “Freeman’s Folly”, alluding to Air Chief Marshal Sir Wilfrid Freeman, who defended Geoffrey de Havilland and his design concept against orders to scrap the project. In 1941, it was one of the fastest operational aircraft in the world.
Originally conceived as an unarmed fast bomber, the Mosquito’s use evolved during the war into many roles, including low- to medium-altitude daytime tactical bomber, high-altitude night bomber, pathfinder, day or night fighter, fighter-bomber, intruder, maritime strike, and photo-reconnaissance aircraft. It was also used by the British Overseas Airways Corporation as a fast transport to carry small, high-value cargo to and from neutral countries through enemy-controlled airspace. The crew of two, pilot and navigator, sat side by side. A single passenger could ride in the aircraft’s bomb bay when necessary. It was perhaps the most ubiquitous and remarkable aircraft of WW2.

See page for author / Public domain
The Luftwaffe Night Fighter Arm
German night fighters transformed aerial combat. The success of German night fighters was such that the Allies had to reform their tactics in an attempt to reduce their effectiveness. They were vectored onto the bomber stream and orbited beacons until called in. Because the bomber stream had a number of doglegs and diversionary raids, correctly identifying the target was a fine art and the Germans were good at it.
American bombers were usually used for daylight bombing raids on Germany. RAF bombers were usually used for night-time bombing raids. A typical raid would involve a flight coming into mainland Europe over the coast of the Netherlands en-route to targets such as Cologne, Frankfurt and Nuremberg. The return journey would take the bombers over Strasbourg, Paris and back to their bases usually in East Anglia. Prior to night fighters, bombers were most at risk from anti-aircraft fire – especially if they were caught in a searchlight. Night fighters put a new dynamic into a bombing run.
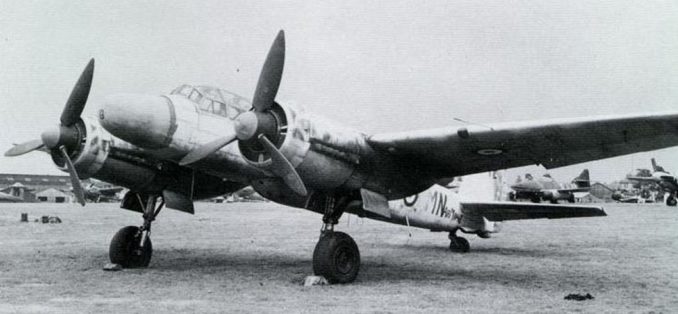
Germany’s main night fighters were the Messerschmitt Bf-110G, the Junker Ju-88G6, the Dornier Do-217J and the Heikel He-219A Uhu (Owl). Towards the end of the war, a night fighting version of the Me-262 was used. Though this was potentially a highly effective weapon, as with other weapons developed by Germany towards the end of the war, it was a case of ‘too little too late’.
The Messerschmitt Bf-110G was a very successful night fighter. With a top speed of 342 mph and a maximum ceiling of 26,000 feet, it could easily get among a formation of bombers. Equipped with 2 x 30mm and 2 x 20mm cannon with a 7.9mm machine gun, it also carried a formidable weapons load.
The Junkers Ju-88G6 was also a widely used night fighter. Unlike the Messerschmitt Bf-110G, it was equipped with the ‘Schrage Musik’ – upward-firing 2 x 20mm cannon mounted in the central fuselage. It had a maximum speed of 311 mph and a maximum ceiling of 32,500 feet. Along with the ‘Schrage Musik’, this night fighter was also equipped with 3 x 20mm cannon and 3 x 7.9mm machine guns.
The Dornier Do-217J had a maximum speed of 320 mph and a maximum ceiling of 31,170 feet. More heavily armed than the Messerschmitt Bf-110G or Junkers Ju-88G6, it was equipped with 4 x 20mm cannon, 4 x 7.9mm machine guns, and 1 x 13mm machine gun in a remote-controlled dorsal turret.
The Heinkel ‘Owl’ first flew in 1942 and on paper was a potentially fearsome opponent to nighttime bombers. However, only 268 were ever built because of the targeting of the factories by Allied bombers. It was the fastest of the propeller-driven night fighting aircraft with a top speed of 416 mph and a ceiling of 41,660 feet. It was armed with 2 x 30mm and 2 x 20mm cannon and 2 x 30mm ‘Schrage Musik’ cannon.
All the above aircraft could not fly blind at night and had to be equipped with night flying radar. In the case of the Luftwaffe, they used the Lichtenstein radar. By 1943, Germany had developed a radar shield that identified aircraft when they were miles away and gave night fighters a fix on incoming bombers so that the night fighters themselves could then use their Lichtenstein radar before attacking. At twenty-mile intervals across the coast of northern Europe, the Germans built a long-range early warning radar called ‘Freya’. This would pick up an incoming raid when it was still miles out. As the raid closed, it would be picked up by short-range radar called ‘Wurzburg’. This radar system would also have a second fix on circling night fighters and by decreasing the angle between both fixes would bring the night fighters nearer to the incoming bombers. Once they were near enough, each fighter would use its Lichtenstein radar to hunt out a target.
Unknown author / Public domain
In July 1944, the newest version of the SN-2 radar fell into Allied hands when a fully equipped Ju 88 G-1, of 7 Staffel/NJG 2, flew the wrong way on a landing beacon and landed at RAF Woodbridge in England by accident, with the crew not realising the mistake until it was too late to destroy the radar or IFF gear. This led to successful jamming of several frequency bands of the FuG 220 (I to III, 72, 81 and 90 MHz), and a partial adoption of the use of the low-to-mid VHF band 170 MHz FuG 216 and 217 Neptun radar — which used eight shorter-length dipoles in the same “stag’s antlers” layout for its frequency ranges than the SN-2 did — but several other bands that the SN-2 used were still operational. After the Allied jammings the FuG 220 antenna setup was optimized 90-degree vertical dipole setup was changed to a 45-degree diagonal setup.
“If it was the flak that caused the damage and forced bomber crews to jink their aircraft, thus making accurate bombing difficult, it was the venomously efficient night fighters that were the real killers.” Flight-Lieutenant Alfred Price.
RAF_Bomber_Command_aircrew_of_World_War_IIhttps://en.wikipedia.org
Handley_Page_Halifax#/media/File:Halifax-mk3.jpghttps://en.wikipedia.org
Avro_Lancasterhttps://en.wikipedia.org/wiki/De_Havilland_Mosquitohttps://en.wikipedia.org
Junkers_Ju_88https://en.wikipedia.org
Bombing_of_Dresden_in_World_War_IIhttps://en.wikipedia.org
Sir_Arthur_Harris,_1st_Baronet //en.wikipedia.org
© Blown Periphery 2020
