In part 2 (Part 1) we are going to take a 2d design and make it 3d. Once you do this then you will see that anything can be made 3d-ish.
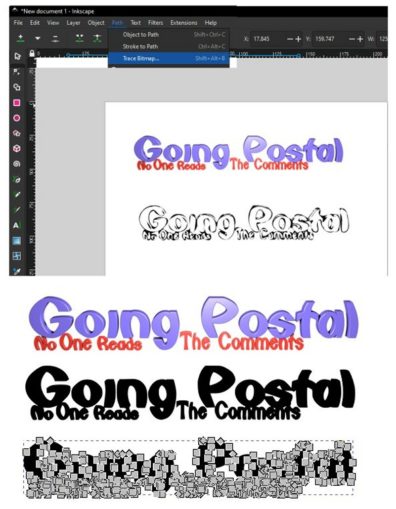
First we load up InkScape (Illustration software) and go fetch the very flat going-postal web site logo and copy the image and drop it into InkScape.
Once traced we have turned it into points …. now the fun begins……
We import this into our design app – blender.org or tinkercad and then …. we extrude the points….


And there we go – save (STL) > Load into Flash Print > Slice > Save as GX > Load onto Flash Forge Printer …..(see Part I)
The very nature of InkScape and it’s Trace bitmap feature means turning any image into a 3d print is quite easy – you can even do your own face and photos!
To help you here is a list of how to get started ….
3d Printer Starters List
FlashForge Finder – your first 3d printer with easy self levelling
PLA 1.75mm – the plastic to melt!
ThingiVerse.com – ready to download models
TinkerCad.com – online design software
Blender.org – professional design software
FlashPrint will convert your design into 3d printer ready file
Visit to see and edit list to your own specification … https://chooseydo.turnshirts.co.uk/gigi/654ca7eba4723
Next – 3d Printing Primer – Part 3 – Solving a real world problem with a 3d printer.
(Ed. If you are interested in the .gx, or .stl files email me)
© Mark Heywood 2023