Usually around this time of the week I start to think about what I could possibly write about shunting. Most of the emails are cleared, the meetings sorted out, the minutes done etc and the midweek lull sets in.
Racking my brains, thinking ‘there can’t possibly enough to create an article, I usually refer to pictures taken during the week to remind myself.
Fortunately, there are a few pics to go with, so 1200+ words, here we go.
So what has been going on?
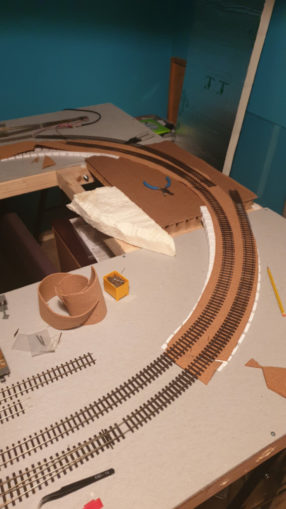
Parcels arriving always spur activity, not necessarily to completion but it’s the thought that counts. The arrival of UHU glue and spray sticky has meant fixing windows into cardboard buildings is a lot easier – no longer relying upon superglue, and the sticky spray does seem to work, holding down the polystyrene inclines and cork underlay. I decided that there has been enough faffing and start to put down the track. To do that means a series of steps need to occur:
- Confirm where the track is going – Done!
- Fix inclines and cork on the raised sections to prepare the route – partially done
- Sort out the ‘bridge’ section – more later
- Paint an undercoat of grey where the track bed will be, dust the wet paint with chippings to provide a base of gravel. One for the weekend (do I have any paint?)
- Drill holes for the points – where the levers move and all the wires that feed power to the switched sections. Fix down the points, set up and wire in the point motors and switches.
- Do the same for all the rest of the track, cutting and fixing as necessary to join up those points.
So far I’m half way through (2).
Those of you with keen memories may recall the inclines rise an inch, to then cross an open section – well it will be once the bridge is built.
© Sweaty Dave, Going Postal 2021.
That bridge will have to stand upon something, in this case a lower level base that will then be covered in scenery to give all sorts of variable heights. I dug a bit of hardboard laminate out of the garage, cutting and measuring to match that smaller end piece of the layout – 20in x 23in, drilling and countersinking screw-holes.

© Sweaty Dave, Going Postal 2021.
In addition I cut the cardboard packing that is holding the tracks to the width of the bridge. I don’t think it has enough structural integrity as it stands to cope with heavy trains so the bridge will need some engineering.

© Sweaty Dave, Going Postal 2021.
It fits but there could be an issue. Remember I did promise that this layout could be taken apart and stored in the cupboard? You won’t be able to get access to the bolts from above due to scenery and this sheet would block access from below. In addition the layout sits on trestles, with the beams resting on the horizontals. Adding a 3/8in thick piece of hardboard raises that section up, stressing the joints and making the overall layout uneven.
Holes had to be cut to allow access to bolts and space for the trestles, so it doesn’t look quite as neat, but as it is hidden will be fully functional. Those oscillating multi-purpose cutting tools from Lidl are a boon, making cuts so much easier than the old coping saws. The result isn’t pretty, but functional and will not be visible.

© Sweaty Dave, Going Postal 2021.
The six offcuts are actually extremely useful – as baseplates to hold the wiring blocks under each baseboard. I screw the wiring block to the offcut and glue (no more nails) the pair of them to the underside of the layout. This is a lot better than the danger of screwheads from the blocks poking through the soft baseboard material, which itself is not really strong enough to hold any suspended weight. Adding the offcut spreads that load over a wide area rather than a single point.
I mentioned some point motors – they have arrived. These are ones with long posts, so you can fix them to the underside of the baseboard and they’re long enough to poke through to change the point from underneath – you trim the excess so they’re not visible. There are three components pictured right to left – a mounting plate that fixes to the board, the solenoid itself and a switch – that switch is activated by the change of the points rather than to control them, it is controlled by the point. It can be used to either set a signal or in this case electrify the bit of the point that crosses over – you might remember this diagram, where some of the track has to be + or – depending upon which track is used.

© Sweaty Dave, Going Postal 2021.
This switch sets that polarity (similar for DCC). I have bought these two to work that three way point, as it needs the power switched to operate. All I need to do is to wire up two solenoids in the exact location while upside down four feet off the ground! (too high to lie on the floor, too low to crouch underneath. To make that easier I’ve ordered some push fittings so at least I don’t have to solder wires in that position. Hopefully the baseboard has enough integrity to hold the point motor or more hardboard offcuts will need to be added.

© Sweaty Dave, Going Postal 2021.
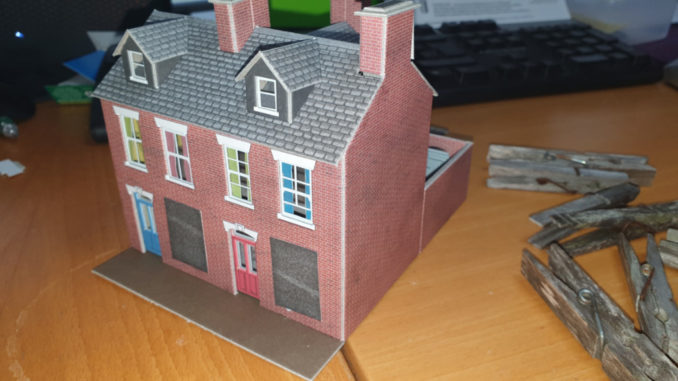
Buildings
Well after the excitement of Bob’s bottle shop, this week is a little different. I’ve started on the Coalmine – it will of course be a collection of buildings and the biggest challenge will be to build a headgear tower (the one with the wheels on top). You can buy a kit from Pola, of a European Coalmine but it costs a lot of money for a few bits of metal/plastic and isn’t quite right, so I’ll get some scale girders and make something in time.
First building up is the boilerhouse/winding engine – where the cables for the tower will end up. Of course, it is made from a Metcalfe cardboard kit though they do not have a coalmine in their catalogue. This one is part of a factory. It is actually a boiler house, with built in water tower (and shiny water in the top of the tank). Easy to build, with a very imposing chimney, I will need to modify it in time to accept a couple of ‘cables’, hopefully a wheel inside will allow the cable to move and I can build a motor under the baseboard to make the pit wheels turn.

© Sweaty Dave, Going Postal 2021.
The rest of the kit was an imposing factory entrance. As it was there, no harm in making the thing – it can be the mine entrance, though the eldest son did ask if I was making a model of Auschwitz as ‘a track would just fit through those gates!’… bloody kids…
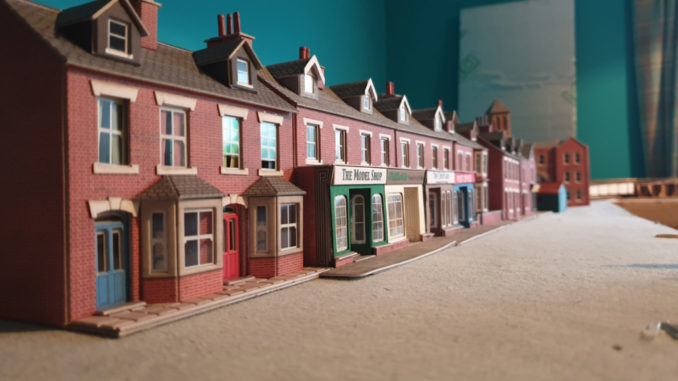
I have another terrace house to make – so lots of curtains to hang. The UHU glue in a lot easier to deal with when in an accurate dispenser. This time I’ve made it for the posher end of the street with bay windows which do rather protrude into the pavement.
© Sweaty Dave, Going Postal 2021.
There are quite a few buildings now. I’ll have to find one of a chapel, rather than a church, which were so prevalent in mining communities.

© Sweaty Dave, Going Postal 2021.
So this weekend looks like the time to start painting the baseboard, and have a look at that bridge… always something!
© Sweaty Dave, Going Postal 2021.
© Sweaty Dave 2021
The Goodnight Vienna Audio file