
© Sweaty Dave, Going Postal 2020
As the nights draw in and the lockdowns only get more stringent, thoughts run to more positive times. Nostalgia is a powerful thing, particularly at the moment as everyone loves to think back to happier times past. As one example, over the summer, ELO’s ‘Mr Blue Sky’ was one of the most requested/streamed songs.
Anyway, in this case it has meant I’ve hankered after another railway modelling project. This was further increased by chatting with one of the volunteers at Tanfield Railway, a lad enthusiastically describing the various layouts he has. Pity his poor mum who has lost the use of her garage and various other spaces in their house.
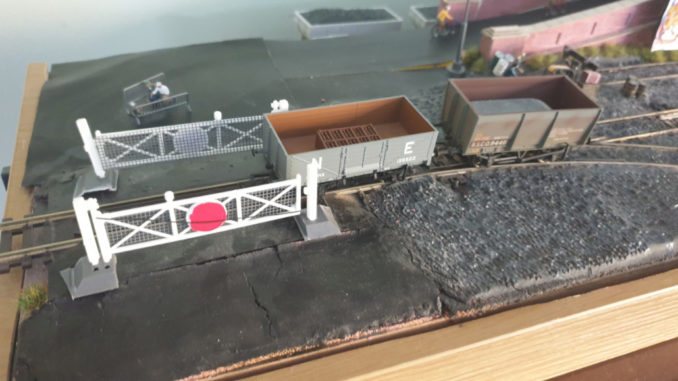
With all that in mind, I initially decided to dust off the cyclists and improve the connections for the trains. This needed doing and I’ll potter on, repairing the storage damage, dust, dirt, improve the wiring and replace the level crossing but feel the need for a new, bigger challenge.
Tidied up.
I had ruled out making anything new for the foreseeable future, due to no particularly available space. However, having managed to deposit son #2 to Uni just as #1 returns home, there is a little more breathing room in the house. In addition, Mrs SD was pestering after a tidy up of the study and as I’m spending most of my life in there at the moment, I am in agreement. Why is this relevant? Well there is a desk in there that I built years ago measuring 1m x 2.5m in a U shape that would need to come out – just big enough to build a railway on…. It’d be freestanding, so not a permanent fixture needing a set place or damaging any walls, ideal for something I’d want to make and consider only having a short lifespan. Simply box the parts up and move on/re-use in the next one.

© Sweaty Dave, Going Postal 2020
I suggested this to her while we were in isolation (thanks to daughter) but it turns out she’s now quite happy with the desk having had to use it herself. For some reason it was when we used to have four desktop PCs lined up on it like mission control that was bothering her – what could be wrong with that?! She was, however, happy with me making something for a layout and leaving the desk alone.

© Sweaty Dave, Going Postal 2020
So what design/plan? Back to the drawing board for the base size and naturally everything springs from those foundations.
I mulled over it for a few days then decided to go with something that I could pack away in a cupboard when not in use – yes being fickle/busy means that working on a layout will be piecemeal – and probably be over a long period of time. It’ll have to be tidied away every so often as despite room, there isn’t any particular place I can dedicate to it.
We have a large sliding door cupboard in the spare room that can be cleared out. In there is a space 40in wide and 23in deep – not much you think? Well if I make a layout out of a number of sections, each 40in wide, 23in deep. I could add a few battens and they can be stacked into that cupboard like a set of drawers. It also means I can work on one or two at time, building it up rather than having to do an entire base in one go, which may feel like it needs to be rushed to completion. If it does come near completion it could even be exhibited – being sections mean they could be packed into a car. It does mean the joins have to be good, and connections made in the wiring but worth the trade off.

© Sweaty Dave, Going Postal 2020
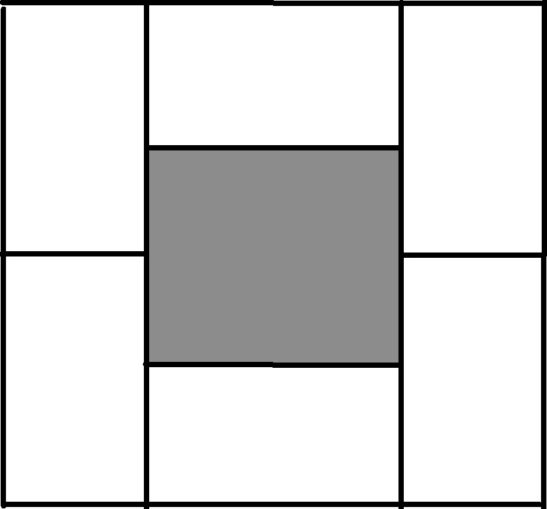
That cupboard has enough room to hold six sections, I’ll stack them with enough room between each one for the scenery, buildings and track. If I join the sections it makes an oval with centre space measuring 86in x 80in (roughly 2m x 2.2m) with the end sections being deep/wide enough for 2nd and 3rd radius curves. (that’s ones that are not too sharp which cause some engines problems). So this solution is much better – a larger board which can be put away when not in use.
© Sweaty Dave, Going Postal 2020
Section outline
Industrial/semi rural? Not city centre, it could be big enough for sweeping countryside
Type –
Some elements of a round and round layout – not just end to end so I can run longer trains, add some signals and make it more enjoyable. It has to be more than a couple of ovals with trains running at top speed as you’d have when age 7. Different levels – Possibly could add some height? No sharp curves, two sections together are wide enough to allow more realistic curves. Two stations/halts needed to give demand, plenty of sidings or facilities that need stuff delivering be that people or goods. Possibly add a ‘water’ feature – not real water, but clear resin, a form of the scenery I’ve not done before – perhaps add a canal lock and RP’s old boat. I think I’ll go with a mining theme as that’s the main reason for rail in the area, so a coal mine, trucks, yard etc. etc. Maybe even a staithe into the river?? Possibly a coke works to accept the coal – endless options that will evolve over time.
Era:
Could be any age, I’m minded to use at least one of the existing locos – the Austerity steam logo which hasn’t performed well on the current layout, so late steam BR/60s. It might be a bit more modern – early/mid 70s would be my nostalgic era. Older ones could be on a heritage line, or simply in coalmine yards where they did run well into the 70s. Express engines and coaches take up a lot of space, running them at high speed isn’t what I’m after. A tank engine or shunter with trucks can be any length.
Tech – DCC this time, rather than old fashioned control. Never tried it before and while it is significantly more expensive, is worth a go for larger layouts. I suspect the Austerity loco is designed for digital and may run more smoothly than it does on the current setup. That topic in itself is at least an article.
Items of interest – no cyclists this time, they’ll stay where they are. I’m sure I’ll find something – Signalling will be a lot more important, with a lot of possible options available – another article as that comes together.
So I have two challenges,
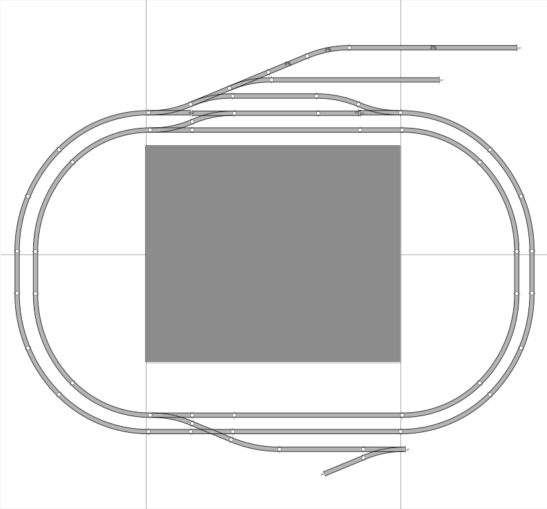
- Now I have the available space mapped out, what plan to use? Round and round, not just ovals, one or two tracks?
- What form of baseboard? Most sets are made up of a frame of 2×4 the chipboard/hardboard sheet on top. In the past I’ve then added fibreboard as it is softer to work with and absorbs noise. This sort of construction is stable but heavy and everything is on the same flat plane, not really very realistic. One alternative used these days is a sheet of insulation- the Kingspan boards which mean you can cut into them to varying depths. A large sheet measures 2400 x 1200 with varying depths available– that sounds like the size to start with. I need to work out the trackplan first, using anyrail and freetrackplans.com
- A final alternative is the one suggested in the venerable book ‘Model World’ – a guide made by the BBC in the 70s that I still own. It suggests an open frame with the track surrounded by simple formers for the scenery which is then built up – very light and potentially portable. It does mean a lot of woodwork and the track is the last thing to be built, whereas the urge is to do it first!
Going with a sectional layout means I can use a mixture of the above, so where water means the level is lower, that can be an open piece, any hilly areas can use Kingspan, marshalling yards and flatter areas be straight board.
How big? To get decent curves in a line, they cannot be too sharp. The minimum diameter for a mainline curve is called Radius 2 – measuring 17.24 inches, so a 180degree turn needs 35 inches and radius 3 at 39.5in. To get that sort of space I’d need to have two boards linked end to end giving a width of 80in.
© Sweaty Dave, Going Postal 2020
As mentioned it doesn’t have to all be done at once – I will start by making two or three sections and build an end to end upon there, adding further sections as time permits. No doubt their purpose will change over time, perhaps one area initially being a behind the scenes fiddle yards, later developed into a part of the scenery.
One final note, as this is to be a more lifelike rather than just a toy, there are a whole set of criteria for the track that can be considered. Just look at all the terms that have built up over the years:
© Sweaty Dave, Going Postal 2020
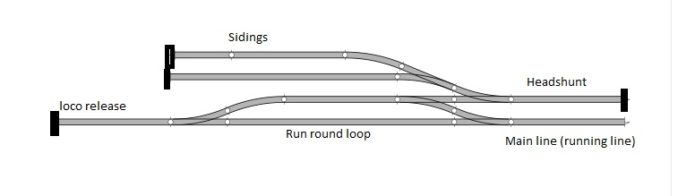
Above shows the end of a line. There could be a platform where it says ‘run round loop’. In steam days, engines always had to pull trains, pushing or propelling them is only allowed in emergencies. To bring the engine to the front of a train once arrived, the train is halted within the run round loop – it has to fit completely! The engine is uncoupled and run into the loco release area, the points changed and it moves around the train to couple up at the other end. Naturally with modern sprinter and express passenger trains the driver can drive from either end, simply walking through but the process is still in place for freight trains.
Sidings are of course, to store rolling stock and to put together trains. Having a headshunt gives the opportunity for the shunter to move the stock into order without affecting the main line, which can carry on without interruption.
Most railways in real life will have a number of these features and including them in the model helps improve accuracy and widen the options available for movements.
What’s next? Well I’ll make up a couple of board sections, work out how to fix them together in ways that mean they always join up at exactly the same spot (as tracks have to line up), research the layout of colliery tracks and work out what’s going where.
© text & images Sweaty Dave 2020
The Goodnight Vienna Audio file

