A Simple Dual Beam Setup
We’ve got our film, developer and a safety lamp. Now we need a holographic camera. Well, not exactly a camera. You can’t take a picture of rolling hills or a nice family snapshot at the seaside with it – yet.
Holographic ‘cameras’ are really a collection of lenses and mirrors stuck onto a heavy, vibration proof, table. You place the object (usually quite small) to be holographed onto this table and hope for the best. There are no light meters that you can use to determine the exposure time. You are basically back to 1800s photography – and it’s great fun!
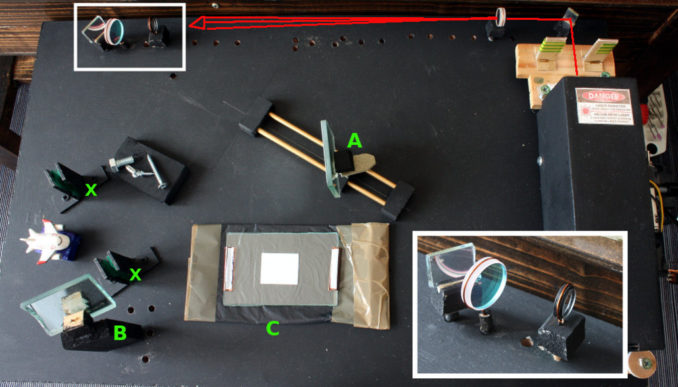
The above photograph shows a simple dual beam optical setup to make a holographic image. All of the optical components were sourced from old cameras or scanners/photocopiers. The mirrors have to be first surface coated. Simple shaving mirrors are no good – the glass creates multiple reflections which will ruin the single phase light that we need. Speaking of the light source, I’m using my trusty He-Ne laser. You can see it on the right hand side of the photo. A good quality diode laser works just as well, if not better.
Professional holographers have been known to use a sand box to set up their optics. You might remember those indoor nursery school sand pits on small wooden legs – they are exactly like that. The sand dampens vibration and it’s also easier to position the optics. Some holographers stand their ‘sand pits’ on the inflated inner-tubes from car tyres. Holography is a serious business!
I haven’t got room for a four by eight foot sand pit in my house so I opted for a tiny setup, only 24 X 14 inches. It’s a slab of one inch thick MDF wood that I have painted matt black. Very easy to drill and using pieces of wooden dowel and copper wire you can improvise pretty good mounts for the optical components.
Beam Divergence
If you recall, from part one, we need two in phase light sources. One to act as a reference the other to illuminate the object that we wish to make a holograph of.
When the light leaves the laser it’s about 1mm in diameter. To make a useful holograph we need to expand it to about three inches in diameter. To do that I’ve used two lenses – one positive and one with a negative focus. They are just what I happened to have in my lens scrap box. After diverging the beam it then hits the beam splitter – the cyan coloured mirror. About half of the laser light hits mirror A, the reference mirror, and the rest hits mirror B or the object illumination mirror. The inset image (lower right) shows a magnified version of the main optical components for the divergence and light splitting.
Hold any lens at an arm’s length and look at a distant object through it. Close one eye and the object will appear the right way up if the lens has a negative focus (short sighted glasses). If the focus is positive it will appear upside down (a magnifying glass or reading glasses) . The smaller an object looks the stronger the magnification and, therefore, the laser light will diverge more rapidly. Opticians can use this trick to quickly judge the strength, or type, of your glasses.
Anyhow, by using just two lenses we can expand/diverge a laser beam to create a reference and object light of nearly three inches in diameter over a very short distance. No real precision is required – just play about with different lenses until you get a spot size that you need.
The photograph below shows how to make a diffraction grating. The object – a first surface mirror – acts like lamp B from fig.4, part 1.

I’ve painted in the optical paths with coloured lines. The initial laser light passes through the two lenses and then the beam splitter. This divides the light into two beams – the green and purple lines. The length of the green and purple light paths should be to within a few centimetres of each other. This is to preserve the phase coherence of the laser light. The closer that we can maintain the phase relationship between the to beams the better the holograph will look.
The film plate, C (top photo), stands vertically in the holders marked X. It’s made from two pieces of glass that are held together with small clips. The holographic film is ‘sandwiched’ between them (shown by the little piece of white paper) and stored in a light proof bag until it’s ready for exposure. The glass plates keep the film safe and flat. The glass is from a photo frame; purchased from a charity shop for about fifty pence and cut with a high speed diamond disc using a little twelve volt mini drill.
The whole optical assembly must be placed on a firm table and on a concrete floor. The slightest vibration will ruin a hologram. Cars, people walking around and things like fans/air-conditioners can easily spoil your fun.
How To Expose The Film
Imagine the scene: It’s late at night, probably the early hours. It’s quiet and dark – just you and the creatures of the night. The little green lamp is glowing softly. The laser is warmed up, stable and casting its own eerie light. You carefully remove the holographic film from its light proof bag and place it in the upright stands on the optical table. The object to be captured, in all of its three dimensional glory, is in its place. You stand dead still, take a deep breath and…
Well, it’s not quite that dramatic but the procedure is certainly true. All cameras work the same. You need to expose the film (or electronic sensor) to the image being photographed for a set amount of time. Too long an exposure to the light and you’ll burn the film, too short and you’ll get no image at all. The thing that regulates this exposure time is, of course, a camera’s shutter.
Making a holograph also requires a shutter – in this case a small piece of cardboard painted matt black. By holding it in front of the laser you close the shutter and block the light. Exactly the same as a standard camera.
When you are ready to take your holographic image you simply lift the cardboard shutter (very carefully and taking a deep breath!) out of the laser beam’s path and count in seconds. When you think that the film has been exposed for long enough simply replace the cardboard and develop the film.
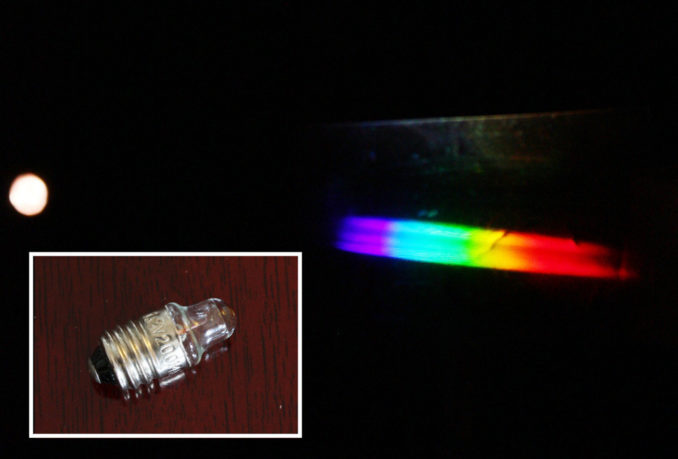
The above photograph (of a holograph) shows the result of exposing PFG-01 film using the diffraction grating setup. The exposure time was about five seconds.
The inset image shows the lamp that I used to illuminate the processed film. Those of a certain age might remember them! Before LEDs they were used in ‘pen light’ torches and they make a reasonably good broad spectrum point light source.
The lamp, left side, strikes the back of the film (the edge is just visible) and if you observe it at the correct angle it generates a complete spectrum of colours. Such diffraction gratings are used in spectroscopy and astronomy to analyse the basic elements that make up stars. The holographic film has made a super prism.
Different Types Of Holographs
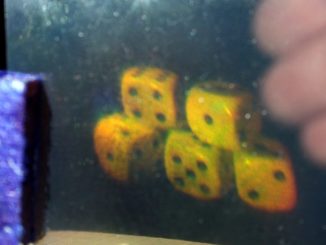
There are many types of holographs that you can make but the principal two are called a reflection hologram and a transmission hologram. Remember that holographic film is almost transparent. A reflection hologram is made by the reference light and the object’s light being on the opposite sides of the film. If you refer back to the top photo, you can see that I’ve placed the little toy plane on the left side of the film plate holders. That is the object’s position to make a reflection hologram.
With a transmission hologram the reference and object light shine onto the same side of the film. Again, referring back to the top photo you can see that I’ve placed some screws onto a wooden block. That is the object’s position to make a transmission hologram. The key difference is how the interference patterns are recorded inside of the film’s emulsion.
The terms reflection and transmission come from the way a holograph is reconstructed or viewed. As the name suggests, a reflection hologram is seen by shining a light onto the holographic film. A transmission hologram is viewed by shining a light through the holographic film. Simple. Apart from one big difference. Reflection holograms can be viewed with a point white light source, such as the Sun. Transmission holograms can only be viewed with a laser.
In the final part I’ll show you some simple holographs (or holograms) that I’ve made with this little setup.
© text & images Doc Mike Finnley 2020
The Goodnight Vienna Audio file