Holograph Examples
The PFG-01 holographic film that I’ve used in the examples below is ideally suited to making transmission holograms but it can also be used to make reflection holograms.
Reflection Holograms
One of the major problems with writing an article about holography is being able to show you some actual examples. They are best viewed with your own two eyes and they’re not easily photographed. Still, I can try to give you an idea of what’s going on. Here’s a knight chess piece and a puffin key ring:
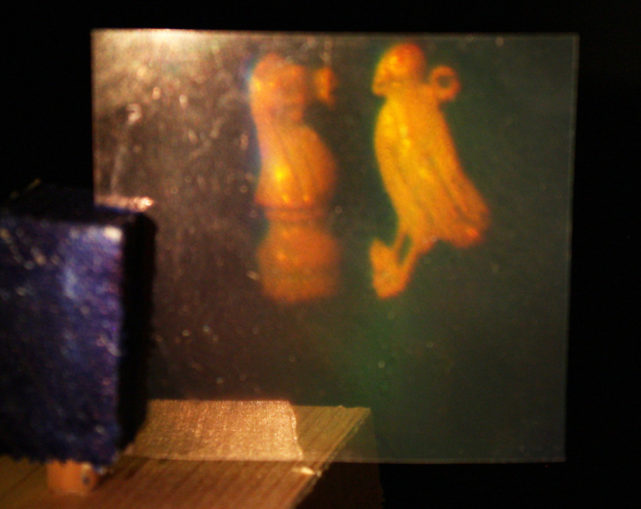
You can see that it’s quite blurry. This is because it’s being illuminated by a white light source. The holograph’s diffraction pattern is scattering the different colours that make up the white light toward different angles. If you look closely at the left side of the knight you can see a blue hue. Similarly, our puffin looks evil with his red eye! This is called a chromatic aberration.
Here’s a short video (not very good) to demonstrate how a reflection holograph looks. I had to juggle a point light source in my left hand while positioning the film with my right. All the time my phone’s camera wouldn’t focus properly whilst trying to avoid the light’s reflection from the film’s surface. Difficult to get just right.
At least it gives a better idea of how three dimensional a holograph actually is. Notice how the specular reflections (or highlights), especially off of the plane’s nose cone and the dice, appear as they would look in the real world:
Transmission Holograms
You’ll instantly notice that transmission holographs are clearer. PFG-01 holographic film is happier with this mode and it requires shorter exposure times. This reduces the chance of image noise caused by vibration.
To view a transmission hologram you have to use laser light (or a very good quality monochromatic light source). This also explains why the images look sharper. We no longer have the problem of chromatic aberration (puffin’s evil eye) because we’re using an almost single wavelength of light.
Obviously it’s a bad idea to stare into a laser beam, and in any case it’s a point light and we need a diverging light to view our holograph. The easiest way is to unscrew the focusing lens from a cheap semiconductor laser module (low power, <5mW). You have to be very careful. Never look directly into it. Such a module gives a good diverging and monochromatic light source. It’s what I’ve used to reconstruct the holographs in the photographs below.
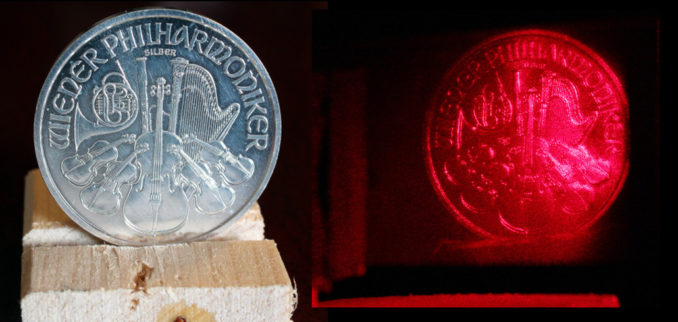
In part one I wrote that a hologram can create two types of image during its reconstruction. First, a virtual image. This is the image that you normally look at when viewing a hologram. Second, a real image. An image that you can project onto a surface, such as a piece of paper. In the above image I’ve made a transmission hologram of a silver coin. On the left side is a photograph of the coin and it’s standing on a small wooden base. On the right you can see the reconstructed holographic virtual image. Actually, I find that very shiny objects are tricky to holograph but this turned out quite well.
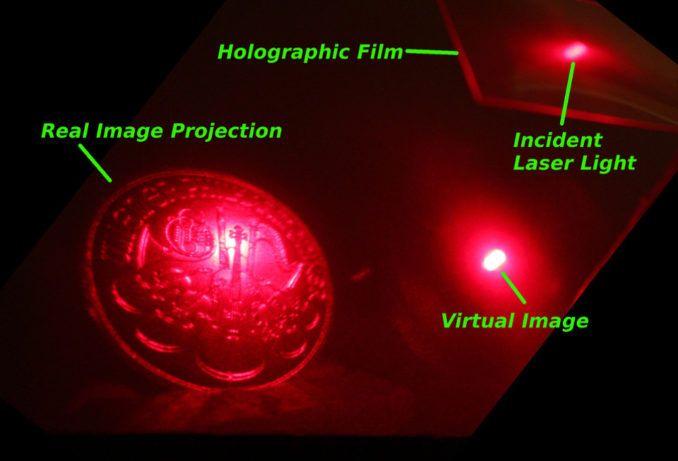
The above image will take a bit of an explanation! Starting at the top right (outside of the image) I’m holding a laser pointer. Note that I’m using a point laser source to reconstruct (or project) the real image.
You can see that this light intersects the holographic film at the incident spot. Now remember – a holograph contains every possible point of view in every part of the film. Even though I’m only illuminating a tiny fraction of the film’s surface a complete image of the coin is projected onto the white piece of paper. If you look very carefully you can just about see the wooden base on which the coin stands. This is called the real image and you can also see the virtual image to its right. The virtual image of the coin, seen in the other photo, is that little bright spot.
Interference Holograms
Long before desktop super-computers engineers liked to know how/where metal components were stressed under various load conditions. Holography not only made this possible but also possible in real time. The holograph below gives the basic idea:

Here I’ve made a double exposure. The object is simply a little block of wood. I took an initial two second exposure. I then blocked off the holographic film and carefully placed a small 25 gram lead weight on the top of the wooden object. This caused it to move very slightly. The film was then exposed for another two seconds. The lead weight’s pressure caused a slight movement and the resultant striped interference pattern. We can easily see 1/1000 of an inch of movement.
A student in the United States used this fact for a science project. He took a growing mushroom and made a double exposure of it with a two minute delay between each of them. When the film was developed the interference pattern showed that the mushroom had indeed grown over those two short minutes!
Multiple Images On A Single Holograph
In the 1960s much interest and research was put into the possibility of holograms being able store huge amounts of information – both in digital and analogue form. It’s reported that up to three hundred pages of text were captured and reproduced from a single piece of holographic film. I don’t know about that but here’s my attempt at two images:
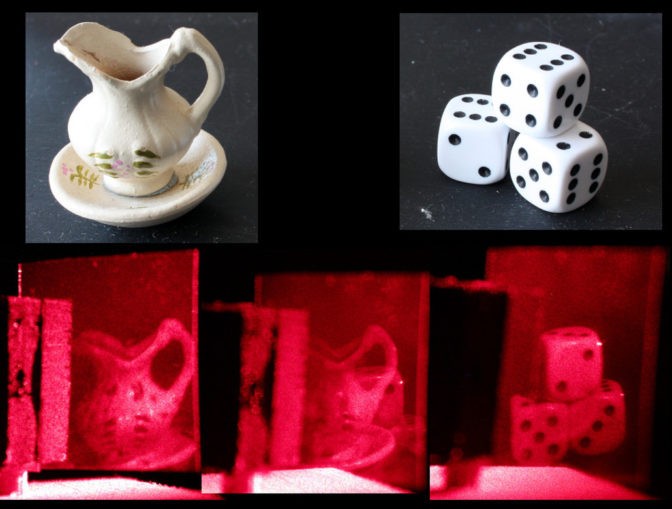
Going back to my little set up, part 3, you might have noticed that I’ve mounted my reference mirror on two brass ‘rails’. Moving an object (let alone replacing it) is an absolute taboo in holography. With an exception. If, during multiple exposures, we change the position of the reference light it’s possible to record not only different object positions but also completely different objects. Here I took a two second exposure of the water jug and then ‘slid’ the reference mirror along its track and took another exposure, now with the dice.
I don’t think that I could capture more than about four different objects, let alone three hundred pages of text! This short video (a tad underexposed, sorry!) shows the effect:
Conclusion
When I started researching this subject I didn’t realise how vast it is. I’ve only written about the very basics within these few articles. Panchromatic, or full colour, holography is also possible using exactly the same techniques that I’ve described. You’d need a red+green+blue laser source and have to work in complete darkness to expose/develop the film. Very tricky to set up and it would require a lot of patience and money!
Research into digital holography (and this) seems to be very promising. Perhaps, in the not too distant future, your smart phone will have a holographic camera. That’s if a civilised – and a reasonably intelligent – human race can survive but it’s not looking too good.
On that depressing note I’ll finish with a cheery image:
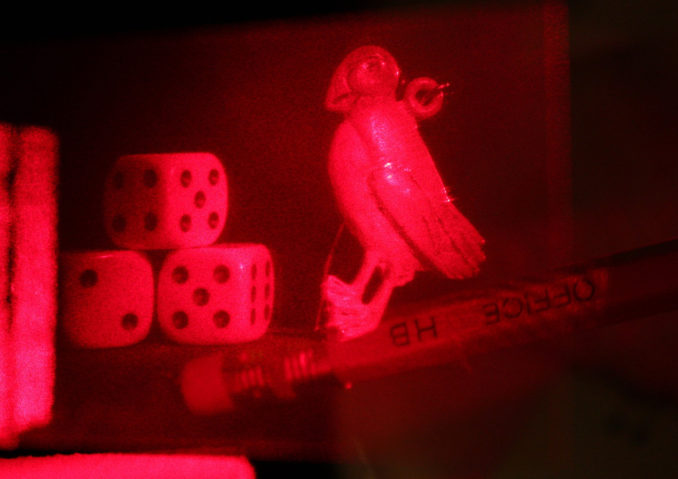
Puffin and Dice. I’m holding a pencil behind the holographic film during the hologram’s reconstruction. It looks like the puffin is standing on the pencil. You can clearly see the wire that I used to hold the puffin upright during the film’s exposure. The pencil is real and the puffin and dice are a hologram.
Happy looking through a looking-gram!
© text & images Doc Mike Finnley 2020