
Follow… Follow…
Leave your England at dead midnight still
Guarded by grandsires, babes and old women,
Either past or nor arrived at pith and puissance.
For who is he, whose chin is but enrich’d
With one appearing hair, that will not follow
Those culled and choice drawn cavaliers to France?Henry V: Act III

Malindine E G (Lt) War Office official photographer, Public domain, via Wikimedia Commons
The Ministry of Ungentlemanly Warfare
The unlikely author of the St Nazaire Raid was a gentleman called Colin Gubbins of the SOE. In March 1942, Britain had neither the means nor the ability to attack the largest battleship in the world, the German Tirpitz, which was currently in its lair in a Norwegian Fjord. The great fear occupying military planning was that the Tirpitz, like its sister ship the Bismarck, would venture out into the North Atlantic and wreak havoc with convoys from America.
Every battleship is only as good as the dry dock and port facilities that support it. There was a dry dock in Germany, but the Tirpitz would have to transit the English Channel, which could be easily mined. The only dry dock large enough to service the Tirpitz was the Normandie Dock at St Nazaire. Destroying this facility became a priority and Gubbins started to plan its destruction.

TouN, CC BY-SA 3.0, via Wikimedia Commons
The dock was over 1,200 feet in length and built of reinforced concrete blocks. Any attempt to destroy the Normandie dock, would have to destroy the steel caissons at either end. These were constructed of reinforced steel, thirty feet thick and set in underground sockets.
In 1942, Bomber Command lacked a sufficiently powerful bomb, the accuracy to deliver them and Churchill complicated matters by insisting that no French citizens should be killed. Reconnaissance photographs showed the bad news that because it was such an important target, the Germans had heavily defended it with gun emplacements, anti-aircraft guns and heavy mortars, most sited to cover the dredged channel that led directly to the lock gates.
Next, SOE was asked to destroy the dock, but they had insufficient manpower and could never carry enough explosives to complete the task. Gubbins concluded that it would require thirty-eight trained saboteurs, supported by several hundred soldiers. Wile he mused the problem, it was lateral thinking by a naval Commander John Hughes-Hallet and his friend Dick Costobadie, that spotted the way to surmount the German defences lining the Loire. Spring tides would make the waters of the estuary sufficiently deep, to allow a shallow-draft ship to move into the dock, clear of the heavily defended channel.
Gubbins took the bare bones of the plan to Lord Mountbatten, Head of Combined Operations. Mountbatten realised this was an opportunity to be seized and authorised the plan to go ahead. The commandos of the attacking force would be drawn from Mountbatten’s assets, while the explosive and specialist training would be conducted by Gubbins. The plan evolved into having an old ship full of explosives, ramming the dock gates. It would be the dirtiest bomb ever made and the walls of the dock would contain and amplify the destructive force. Now all that was needed was an old ship.
HMS Campbeltown
USS Buchanan was a Wickes-class destroyer, ordered from the Bath Iron Works, Bath, Maine, and laid down on 29 June 1918. She was launched on 2 January 1919 and commissioned into the Navy on 20 January. She had a typical inter-war career, and was placed into the reserve in 1939. She then became one of 50 destroyers transferred to the Royal Navy in 1940 after the finalisation of the Destroyers for Bases Agreement. She was transferred on 3 September 1940 and commissioned on 9 September at Halifax, Canada.
Operation Chariot was a plan to ram an explosive-laden warship into the dock gates. Accompanying her would be a number of small boats carrying British Commandos, who would destroy the dock’s pumping and winding machinery and other infrastructure. The troops would then be evacuated by the small boats before the explosives in the ship detonated. A particular difficulty was that the dock was located several miles up the estuary of the Loire River. As an obsolescent destroyer, Campbeltown was considered to be expendable and was selected to be the ram-ship. She spent February undergoing modifications. These included removing her third and fourth funnels and having the remaining two funnels raked to simulate the structure and appearance of a German Raubvogel-class torpedo boat. A 12-pounder gun was installed forward and eight 20 mm (0.79 in) Oerlikon anti-aircraft cannon were mounted on the upper deck. Some extra armour was provided to protect the bridge structure, and unnecessary stores and equipment were removed to lighten the destroyer.
Converting Campbeltown for the raid took ten days. She had to be lightened to raise her draught to get over the sand banks in the estuary. This was achieved by completely stripping all her internal compartments. The dockyard removed her three 4-inch guns, torpedoes and depth charges from the deck and replaced the forward gun with a light quick-firing 12-pounder 3-inch gun. Eight 20 mm Oerlikons were installed on mountings raised above deck level. The bridge and wheelhouse were given extra armour-plate protection, and two rows of armour were fixed along the sides of the ship to protect the commandos on the open deck.

Royal Navy official photographer, Public domain, via Wikimedia Commons
An explosive charge consisting of 24 Mark VII depth charges—containing a total of 4.5 short tons of amatol high explosive—was fitted into steel tanks installed just behind the steel pillar that supported her most forward gun mount. The charges were to be detonated by multiple eight-hour time pencils connected together by cordtex, set before steaming out and cemented in to prevent any interference with the detonation. Campbeltown steamed from Devonport to Falmouth, Cornwall on 25 March to join the other ships that would take part in the operation. The crew—which would be evacuated with the commandos—was reduced to 75 men, under the command of Lieutenant-Commander Stephen “Sam” Beattie.
The Men
To assist in transporting the commandos, 12 Fairmile B Motor Launches (ML) were assigned from the 20th and 28th Motor Launch flotillas. These boats were re-armed with two Oerlikon 20 mm guns mounted forward and aft to complement their twin 0.303-in Lewis guns. At the last minute another four MLs were assigned from the 7th Motor Launch flotilla. These four boats were also armed with two torpedoes each. Instead of transporting the commandos, these boats were to engage any German shipping found in the estuary. All the MLs had a 500 imperial gallons (2,300 litres) auxiliary fuel tank fixed to the upper deck to increase their range. The S-class submarine HMS Sturgeon would leave before the rest of the convoy and be in position to act as a navigational beacon to guide the convoy into the Loire estuary.
The man selected to lead the Commando force was Lieutenant Colonel Charles Newman; his No. 2 Commando would provide the largest commandos contingent, 173 men, for the raid. The Special Service Brigade headquarters used the raid to provide experience for their other units and 92 men were drawn from Nos 1, 3, 4, 5, 9, and 12 Commandos.
The commandos were divided into three groups: One and Two would travel in the 12 MLs, while Three would be in Campbeltown. Half the commandos would be in the motor launches, alongside the explosive destroyer. Under the command of Captain Hodgeson, Group One traveling in ML 447, 457, 307, 443, 306 and 446 had the objectives of securing the Old Mole and eliminating the anti-aircraft gun positions around the southern quays. They were then to move into the old town and blow up the power station, bridges and locks for the new entrance into the basin from the Avant port. The capture of the mole was a major objective, as it was to be the embarkation point for the evacuation after the mission.
Group Two, under the command of Captain Burn, in ML 192, 262, 267, 268, 156 and 177 would land at the old entrance to the St Nazaire basin. Its objectives were to destroy the anti-aircraft positions in the area and the German headquarters, to blow up the locks and bridges at the old entrance into the basin and then to guard against a counterattack from the submarine base.
Group Three was under the command of Major William ‘Bill’ Copland, who was also the commandos’ second in command. It was to secure the immediate area around Campbeltown, destroy the dock’s water-pumping and gate-opening machinery and the nearby underground fuel tanks. All three groups were subdivided into assault, demolition, and protection teams. The assault teams would clear the way for the other two. The demolition teams carrying the explosive charges only had sidearms for self-defence; the protection teams, armed with Thompson submachine guns, were to defend them while they completed their tasks.
The commandos were aided in their planning for the operation by Captain Bill Pritchard of the Royal Engineers, who had pre-war experience as an apprentice in the Great Western Railway dockyards and whose father was the dock master of Cardiff Docks. In 1940 while part of the British Expeditionary Force in France, his duties had included determining how to disable the French dockyards if they were captured. One of the dockyards he had studied was St Nazaire, and he had submitted a report detailing how to put the dock out of action.

From Wikimedia Commons
The Raid
Escorted by two Hunt Class destroyers, the flotilla left Falmouth and out into the Atlantic in three columns. A German submarine was spotted and engaged by the destroyers. At 22:00 on Friday 27th March, the flotilla spotted the signal light of the submarine HMS Sturgeon, marking the entrance to the Loire River. At 00:30 hours on 28 March the convoy crossed over the shoals at the mouth of the Loire estuary, with Campbeltown scraping the bottom twice. Each time she pulled free, and the group proceeded toward the harbour in darkness.
At 22:30 the RAF Bombing raid commenced. The Germans were suspicious as there was no rain of bombs and incendiaries dropped on the docks, the aircraft just cruising over the estuary drooping one bomb at a time. Far from keeping the defenders looking to the skies, it alerted the Germans that something was going on. The commander of the flak defences around St Nazaire, Captain Mecke sent a signal to all units: Conduct of enemy aircraft inexplicable… suspicion of parachute landings. One of the flak battery commanders saw in the darkness, a force of small ships heading up the river. This was relayed to the harbour commander who confirmed that no ships were due in to the docks.
At 01:20 on 28th March, Captain Mecke sent another signal: Beware landing. By then Campbeltown was two miles from the lock gates and working up to full speed. A large searchlight snapped on and two German signal stations sent warnings followed by warning shots. Campbeltown signalled back, using codes captured during the Vaagso Raid: Proceeding to harbour in accordance with orders. The German guns ceased fire and the searchlight went out, buying the assault force more precious time.
There was a further exchange of signals and Campbeltown fired a red colours of the day flare. Unfortunately, it was the wrong shade of red. At 01:27 with the dock gates in plain sight, HMS Campbeltown hauled down the German colours and ran up the white ensign. Every gun in the harbour on the estuary and from the ships seemed to open fire and the sky was criss-crossed with tracer firing horizontally and at close range. The commandos could only remain in shelter behind the armoured screens of the destroyer’s gunwales, as they felt they were in the middle of a maelstrom of high explosives. The firing caused havoc among the MLs, lacking armoured plate.
Campbeltown rammed the dock gates at 01:34, its bow lodged deep withing the caisson gates. The troops swarmed ashore, joining the other five assault and demolition parties already ashore. As they cleared the docks, the fighting was largely at very close range A group of commandos made a stand from behind the armour plates, firing three Bren Guns at the counter-attacking Germans. They remembered the six tons of Amatol smouldering under their feet and left the ship, fighting their way into the town.
The other two commando groups were not as successful. The MLs transporting Groups One and Two had almost all been destroyed on their approach. ML 457 was the only boat to land its commandos on the Old Mole and only ML 177 had managed to reach the gates at the old entrance to the basin. That team succeeded in planting charges on two tugboats moored in the basin.
There were only two other MLs in the vicinity: ML 160 had continued past the dock and was engaging targets upriver, ML 269 appeared to be out of control and was running in circles.
Lt Col Newman aboard the MGB need not have landed, but he was one of the first ashore. One of his first actions was to direct mortar fire onto a gun position on top of the submarine pens that was causing heavy casualties among the commandos. He next directed machine-gun fire onto an armed trawler, which was forced to withdraw upriver. Newman organised a defence that succeeded in keeping the increasing numbers of German reinforcements at bay until the demolition parties had completed their tasks.
Some 100 commandos were still ashore when Newman realised that evacuation by sea was no longer possible. He gathered the survivors and issued three orders:
To do our best to get back to England;
Not to surrender until all our ammunition is exhausted;
Not to surrender at all if we can help it.
Most of the MLs had been destroyed on the run in and were burning. The first ML in the starboard column was the first boat to catch fire. Her captain managed to beach her at the end of the Old Mole. Some starboard boats managed to reach their objective and disembark their commandos. ML 443, the leading boat in the port column, got to within 10 feet of the mole in the face of heavy direct fire and hand grenades before being set on fire.Newman and Copland led the charge from the old town across a bridge raked by machine gun fire and advanced into the new town. The commandos attempted to get through the narrow streets of the town and into the surrounding countryside, but were eventually surrounded. When their ammunition was expended, they surrendered.

Bundesarchiv, Bild 101II-MW-3717-12A / Kramer / CC-BY-SA 3.0, CC BY-SA 3.0 DE, via Wikimedia Commons
There was nothing more the small boats not sunk or burning could do for the commandos, so they headed out to sea. On their way they were continuously illuminated by German searchlights and were hit at least six times by the German guns. Passing ML 270, they ordered her to follow and made smoke to hide both boats.
When they reached the open sea the smaller calibre guns were out of range and stopped firing but the heavier artillery continued to engage them. The boats were about 4 miles off-shore when the last German salvo straddled them and killed Savage, who was still at his gun. He was awarded a posthumous Victoria Cross for his exploits. His citation recognised both Savage and the bravery of “many others, unnamed, in Motor Launches, Motor Gun Boats and Motor Torpedo Boats who gallantly carried out their duties in entirely exposed positions against Enemy fire at very close range.”
ML 306 withdrew from St Nazaire with twenty-eight men aboard including fourteen commandos. They were looking forward to returning to England, when they ran into German ships of the 5th Flotilla. ML 306 was able to slip past two, but the third the Jaguar detected the launch and opened fire. The crew replied with Tommy Guns and a twin Lewis gun. The two vessels continued to engage each other at close range, circling like angry lions, killing and wounding twenty of ML 306’s crew.
The Jaguar stood off and asked the launch to surrender and Sergeant Durrant manning the twin Lewis Guns opened fire again. He had already been wounded three times. The Jaguar opened fire, killing Durrant and most of the remaining crew. The last man standing Lieutenant Swain stood among the dead and wounded and told them: “I’m afraid we can’t go on.” The wounded and battered survivors were taken on board the Jaguar, where they were treated well. The Jaguar’s captain complemented Swain of a gallant fight and asked the name of the Lewis gunner. Later an officer from the Jaguar visited Colonel Newman in the POW camp at Rennes and described the battle with ML306. He suggested that Durrant should be awarded the highest gallantry award and he duly received the Victoria Cross after the war.

Bundesarchiv, Bild 101II-MW-3722-03 / Kramer / CC-BY-SA 3.0, CC BY-SA 3.0 DE, via Wikimedia Commons
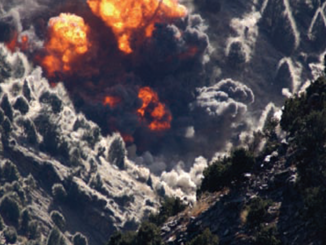
The explosive charges in HMS Campbeltown detonated at noon on 28 March 1942, and the dry dock was destroyed. Reports vary on the fate of the two tankers that were in the dock; they were either swept away by the wall of water and sunk, or swept to the far end of the dock, but not sunk. A party of 40 senior German officers and civilians who were on a tour of Campbeltown were killed. In total, the explosion killed about 360 men. The wreck of Campbeltown could still be seen inside the dry dock months later when RAF photo reconnaissance planes were sent to photograph the port.
According to Captain Robert Montgomery (Royal Engineers, attached to No. 2 Commando), Campbeltown was meant to have detonated at 04:30, the delay caused, he believes, by some of the acid in the pencil detonators being distilled away. As the morning progressed, more and more captured comrades joined him in the German HQ.
Just before the Campbeltown exploded, Sam Beattie was being interrogated by a German naval officer who was saying that it wouldn’t take very long to repair the damage the Campbeltown has caused. Just at that moment, she went up. Beattie smiled at the officer and said, ‘We’re not quite as foolish as you think!’
At 06:30 the five German torpedo boats that the convoy had evaded the previous day were sighted by HMS Atherstone and Tynedale. The destroyers turned toward them and opened fire at a range of 7nm. After ten minutes the German boats turned away, making smoke. The destroyers sighted the MGB and two accompanying MLs soon after and transferred their casualties to Atherstone. Not expecting any more boats to arrive, they headed for home.
Just after 09:00 the Hunt-class escort destroyers Brocklesby and Cleveland arrived, sent by Commander-in-Chief Plymouth. Shortly after this the ships were spotted by a Heinkel 115 floatplane of the Luftwaffe. The next German aircraft on the scene, a Junkers 88, was engaged by a RAF Bristol Beaufighter which had appeared in the area earlier. Both machines crashed into the sea. Other German planes arrived but were driven off by Beaufighters and Hudsons from Coastal Command. The Atlantic weather conditions deteriorated. Amid concerns about the growing German threat and the realisation that the damaged small ships would not be able to keep up, Commander Sayer ordered the crews off the smaller boats and had them sunk.
The explosion put the dry dock out of commission for the remainder of the war. The St Nazaire raid had been a success, but at a cost – of the 612 men of the Royal Navy and commandos who took part in the raid, only 228 men returned to England. Five commandos escaped via neutral Spain and Gibraltar with the help of French citizens and took a ship to England; 169 men were killed (105 RN and 64 commandos) and another 215 became prisoners of war (106 RN and 109 commandos). They were first taken to La Baule and then sent to Stalag 133 at Rennes. The fallen British raiders were buried at the La Baule-Escoublac cemetery, 8.1 mi west of St Nazaire, with military honours.
To recognise their achievement, 89 decorations were awarded for the raid, including Victoria Crosses awarded to Lieutenant Commander Beattie, Lieutenant Colonel Newman and Commander Ryder and posthumously to Sergeant Durrant and Able Seaman Savage.
The battleship Tirpitz never entered the Atlantic. She remained in Norwegian fjords to threaten Allied shipping until she was destroyed by the RAF in Operation Catechism on 12 November 1944.
A memorial to the raid erected in Falmouth bears the following inscription:
OPERATION CHARIOT
FROM THIS HARBOUR 622 SAILORS
AND COMMANDOS SET SAIL FOR
THE SUCCESSFUL RAID ON ST. NAZAIRE
28th MARCH 1942. 168 WERE KILLED
5 VICTORIA CROSSES WERE AWARDED
———— · ————
DEDICATED TO THE MEMORY OF
THEIR COMRADES BY
THE ST. NAZAIRE SOCIETY
References:
Churchill’s Ministry of Ungentlemanly Warfare Giles Milton
The Raiders – Army Commandos 1940-46 Robin Neillands
Wikipedia
© Blown Periphery 2022

